Mastodon

We're looking for the trash fence...

Watermaker Decision–Spectra Cape Horn Extreme

Posted on Sun 23 January 2011 in Boat Shows

I woke up this morning feeling pretty good that with the options I had narrowed myself down to that ultimately none of them would be “the wrong decision”. By that I mean, I felt pretty confident they’d all work reliably and I really what I needed to focus on was how I wanted to run the boat and her systems. I decided I want to run on DC augmented when needed by the generator, not rely exclusively on the generator. I’m sure others would be fine relying on the generator though. My main concern was figuring out a way to mount and run the Honda EU2000 while on an ocean passage. I’m sure it could be done, but I just decided I didn’t want to be doing that and that eliminated the AC option for me.

Once I had narrowed my choices down to the DC options, I decided to go with Spectra based on their wide spread usage and claims of great support when issues arise. It also helps that Jack on s/v Whoosh (another P424) did some excellent research on this topic. In order to enhance the high-end output which we could utilize when we are running the generator we decided to go with the Spectra Cape Horn Extreme (CHE).

The Spectra CHE (or Ché as I think we’ll call it) is similar to the Ventura 150 200T series. but it has a larger \~40” membrane and two feed pumps which can be run individually or together. Individually they can operate as a lower-amp solution and redundant backups if one is having a problem. Together they can be run to double the fresh water production but at the cost of more power. This high power option will be perfect for when we are running the generator, whereas the single pump will be ideal for passages and when we want to rely only on solar, wind, etc. Ché is designed for the racing circuit and it’s pumps are a tad more resilient and can deal with running dry. On a race boat this might happen when the boat heels over and lifts the thru hull from the water for instance. On a cruising boat its more likely to happen if you suck something up into the strainer or you do something stupid like forget to open a seacock or something.

I’m very happy with our decision, the guys from Emerald Harbor Marine at the Seattle Boat Show were very helpful, I believe we got a fair price and I look forward to working with them further as we do the install.

One less decision to make, whew…


Watermakers–Ya gotta have Faith…

Posted on Sun 23 January 2011 in Boat Shows

I’m deep into my research about water makers, having met with Spectra, Hydrovane, and Village Marine yesterday at the Seattle Boat Show. I’ve also had extensive conversations with CruiseRO. You can see all the makesmodels and specifications of the units I’ve been looking at in my Watermaker Comparison spreadsheet.

The main debate I’m having with myself is DC or AC based systems. A DC based system has to run much longer to make an equivalent amount of water to an AC based system, but you can run it any time without starting a genset. An AC based system would mean running the Honda EU2000 generator anytime we want to make water including on longer passages.

This is feeling more and more like one of those faith or belief based decisions, as opposed to one that’s entirely gallonamp-hour based. One the one hand with a DC based system we have the opportunity to leverage alternative fuels (sun, wind, etc). With the Generator we’re always committed to burning gas, LPG or Natural gas. We also would be committed to managing the generator and running it on long passages (> 1week).

I’m really torn on this one… I’m hoping there’s something I’m not seeing and that you all might have some additional insight to help me make my decision.


The Seattle Boat Show 2011

Posted on Thu 20 January 2011 in Boat Shows

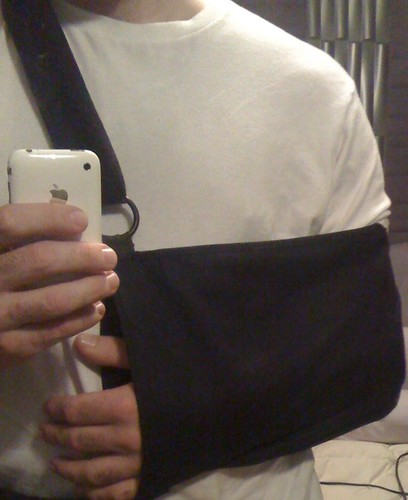
The Seattle Boat Show starts tomorrow and due to my one-armed-ness, I’m not going to be able to put together my spreadsheet of the seminars. We will probably spend little time in those sessions this year, I haven’t even looked at it.

We are trying to personally fire up the economy and have the following items on our list:

  • Watermaker
  • Wind Vane
  • Class B AIS Transponder
  • Mattress for the V-Berth
  • Koden RADARpc MDS-51R

If you are going to the show look for the bald guy in the arm sling and say Hi!

I’ll be tweeting with the #SeaBtshw tag from @DeepPlaya.

If you’ve got a booth at the show, give me sweet deal!!  :-)


New ways of getting things done

Posted on Sun 09 January 2011 in Geek

Since I've been laid up in bed, I've been trying to figure out how I'm going to be able to do things at work, let alone the boat with only one hand.  Microsoft Windows seven has built in speech recognition software which I'm using to write this blog post.  It works a lot better than typing with my left hand and where it lacks and speed it makes up for it but properly capitalizing all the sentences and words which is really hard to do typing with one hand.  Microsoft's products, like Internet explorer, windows live writer, etc..  Work really well because they have all of the accessibility hooks built in.  Applications like Google chrome and tweetdeck don't seem to have all of these hooks and you still need to use your mouse to click around which is OK for me since I have my left hand to use as my mouse hand but if you really needed to use voice recognition as your main way of using all functions on the computer you really only could use Microsoft applications.

Any way this was just a test for me to type in a long paragraph, or I guess dictate is the right word.  It works really well and I think over the next two weeks it will be how I type a lot of work.


Going to be some delays..

Posted on Fri 07 January 2011 in Health and Wellness

This was not a boating related injury, but Wednesday I broke clavicle in an accident on my scooter. I’m fine other than the collarbone and the completely drugged out non-functional state I’m in. The break is not that severe as these things go, but when the meds wear off it hurts like hell! So for the next two months or so Dawn will be taking the lead on boat projects when she’s not taking care of me; which I lover her for. More to come on all this, I can only type with one hand…

Setback


We did a lot this holiday season

Posted on Mon 03 January 2011 in Projects

We make lists and we check them thrice and then we check them thrice more and then we check ‘em off and drink! You can expect more to come on most of these, I just wanted to make a big list and check it thrice! ;-)

  • Finished lining the foot locker in the v-berth with cedar, put hinges and a latch on hatch.
  • Painted the tabbing connecting the shelves in the v-berth to the hull. Dawn is getting ready to convert this into area into cabinets as well.
  • Dissembled the pedestal canvas cover, bought new canvas and made the initial template which is step one in our first canvas project with the Sailrite LSZ-1 we bought.
  • Fixed a leak on the toe rail into the locker in the head
  • Fixed a spot on the toe rail t-track where the cars would not slide though one section of the t-track by removing some of the teak on the rail with chisel and sanding it down. This was probably due to some toe rail rot or something like that, the track is actually recessed into the toe rail a bit in this section. Not sure… we’ll probably need to replace this section of toe rail in the next 5 years.
  • Finished all the final mockup and dry fit for the Maretron DSM250 to be mounted in the cockpit under the dodger (more on that to come). Almost completed this project, no really almost..
  • Re-bedded all the hinges in the lazarette with new bolts and Sikaflex 295 with the goal of eliminating leaks from the bolts
  • Chain Locker and Windlass complete
  • Installed the last two Lewmar D2 rope clutches on the mainmast
  • Installed the bottom half of the hardware for the mast end spinnaker pole (pad eye and cheek block)controls (the line is still being shipped)
  • Replaced the vent hoses on the water tanks adding proper vented loops and having them drain to the sewer instead of inside forward lockers (really, in the lockers)
  • Pulled the dinghy from the water, cleaned it and took the Yamaha F8 to Jacobsen Marine. It wasn’t running smoothly and I don’t have the time to deal with it right now so we took it to “the man”. Probably just needs the carbs cleaned. I also learned that the right side to set the the outboard on is the other side from the one I had set it on, so we had a bit of an oil leak. If you have a Subaru Forester the cargo liner for the back is a very very nice to thing to have!

Now it’s time for a glass of Balvenie Portwood !


Seminar in January from Cruising Consultants

Posted on Fri 31 December 2010 in Classes and Workshops

There is a seminar coming up in January 2010 that those of you who plan to head north might want to check out.

Cruising the Inside Passage on the boat you have now

Greg Filipek, owner of the marine outfitting business Cruising Consultants, will discuss different\ outfitting strategies for boating in the Pacific Northwest. Preparing for a cruise to Desolation\ Sound, The Broughtons, or up the Inside Passage to Alaska and Glacier Bay doesn't have to\ include a 50 foot boat or ten thousand dollars worth of the latest electronics. This seminar\ will give you an in-depth look at the different equipment options for a happy and safe journey,\ regardless of budget or boat size. Topics include pre-trip preparation, equipment options for\ various boats and budgets, and cruising realities for the area. The information you take away\ from this talk will help focus your boat show equipment shopping, answer questions you have\ about an upcoming cruise, and reassure you that this once -in-a-lifetime trip can be a reality for\ you.

Friday January 14\ 6-9 pm West Marine Everett\ Saturday January 15 6-9 pm West Marine Bellevue\ Sunday January 16\ 5-8 pm West Marine Shilshole

\$35 per person/\$50 per couple

For more information and to sign up: http://cruisingconsultants.net/seminars or 425-750-6956


New Chain Locker and Windlass Relocation Complete

Posted on Thu 30 December 2010 in Projects

Before Foredeck Before

Main Berth Before

After After

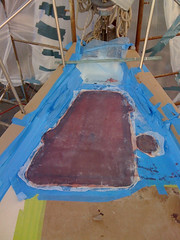
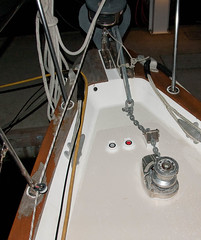
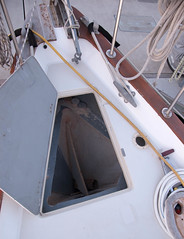
Tonight we marked the chain and loaded it into our new chain locker with the windlass. This project has been over a year in the making since it was November 2009 when we removed the windlass from it’s original location and closed up the holes in the deck.

The reasons for moving the windlass were many, but the main ones were to remove the rubber hose hawse pipe from the middle of the mattress in the v-berth (which prevented any cuddling) and to create a proper chain locker in the bow below the original (and useless) foredeck anchor locker.

I did most of the demolition and prep work and <<The Yard>> did all the structural and finish work. Here are some shots of the fiberglass work in progress there are more pics on flickr.

DSC_8889

image


DSC_8942

We also installed a bow padeye for attaching an anchor snubber closer to the level of the waterline which is a better angle for the boat to pull on the ground tackle to keep the anchor digging in. It also removes some the up and down motion on the ground tackle as well which should also make the boat rider more comfortable at anchor as well. We used the 1/2” bolts coming into the chain locker to attach an eye nut which I used to attach the bitter end of the chain.

The inside of the locker was prepped, primed and painted by Dawn with Interlux Bilgekote. She used gray primer and white paint to help here see how things were covering. She applied two coats of primer and three coats of paint over the Christmas holiday weekend. She was wearing a full set of coveralls a painters hood and a respirator. I’ve done that when grinding fiberglass and I can tell you it sucks! We originally thought we’d go slap on some paint and go sailing, but it takes 24 hours between coats then you have to sand, clean and put on the next layer. It was not how we planned to spend Christmas, but it looks awesome and I’m confident the fiberglass is well protected!

DSC_8933

Once the paint was dry Dawn literally went inside the chain locker and we shut her into it so she could place two starboard guides on the inside of the bulkhead so our 1/2” inner panel would have a place to rest and line up properly. It basically fits in place like one giant hatch board. This bears all the weight of the chain. I was originally planning this elaborate and over engineered inner hatch that would also be water tight. Instead we put the original cover board back in place with a single screw on the top. We’re going to see how that goes if our toes get wet then I’ll resort to something more complicated. This is inline with the advice from fellow sailors and comparisons to other boats.

In addition to all of that we added proper up and down windlass foot controls (and control box) on the foredeck, port and starboard chain locker drains and just because we were in there doing stuff I replaced the very corroded port and starboard running lights with shiny new ones. We also re-marked our rode, but I’ll save that for another post. There are more posts in the Systems - Ground Tackle category if you want to see more details.

This means we can go sailing and anchor at fun places!! Woo Hoo !!


Seattle Fabrics – WOW !

Posted on Thu 30 December 2010 in Destinations - Puget Sound

image

Now that we have a Sailrite, Dawn and I finally paid a visit to Seattle Fabrics to check out the place. Wow, they have everything! Not only do they have a ton of Sunbrella and other outdoor fabrics, but they also have a ton of snaps, buckles, and other accessories you might need in a project. Their prices on Sunbrella are higher than Sailrite, but sometimes you can’t beat stopping in the actual store to pick stuff up. This may shortly become the next place we spend all our money.  ;-)


Installing Ash Battens

Posted on Wed 29 December 2010 in Interior

After purchasing Deep Playa, the first project Patrick and I completed was to tear out all the old vinyl foam that lined the entire hull of the boat. After this was complete we prepped the hull and, in some areas, we painted and installed insulation to cover interior spaces and inside cabinetry.  This makes a really big difference in the comfort level on the boat especially when sleeping near the hull!

Scraping Hull

We decided to beautify the interior by adding wood Ash battens in the v-berth, aft berth and the salon cubby holes. I followed Jerry’s recommendations for preparation and installation of the battens with a few modifications. http://www.pearson424.org/interior/Q424walls.html

Materials

  • 55 - 2” x 3/8” ash battens cut to 82” long
  • Around 10 pieces Fir firring strips 1” x 1”
  • West System Epoxy
  • Reflectix Insulation
  • Varnish

Preparation

I was able to find a local hardwood specialty shop that was able to cut the ash according to my specifications. After receiving the battens I had our buddy, Jim Harris of Classic Wooden Boats, put a ¼ round edge on the battens and had him sand them down. Jim has all the high-end tools and know-how to finish them off beautifully. If you would like to complete the project without outside help, then please feel free to read through Jerry’s detailed instructions for recommended procedures.

I then laid out 20-30 battens at a time to sand and varnish the battens in our workshop. I first sanded them all down using 100 grit sandpaper, both sides and worked my way up to 120, 150 and finished them off with 220 grit. I then vacuumed and wiped them down with a tacky cloth and mineral spirits to remove any debris.

I decided to use a polyurethane varnish with a Satin finish which leaves a nice sheen but not a shiny finish. I applied three coats and sanded lightly with 220 grit sandpaper between coats on both sides of the battens.

I prepped the hull buy sanding all of the old sticky glue in the areas where the firring strips would be installed. The firring strips will be epoxied to the hull and will provide the surface to fasten the battens. I ensured that the hull was clean and wiped free of dust and residue. As the final step, I wiped them down using Acetone. I first removed all of the trim from the areas and measured the length of the hull and installed three evenly- spaced vertical firring strips in the aft berth and four, each side, in the v-berth. Since some of the trim was going to cover the messy ends of the battens I made sure to include them in the measurements. You don’t want to install the firring strips and then realize the screw heads will look unevenly spaced after the battens are installed. I first tried to kirf the firring strips but then quickly realized that I did not have the skill level or tools to complete the job to satisfaction. After my kirfing was complete, I did not have enough material left to epoxy to the hull.

image

Again, Jerry was obviously much more skilled then I and completed this step on his own. I decided to cut the firring strips into small pieces so they fit snug to the hull. I then thickened up some epoxy and placed the strips on the hull ensuring that they are perpendicular to the berth. I then held them in place with tons of blue painter’s tape. I ensured the strips were straight so that the screw heads lined up after installing the battens. After the epoxy dried I went back and wet down every inch of them with epoxy to ensure that any moisture accumulation behind the battens would not penetrate the Fir strips. To ensure the screw heads lined up straight I took a carpenters’ square and drew a straight line down the middle of each firring strip. This acted as a guide for placing the screws into the battens.

Installation

I then cut pieces of insulation to fit in between each firring strip. I used the insulation tape that is recommended in combination with the insulation to hold the insulation in place. I recommend using Reflectix insulation because it was really easy to use and install. It is eco-friendly and does not require any special handling or protection to install. Reflectix Inc.

I cut the battens to fit starting at the top of the berth underneath the cabinetry and making our way down. I had a foam brush soaked in some varnish to apply to the unvarnished ends of the newly cut battens. Ash wood tends to blacken with age so I dabbed each end and each screw hole with varnish in hopes of preventing this from occurring. I then predrilled the holes through the battens and countersunk the holes. We chose #4 ¾” stainless steel flat head screws. Patrick and I created an assembly line to make the process faster. We would dry fit the batten against the hull. I would drill the holes ensuring that they lined up with the ones above it, then using another drill with a countersink bit, he would countersink the holes I just completed. After this is complete we held up the batten and screwed it into place.

After we completed the process I had to retrofit the old teak trim pieces we removed. I had refinished the varnish on each piece to make it really shine! It took quite a bit of modification to make the varnish trim that surrounds the scupper hose in the aft berth. Since we were pulling everything apart, we decided remove the old hose and replace it with a new one. The new one was less flexible so it stuck out slightly further then the old one.

I repeated this same process in the cubby holes (what we refer to as the “Library”) in the salon.

Some things of note:

I bought way too much Ash wood for the job. I didn’t take into consideration that Jerry’s original project used 1 ½” battens and I decided to go with 2”. So I recommend doing a final measurement on your own to ensure you don’t purchase too much wood.

So if anyone is interested in trying this on their Pearson, or any other boat, please feel free to reach out me. I have some finished Ash battens that you can purchase from me! :0)