Mastodon

We're looking for the trash fence...

RADAR Options Greatly Simplified

Posted on Wed 29 December 2010 in Gear

I think I should have be reincarnated as a search engine; I love to look things up. And in that vein I’ve ben doing all kinds of research on RADARs and PC Navigation Software packages and as a slight backup plan by looking into Chartplotters. That was a really open ended problem space and a tad frustrating to look at all that data and feature comparisons.

I was able to boil all that down pretty quickly since I’ve decided for sure to go the PC Software route with no chartplotter. Instead of a chartplotter I’ll use a Tablet PC and the Maretron DSM 250 instrument display in the cockpit.

When you look at RADARs they have two ways to connect:1) through a chartplotter and to a network or directly to a PC or 2) through a box that puts the RADAR data onto a network which the PC can plug into. This second mode is what I need, so that narrows it down to Koden’s RADARpc’s MDS-50R 18” radome and MDS-51R 24” radome and the Nobeltec IR2-4D 24” radome (seems their 2kW offering has been discontinued).

With Nobeltec you have the option of using Nobeltec Admiral or VNS navigation programs.

With the Koden RADARpc you have the option of using the following software packages:

Some general thoughts about these:

P-Sea is not a properly built or designed Windows 7 Application. The first thing they tell you to do before installing is to turn off some Windows 7 security features. I’m not willing to do that so I’m not going to be able to evaluate P-Sea.

iExpedition is apparently really cool, but I can’t find a reliable website that is clearly the development company that has contact information, support forums, all the things I’d expect for a quality software package. Maybe it exists and I can’t find it but without that I’m not even going to bother.

Now we’re down to RosePoint and Nobeltec. I have RosePoint and like it pretty well, they’re a local company which is nice. They’re also very responsive on their forums. I was very intrigued by the network and multi-PC capabilities of EuroNa'v’s SeaPro 3000, but it doesn’t support RADARChart overlay and that lead me to ask about Coastal Explorer’s plan for multiple PC scenarios which it turns out are the high priority for this year.

I don’t know much at all about Nobeltec, but I’m going to seek out a demo copy.

At any rate that was a long winded way of saying that I’ve narrowed down my RADAR to the Koden RADARpc MDS-51R, now I just need to look for the best price, possibly with a software package deal.


Thinking about AIS Integration

Posted on Mon 27 December 2010 in Geek

I’m starting to get back into the electronics projects one of which is the AIS solution.

What is AIS you ask?

Non Sailor Elevator Pitch: AIS is a radio based system that large vessels use to transmit information within their local area about who they are, where they are going, how fast and how to contact them. By receiving their signal and displaying it on your charts you can avoid hitting them which is the most important but not the only way in which you can use the information. For more go to Wikipedia’s article on AIS.

As a non-commercial vessel we’re not required to transmit our data so at a bare minimum we will have an AIS Receiver on board. I can’t see why we wouldn’t have a transponder (which can also transmit), but I’m leaving that option out there.

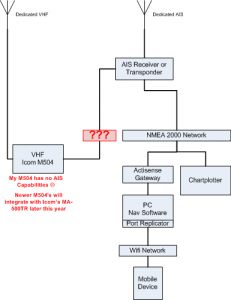
imageFirst thing to think about is how does all this fit together?

This is a logical diagram of the systems involved and how they link up.

The first thing to note is that the antennas are already in place. I have a dedicated Digital Antenna 222-VW VHF Antenna on my main masthead and a dedicated Digital Antenna 236-VW AIS Antenna on my mizzen masthead.

Secondly, I already have the NMEA 2000 network in place with both a NMEA 0183 and NMEA 2000 gateway to connect to the PC.

Integration Items for Discussion:

  • VHF\ The VHF may not happen. My version of the Icom m504 has no AIS capabilities. Icom tech support says there’s no upgrade. I just bought the VHF in April of 2009 so unless someone at Icom can hook me up with a trade-in or an upgrade to my unit I may just skip that part.
  • PC Navigation\ I’ve not picked my RADAR yet so I’ve not picked my Nav Software package, but all of the major vendors call out AIS support as you can see in my PC Navigation Software Comparison spreadsheet on SkyDrive.
  • Chartplotter\ Again, since I’ve not picked out my RADAR I’ve also not decided on my chartplotter. What chartplotter and what connection options they have is part of a new research project and the Marine Chartplotter Feature comparison spreadsheet which I worked on tonight. Seems like all the major players support similar AIS functionality.

Just a few thoughts I guess no real answers, but I hope you find it useful just the same.


Don Casey Sailboat Electronics Simplified

Posted on Tue 14 December 2010 in Buying Guide

I refer to Don Casey’s Sailboat Electronics Simplified, every time I have a pair of wire cutters or crimpers in my hand. It’s an awesome reference guide. I have a copy on the boat, one at home and now you can have one on your Kindle, Phone, or PC! It downloads in about a minute to the iPhone. An absolute must-have in one if not every format.


First Sail in Forever !

Posted on Mon 13 December 2010 in Destinations - Puget Sound

We left <<The Yard>> and went back in the water on Saturday, back to the slip to tank up with water and then headed out with s/v Palarran to Blake Island. On the trip over there was no wind so we motored and despite a minor engine issue on s/v Palarran, who had to bleed their fuel lines in the middle of Puget Sound, we arrived safely without incident at Bake Island. It was pretty rainy and we were there to go to dinner at a party in Tillicum Village so we didn’t’ explore much of the island. We’ve anchored at Blake previously and never have used the Marina. The first come first serve marina is a tight entrance but well protected. The dock fee is \$.50 a foot and for \$6 a night you can also use the shore power. There are nice shore side toilets and showers and large picnic building with large fireplaces. You need to bring your own wood or but it onsite. We will definitely be back to have a big fire soon!

After our dinner party we enjoyed a windy rainy, rainy, rainy night at the dock which allowed us to find every leak on the boat.

The next morning we holed up, made breakfast and waited for the weather to let up . Around 1pm the wind in the marina was calm enough for us to safely depart and the rain had let up completely. We sailed back in 20+ knots of wind with seas and current all aiding our progress to the north. With a 110% jib alone really twisted off we reached close to 7 knots repeatedly and were averaging 6 knots. The seas weren’t always complimentary to our sailing and we bounced around a little bit. Having not sailed in a year we weren’t used to that and were a little uneasy, but we settled into it and worked the waves when we could and the gusts as well and then things settled down and our confidence returned.

All in all it was a great trip for us and hanging out with CB and Tawn is always a good time!


Relocate, Rebuild and Rebed the Mainsheet winch

Posted on Thu 09 December 2010 in Projects

New winch layout

Backing plates

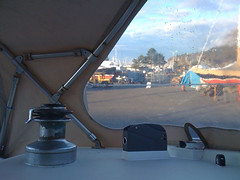
In it’s original, more outboard location, a handle in the mainsheet winch could only be rotated about 1/2 way round because it hit the dodger. to grind in the sheet you had to saw back and forth on the handle. I like to get up on the winch and grind so it needed to move inboard. In order to make that work and have the line run fair (shout out to Brion Toss) I added a cheek block just where the line comes under the dodger to align it to the new winch location (as suggested by Chris Tutmark). This block is mounted to the ridge in the cabin top and through a custom shaped starboard block I made. The rope clutch is also a new addition and replaces the cleat originally used for the mainsheet, it is also mounted on a starboard block I shaped. I added a fairlead for the traveler line so it didn’t rub so hard on the dodger canvas and although it is not in this picture there is a cleat for this line on the deck as well.

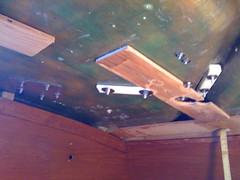
The picture on the right shows the backing plates, washers and fender washers used to back the various pieces of hardware all of which are a major upgrade from the very small washers used prior. All of the holes were drilled larger than needed, epoxied closed to protect the core and re-drilled to the proper size. Everything was bedded using Sika Flex 291.

A new mainsheet was made out of 1/2” Samson Trophy Braid because it’s a bit softer in the hand. This has also been installed. There are now only three original lines on the boat, the furling line and the job sheets and they are on the list.


Chain Locker Bulkhead Design and Material Issues

Posted on Wed 08 December 2010 in Projects

Preparing to make a huge
mess

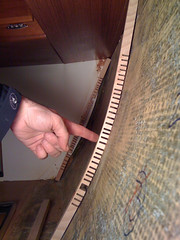
I’m hemming and hawing a bit on the chain locker bulkhead. I need to make a removable panel that keeps the chain and water out of the v-berth. There probably won’t ever be any substantial amount of water in the chain locker, just the normal mess from brining up the chain.

The bulkhead itself is 1/2” thick. The design seems pretty straight forward. I need to make a 1/2” thick piece that fits neatly into the hole and then another 1/2” piece about 1” bigger than the hole. This 2nd piece will be bolted to the bulkhead. Since it needs to be removable and you can’t get to the inside once the panel is in place I’ve decided it will be attached with tee-nuts and machine screws.

I’ve been going back and forth on a couple of things:

Should the panel be bolted on the outside or the inside?\ \ If the panel is on the outside the bolts alone will have to hold the weight of the chain if it rests against the panel. This could be alleviated by putting in a removable set of panel on the inside to bear the weight. A guy at <<The Yard>> mentioned they have done this before and used starboard. Basically it would look like hatch boards.

If the panel is on the inside thee is NO way you’re going to remove the panel without first removing the chain from the locker. This seems like a deal breaker for inside, but I’m already resolved that I will likely add a small water tight deck plate above the panel for quick access to deal with chain castling or other quick inspection needs.

Should the panel be made out of starboard or marine grade plywood coated in epoxy?

Both materials seem fine and I don’t think the plywood would be much cheaper. Joining two 1/2” pieces of starboard seems impossible. I don’t’ think epoxy alone will hold, it would also need to be screwed together. Epoxying two plywood 1/2” thick pieces would be easy and wood is easy to work with. We (pronounced Dawn) also have pretty good epoxy skills. We could put a layer of fiberglass on the inside surface to protect it even more from chain hitting it. We could put a Formica surface on the outside to match the existing bulkhead.

Another option is to use 1” thick material and basically mill the hatch out of the solid material. This would probably be the way to go with starboard.

I’ve looked at G10FRP4 panels and I don’t think they’d be easy to work with especially since I have never seen the stuff in person. I’ve also looked at aluminum and stainless steel sheet metal, but they are way more expensive.

No real conclusions yet, but I need to make my mind up quickly. I’m going to send this to the Pearson 424 list and see what they think if any of you have suggestions please do use the comments.


Wishing for digital updates?

Posted on Mon 06 December 2010 in Gear

Are you wishing for better photos and more amazing updates when we go sailing? Well I added a couple of things to our Amazon Wish List that you might want to check out. I’m not really begging you to buy them for us, more of just a way for me to track toys. But ya know if the spirit moves you…  :-)

The Nikon D700 is their latest prosumer model. The body is more rugged and it’s a big upgrade over my D50 as a still camera and it even shoots HD video. I actually think Dawn is going to end up doing a lot of the photography. She has a really good eye and when we have two cameras then she can start to kick my photographic butt.

The Go Pro Surf Hero is a pretty amazing little video camera used by surfers, snowboarders and all kind of brethren crazy folks. This is what I will use to shoot video and create time lapse movies of our journeys. I’m considering mounting several of them on the boat, one on the bow or mast facing forward and another facing the cockpit. The idea is to have lots of content to create blogs from and to product time-lapse films from captured stills. I really want people to be able to tell what’s it really like “out there”.

We’re going to need lots of file space to store all these images and videos. It’s hard to believe it but for around \$100 you can get a name brand 1TB ruggedized hard drive. The La Cie is used by photographers and adventures galore. I have a couple 500GB ones already (already full). The La Cie 1TB model will hold us over for another year or so until 2TB drive are \$50 or solid state drives drop in price.


Dreaming of far away places getting closer

Posted on Mon 06 December 2010 in Destinations

If you’re dreaming of going to far away places it can be fun to learn about them while you’re still at home.

Radio Australia has an excellent daily show called Pacific Beat which covers the news of the island of the S. Pacific which available online and as a podcast. This is real news (politics, business, etc) like you would expect from NPR not tourism updates on the best beaches or hotels. Good stuff for those who want to understand more about a region than your typical tourist.

Subscribe to podcast Subscribe to podcast

Listen to latest program Listen to latest program

Contact Us Contact Us

Follow us on Twitter

Follow us on Twitter


Awesome retro “sailor” dress

Posted on Mon 29 November 2010 in Geek

This is an awesome dress… I think Dawn needs one.  ;-)

image aisling grace photographed by doralba picerno

More pics and other awesomeness at Limb Clothing


Replacing gate valve with proper seacock

Posted on Mon 22 November 2010 in Projects

Gate valve

On the left is a shot of the original thru-hull for my shower sump. It has a bronze thru hull with a gate (common household hose bib) type valve. It is situated above the waterline unless you’re on a port tack then it’s well underwater. I don’t think it’s not up to code, but it made me squeamish so I am replacing it with a marelon thru hull and ball valve seacock.

There’s a great video on YouTube from Forespar about how to mount Marelon seacocks which I posted previously. I am basically following those exact steps.

I removed the old hose from the barb, the valve from the thru hull and the thru hull from the boat.

I then prepped the inside of the hull by sanding it down to clean fiberglass with a 4” Ryobi angle grinder.

I prepared a 1/2” marine grade plywood backing plate by cutting the wood and coating it with West Systems epoxy. This will be an upgrade over the original installation which has no backing plate.

Next I dry fit everything to make sure it would all fit together and be able to be tightened adequately. – CHECK!

I removed all of the pieces and cleaned the outside and inside of the hull with Bio-Solv (a more friendly   acetone substitute) being sure to get all of the old silicone (yes, silicone) sealant off the hull.

Assembly based on the Forespar video (You will need a helping hand)

  1. Coat the outer part of thru-hull with 5200 (I used fast cure) all the way up to point to where the nut tightens
  2. Coat the back of the backing block with 5200
  3. Insert the outer part of the thru hull into the boat noting the orientation of the internal grooves to prevent it from spinning
  4. Insert the interior backing block over the thru hull
  5. Place the nut on the thru hull and tighten by hand
  6. Clean up any excess 5200 which squeezes out
  7. Use pliers or a board inserted into the thru hull to prevent it from spinning as you tighten the nut with pliers. Don’t over do this, just tighten it enough so the thru hull is tight and doesn’t spin (but don’t try too hard). We’re looking for just tight enough….
  8. Clean up all the excess 5200 from the hull, the backing plate and the threads of the thru hull
  9. Let this setup and cure (24 hours for Fast Cure)
  10. Put plumbers tape on the thru hull threads and attached the seacock tightening by hand.
  11. Have someone keep the thru hull from spinning again and using pliers tighten the seacock so it is aligned properly as in your dry fit, but it may not line up exactly as you did during the dry fit. DON”T OVERTIGHTEN IT. (See Note below)
  12. Put plumbers tape on the hose fitting, thread it into end of the seacock, attach the hose and clamp in place.

Drink Beer !

We’ll be finishing off the interior soon with the DuraFlex paint we’ve been using everywhere, but it will have to warm up a bit for that to be completed.

NOTE: Really what happens is while you’re putting the seacock on the thru hull you’ll snap the damn thing off and have to run half-way across town and buy another thru hull (luckily only \$12). You’ll then redo the thing as outlined above.