Mastodon

We're looking for the trash fence...

Before and After

Posted on Fri 12 September 2008 in Interior

Ok, more of a During and After, but still... its WAY better now.

DSC_0061 DSC_0063

DSC_0075 DSC_0085


Stern Tattoo Complete

Posted on Wed 10 September 2008 in Projects

Deep Playa has her stern tattoo completed.

photo

Nancy the sign painter did an awesome job! She's in the back of 48 North, tell her we sent you.


Replacing the tabbing

Posted on Thu 28 August 2008 in Projects

One of the things we knew we had to do going into this was to repair some of the tabbing holding up the shelves in the v-berth and one of the settees in the salon. I was a little nervous having never done this myself, but the reality is that the process is really simple. The executive summary of this process is as follows:

  1. Put on a respirator.
  2. Grind away the loose fiberglass and remove any paint in the area you need to attach new glass.
  3. Clean the are well and and then wipe it down with acetone.
  4. Mix up your 2-part epoxy. I bought mine at Fiberlay here in Seattle.
  5. Cut and Dry fit (no epoxy) the piece of fiberglass. You are just getting everything ready.
  6. Brush epoxy onto the hull about 1/2 to 1 inch wider than the glass.
  7. Lay the fiberglass down onto your wet area.
  8. Brush more epoxy onto the fiberglass until it is well saturated the kind I used turned translucent when it was well covered.
  9. Use a laminate roller to remove any area bubbles. Brush on more epoxy where you missed spots.
  10. WAIT for it to harden.

When you reach step 10 you'll have left over epoxy. When this leftover amount starts to finalize its reaction its going to put off a LOT of heat. If its in a plastic container it may melt it. I put on my respirator and stirred it until it was hard and stopped gassing (looks like smoke). This seemed to allow it to cool down faster.

You might need to build up layers depending on the work your doing. Read a more detailed book for specifics on all of that, but its really easy and you can totally handle this job! the book I have is Sailboat Hull and Deck Repairimage by Don Casey.


Deep Playa Twitters

Posted on Tue 26 August 2008 in Site Changes

If you'd like to follow along on Twitter, you can check us out here: @DeepPlaya.

Update 2022: We no longer Twitter


Deep Playa Logo

Posted on Tue 29 July 2008 in sv Deep Playa

This the mock-up from the artist (same company who did my PeaBoy work) of the final design Dawn and I chose for Deep Playa. Final rev, web site update, re-naming ceremony, T-shirts, hats, etc. all to come in the near or distant future.

Hetfield'sLOHO01


Head and Holding Bag Removed

Posted on Sun 13 July 2008 in sv Deep Playa

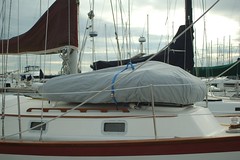
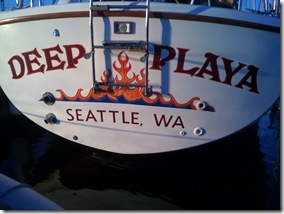
This weekend Dawn and I proved Deep Playa still goes by driving her over to the pump out to empty the holding bag and rinse out the whole toilet system so we could remove it completely as part of installing our Nature's Head composting toilet. Our neighbor Dan was heckling us as we drove out of the causeway since he's never seen us take the boat out. We need to replace the jib halyard before we can really sail her again, but was good to motor her around the marina. We got a little docking practice in as well proving to ourselves that we need a lot more practice. :-

Toilet

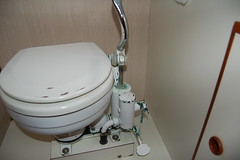
The goal for this weekend was to remove the toilet, the holding bag and as much of the plumbing as we could without covering ourselves and the bilge in poop! As I said we first went over to the pump out and emptied the holding bag. We ran about 20 gallons of fresh water though the system and pumped that out. We also used the bilge pump-out and were able to get the water in the sewer down to less than inch. We'll need to get down there and really clean it good in the next few months.

So after our docking adventures pulled back into our own slip and got to work ripping things apart. My strategy was to pull close to through hulls, pull the toilet and then start removing the bag and hosing in sections. The toilet was head down on a small wood base which was on the larger platform. Disconnecting the toilet from the hoses wasn't too hard but I had to cut the waste pipe with a hack saw. After that the whole thing lifted right out.

Next, I disconnected the hoses to the holding bag. Some of these hoses had plugs handy and some I closed off with plastic bag duct taped in place around the opening. With that done the empty holding bag was removed.

Finally we removed as much of the hoses as we could leaving only those which were directly connected to the through hulls. While the through hulls are closed I'm not sure of the best way to cap the ends. I have a guy coming out to do some fiberglass work and he'll cap those through hulls and remove the remaining hoses.

Toilet Platform Removed

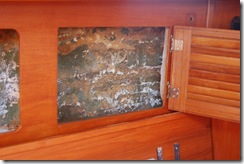
With all the "messy stuff" removed I attacked the 2" high platform the toilet sat on. The wood underneath this was wet and I'm not sure if its rotted. It seems pretty solid but I'm not sure. I left the heated in the head and it dried out a lot in less than hour I hope it will dry out completely over night and the wood will prove to still be solid.

Bilge without Holding Bag

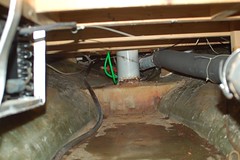
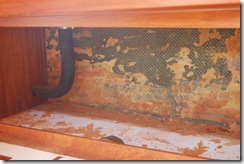
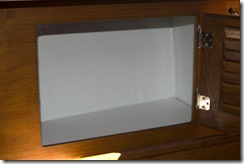
Here's a shot of the bilge area without the holding bag, that is  a LOT of storagesystem area we are regaining.

A great weekend of getting things done! This next week the fiberglass tabbing should be repaired and then we can start putting Deep Playa back together on the inside and start taking her out.


4th of July 2008 Work Party

Posted on Mon 07 July 2008 in Projects

View from aloft

Dawn and I worked on Deep Playa over the long weekend and as part of that I took my first trip up the mast as you can see from the mandatory masthead photo. Here's proof I went all the way up to the tippy top.

Last week a contractor was supposed to come out and do some fiberglass work. They got hung up on another boat and we need to reschedule. To prep for that we took a lot of stuff off the boat and that lead to a lot of running around to get stuff done since some of the things we needed were at home. Another thing which hinders our ability to get things done is the steep learning curve on materials, tools and just having supplies on hand. We really need to stock up on stainless steel screws, bolts, heat-shrink wiring connectors, etc. All kinds of stuff. In the past couple of weeks I have also bought a heat gun and a soldering iron. Both of which I think are going to be worth their weight in gold in the long run!

As part of our on going cleaning efforts we pulled all the cushions off and took them to D.A. Burns to be cleaned. We also started pulling down the last of the hull liner in the aft cabin. After that we'll use the heat gun to pull off all the glue. We tried a little test patch and it worked awesome the glue pulls right off pretty cleanly.

Here's a quick list of what's actually getting done!

  • Put a new bulb in the Stern light. I was looking into upgrading these to LED, but decided we'd keep them for motoring as-is and put a new LED tricoloranchor light combo on the masthead since the existing light isn't working. This will save us from dealing with a new light which won't have the same footprint as the existing lights, plus the bulb lights are fine when the engine is running.
  • The hatch to the propane tanks is now re-attached. The old latch was shot and the hinge screws were pulling out. This is something I'll probably end up doing again with long screwsbolts and washers but for now its working.
  • The old stereo only played Radio or CDs and the FM Antenna wasn't working. I put in a new stereo that includes Sirius Satellite, CD, iPOD Controller and an SD Card slot. Its still not playing the normal Radio or the HD Radio, I need to sort out the antenna issue there still. As part of this I'm doing all the wiring using a bus bar so we can add remove without having to cut into and shortening the wiring every time that happens.
  • Dawn measured the docking lines and looked into new fenders. The old fenders are marring the hull. She also measured the jib sheets and furling lines. As we were going up the mast we learned the wire jib halyard is frayed and needs to be replaced immediately. So I'm researching that as well.
  • Pulled the primary anchor rode to be re-galvanized or replaced. I'm not sure if we can re-galvanize what we have. I'm looking into that.

OK, that's a pretty long blog post so I'll call it good. The summary is projects continue some small one completing and as always more projects revealed. :-)


TT Deep Playa

Posted on Thu 19 June 2008 in Systems - Dinghy

image

We bought a used 2002 Aquapro Sportmaster 860 this week. The baby is almost new condition to my eye. The previous owner is a Boeing Engineer (maybe retired) who only used it one season then stored it in his garage. I know sounds like the classic auto salesman line; a little old lady used it once a week to get groceries but now she can no longer afford the gas.

We paid 1/2 what he paid in 2003 and about 1/3 the price they are going for new! Aquapro isn't my preferred brandmodel for taking to the S. Pacific, but for around Puget Sound this will be a great little dinghy. I bought a cover for it (see photo) and I'm looking for an outboard. If you have any recommendations on a <=8hp short shaft 4stroke outboard drop me a note

I'm going to be getting some Citra-Solve and taking a crack at removing the registration info from the dinghy since a) that registration isn't mine and b) tenders don't need to be registered. I'm still working it out with the state how to handle the registration though. I think I need to pay to have the title transferred and that's it, but we'll see.

The dinghy is more than just a way to get around when you're at anchor its your car when you're cruising, its your work platform when you need to do things on the boat at the water level (like remove the name form the stern) and its your fortress of solitude when you and your partner find the confines of the boat a little cramped. ;-) When we leave to go cruising we'll probably have a kayak and a dinghy or a RIB and a folding inflatable dinghy. We'll have to see how that pans out.


Poop!

Posted on Tue 17 June 2008 in Systems - Composting Toilet

When you're out of the US Coastal waters (as close as BC, Canada) is it legal to pump your marine toilet directly into the sea. There just aren't pumpouts available in every remote cranny of the earth like there are in Puget Sound. This is kind of like you wouldn't poop in your neighbors yard (unless they live in BC), but for extending backpacking trip its considered acceptable to use a cathole.

Our current toilet situation on Deep Playa is that we have a Wilcox Crittenden Imperial toilet and instead of a rigid fiberglass holding tank we have a 20 gallon bladder into which everything is pumped. We're also setup with a macerator (like a garbage disposal) that can be use to grind up everything when you're in an area where pumping directly overboard is acceptable. This also keeps fish from having to swim around with toilet paper stuck to their tail fin. Well, the toilet doesn't pump very well (I bent the handle this weekend), using bladders as holding tanks is kind of a nuisance (you have to lift them while you're pumping) and all of the plumbing needs to be replaces because it smells (this can happen as they age).

Instead of doing all that work we've decided to go with a MUCH simpler solution, the Nature's Head Composting Toilet. The basic system is that urine is captured is in a bottle and your poop is composted along with some peat moss or coconut husks to absorb water. The urine can be disposed of on-shore in the toilet and the compost can be deposited in any flower bed or bagged and placed in the regular trash. Before you get all gross, read this about compost. And then realize that the fact is on a boat (or in an RV, or camping) you become more intimately involved with your bodily functions, and this was the best option for us given our the attractive ness of eliminating 2 through-hulls and to be as good stewards as possible when we're traveling.

I'll have a bunch of photos and more discussion about this as we move forward with the rip and replace. Right now everything has been ordered and is on-hand ready to go, just need to pump out one last time and start removing the old system.


We've lowered the property value on D-Dock

Posted on Tue 17 June 2008 in Destinations - Hudson Point Marina

Destinations - Shilshole Bay Marina, Moorage, sv Deep Playa Slug: weve-lowered-the-property-value-on-d-dock Status: published

View from the cockpit

We made is safe and sound (no pun intended) from Blaine to Ballard this weekend. The first three or four hours of the trip while we crossed the Alden Banks and until the very northern edge of the San Juan Islands we're pretty unpleasant. The seas were very disturbed (i.e., going in all directions) because of the 4 foot swell out of the N and the 1-3 foot wind waves out of the South. It us made us buckle down a bit and get serious about the trip which was good. At that point we were preparing ourselves for a repeat or worse as we crossed the Strait of Juan De Fuca. But as we we enjoyed the peaceful coastal waters of the San Juan Islands and entered the strait, we were pleasantly surprised that the water was calms as could be. You seriously could water skied out there. To top it off the sun was out a bit; it was still a little chilly but nice to see the sun just the same. We spent the night in Hudson Point Marina at Port Townsend and had a nice walk around the town, some wine, some food. Port Townsend is a great little town and one I look forward to visiting again.

Sunday we departed for Shilshole and actually sailed for a few hours, but the winds were light and we were on a schedule so we fired up the iron sail and motored into Shilshole Bay Marina. D-Dock is our new home temporarily while we wait for a permanent slip. We may need to sublet again or move around the sound, but for now until the end of August Deep Playa is a scant 15 minutes away as opposed to 2 hours!

Sunday we stayed a The Dinghy (our condo) but Monday night after work we visited Deep Playa to have dinner and we had our first visitor. Our friend Anna stopped by and shared some wine and food. It was great to see her as she will be soon leaving town for a few weeks. So now we have a guest book photo set on Flickr, hopefully you will stop by and join Anna's photo in the archive.

With the boat closer to home we can focus on the chores to be done, first and foremost ripping out the toilet and holding bag (yes bag) and putting in the composting head, more to come on that for sure!