Mastodon

We're looking for the trash fence...

Making a windlass plan of attack – Step one: Pontificate

Posted on Wed 18 August 2010 in Projects

I have and plan on reusing the Lofrans Progress that came with my boat. The motor is the same large one that comes with the Tigres.

You may remember that my windlass was originally mounted so far aft that the hawse pipe went through the v-berth and into the decommissioned water tank; basically rendering it impossible for use to sleep there comfortably. This winter I removed it had the the deck closed up and am now making my plans to place the windlass further forward on the deck and to run the chain through the shallow anchor locker and into the unused chain locker below.

Seems as though I have one of four choices:

  1. Place the windlass forward of the locker and use a PVC hawse pipe to run the chain aft to achieve adequate fall. Meridian has this kind of setup as does Syringa.
  2. Place the windlass motor and mount just aft of the locker and use a PVC pipe to run the chain foreward and through the locker. Parallax has this setup with a similar if not the same windlass.
  3. Build a stand for the windlass in the anchor locker at the highest point of the chain fall and modify the door to go around the windlass. There are some horizontals which have been done that way.
  4. Install the windlass on the door itself (or a beefed up hatch without hinges) and essentially leave the locker closed except for maintenance purposes. Another derivation of this is to bolt down a more permanent opening, possibly thicker and have it closed with a more bolt down fittings like they use on aircraft.

1 and 2 seem like the least work, but I’m worried about how well the chain will run. I don’t want to be having to deal with kinked up chain in the anchor locker all the time. Also number 1 doesn’t really seem possible on our boat because we don’t have a bow sprit for our anchor and our anchor comes all the way back to the deck. I also plan to put a padeye on the deck just aft of the anchors for the solent stay so again number 1 seems like a no-go. If I can alleviate my concerns about the flow of chain then number 2 is probably the best idea.

number 3 sounds a lot of work and I’m not sure how to make the door water tight once I cut into it. I also am not sure that the drive shaft of the windlass would be long enough to reach through the entire pad.

I think number 4 would be a big upgrade. It would also close off the deck better than the door does today. It would however remove a storage spot from the foredeck, which is handy for wet  things like hoses and our folding anchors.

SO number 2 and number 4 seem like the most viable options at this point with number 2 probably winning out based on the simplicity. If you have any thoughts please do chime in.


Installing Maretron NMEA 2000 connector on bulk Maretron Mid (Blue) Cable

Posted on Tue 10 August 2010 in Geek

Here’s a quick step by step on how to use the Maretron field installable connectors. These are useful when you want to run a wire in a mast or through the deck and you don’t want to use a bulkhead fitting but you’d rather use something like a Blue Sea cable clam. There are NO instructions with these fittings so I hope you find this useful.

Maretron NMEA 2000 connector

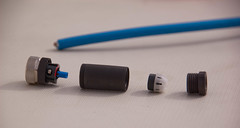
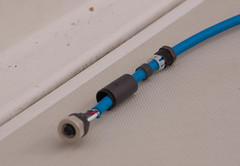
Here’s a shot of the disassembled connector and the raw end of the bulk wire. The white fitting and it’s rubber gasket give this fitting a snug water resistant (proof?) fit.

Maretron NMEA 2000 connector

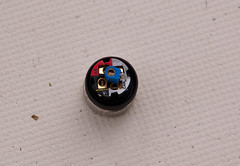
This is a shot of the little tiny holes and screws you’re going to be using to attach the wires to the connector. Everything it very well designed; the color coding makes this a snap. Note that the blue connection is stands approximately 1/4” proud of the other fittings.

Maretron NMEA 2000 connector

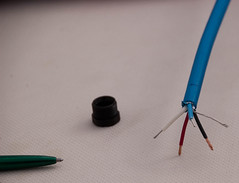
You need to strip back the outer insulation and the foil around the wires. The blue wire should be a bit shorter than the others since it doesn’t have to reach as far as the other wires.

Maretron NMEA 2000 connector

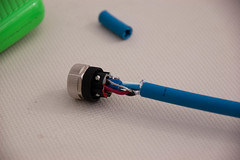
Here’s a shot with all of the wires attached to the connector.

Maretron NMEA 2000 connector

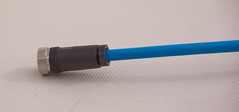
Notice in the that previous picture none of these other pieces are visible. they all need to be placed on the wire BEFORE you spend 10 minutes getting the wires attached and all the screws tightened. If you’re lucky and you don’t have a connector on the other end, you can slide them all the way along the wire like I did. DOH!

Maretron NMEA 2000 connector

I started by tightening the body to the very end of the connector (the left side in this pic). I then worked on the final end fitting where the wire extends out. When you got to tighten everything up it will be a tad difficult to get the end fitting to tighten against the white cone and rubber bushing. I used the small screw driver to work the cone down as far as a I could. be careful, you can break the cone if you push too hard. You will figure it out though. I then used a Knipex Pliers Wrenches (which I LOVE but a crescent wrench would work) to hold the connector body while I bottomed all of the threads.

It’s obviously a lot easier to work with the factory installed connectors but where necessary the field installable connectors are pretty easy to work with and they look solid to me.


RIP: Signet System 4000

Posted on Sat 07 August 2010 in Systems - Electronics

20100806-DSC_8810

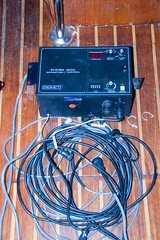
Here’s a shot of the Signet System 4000 instruments package which I finally removed. I can’t find anything out about this on the internet. The big black box was mounted on the electrical panel, the remaining hole is approximately 12”x8”! Did I mention the “display” feature on this 12”x8” are those four red single digit displays (about 1”x2”). At one time there were depth, wind and knot meters. When I purchased the boat only the wind and knot meters were operational. I pulled out all of the wiring and the head unit. I also think at some point there was a pedestal mounted display of some kind because I also pulled a wire labeled display out from under the cockpit that ran up into the pedestal.

I’m going to jury rig the Maretron DSM250 into that huge hole and at some point replace the entire wood panel holding all of the electrical and electronics.


Maretron NMEA 2000 Network and Instruments Installations

Posted on Fri 06 August 2010 in Maretron

20100806-DSC_8802

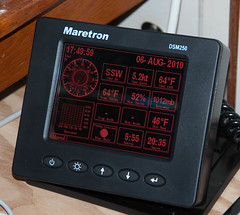
There’s a shot of my Maretron DSM250 (in red on block mode) displaying data from my NMEA 200 network I finished roughing in last night (or I guess this morning) about 0200. I’m calling it a rough-in because I still need to go back and secure all the wiring, mount the display and the GPS, etc. but I was to plug it all together, fire it up and it worked right out of the gate!

20100806-DSC_8803

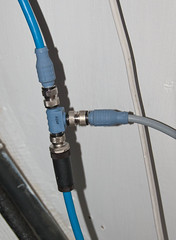
Here’s a shot of the a “T” installed showing the backbone in blue and the drop cable in grey. The black fitting is a field installed fitting whereas the other two are factory pre-installed fittings. The field installable connector has some pretty small screws and was a tad tricky to line everything up, but that is probably due to my large meat hooks. I was able to do it just fine. The waterproof fitting that goes over it all was very tight and I’m sure it has a great seal.

right now I have the following in my system:

I plan to add a depthspeedtemperature gauge to replace my Standard Horizon DS50 depth only unit, but I’m waiting for Airmar’s DST900 to come out (it’s a year late according to rumor) which has the D/S/T and no moving parts! That will be awesome! For now, I’m going to Magruber the DS50 onto the network and maybe if that works fine I’ll just live with that (hurry up Airmar!). We also want to add a rudder angle indicator. I just haven’t gotten to that yet.

Tonight I’ll secure all the wiring and figure out where the GPS will be placed.


Dawn up the mast

Posted on Tue 03 August 2010 in Destinations - Shilshole Bay Marina

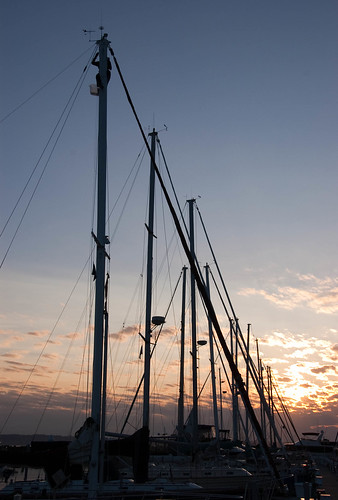
Here’s a shot of Dawn at the masthead installing the stop on the sail track as the sun sets at Shilshole Bay Marina. You can see a close-up here.

20100802-DSC_8796

I would have installed it when the mast was in the yard, but it was missing for awhile. Now it’s installed back where it belongs.


NMEA 2000 wiring planning

Posted on Sat 31 July 2010 in Projects

Maretron Micro Network Diagram I’ve mostly been working on the rigging lately, but tonight I’m thinking about the NEMA 2000 powertap installation. The Maretron powertap looks like a normal NMEA 2000 T but it has MIDMicro cord coming out of T which you wire up to the DC power system in your boat along with a 4amp fuse (See yellow powertap in the picture). Maretron has a good knowledgebase article on how to do the install but in summary you wire a couple of wires to the 4amp fuse and DC +and the rest to DC –.

I have some other DC wiring I need to clean up that is wired directly off the batteries with no fuses and I don’t want to use a bunch of inline fuses, so I’m going to use a Blue Sea Fuse Block to fuse all these individual items, but do so in a way where I have a single spot to do troubleshooting and add-on future circuits.

I’m hoping to pick up the fuse block tomorrow so I can put in the T which is the first step to getting my NMEA2000 instruments online.


MOHAI Minute: Ballard Firehouse

Posted on Mon 12 July 2010 in Destinations - Puget Sound

More local stories about Ballard


Scout Report–> The United States Lighthouse Society

Posted on Fri 09 July 2010 in Lighthouse

This comes via my inbox to you from the Scout Report

American Lighthouse Winner Photo of Coquille River, OR By Eric Anderson The United States Lighthouse Society

http://www.uslhs.org/index.php

Twenty-five years strong, and with an interest in lighthouses throughout the world, the United States Lighthouse Society (USLHS) has a website that informs the public about restoration projects, tours of lighthouses, and the complete subject index to the Society's magazine, the Keeper's Log. The USHLS is a "non-profit historical and educational organization incorporated to educate, inform, and entertain those who are interested in lighthouses, past and present." The "Projects" section of the website is a must-see for visitors, as it contains the history, old and new photos, and restorative needs of each lighthouse, or lightship, as the case may be. The project "LV605" is the restoration effort for one of the few remaining lightships, which were floating lighthouses in waters where a lighthouse was impractical, because of depth, cost, or currents. There are many pictures of these lightships, and a history of these unique vessels is also included. [KMG]

>From The Scout Report, Copyright Internet Scout 1994-2010. http://scout.wisc.edu/


Checking things off the list

Posted on Fri 09 July 2010 in Projects

More checks from the 4thof July 3 day weekend:

  • Dr LED Kevin spreader lights wired and functional. They need to be aimed to point at the proper deck area still.
  • Cleaned up a lot of stuff. There has been a lot of extra tools and supplies on the boat. Some of it is extra gear we will sell at the next Fisheries Swap Meet, the rest of it was recycled, trashed, or now at the workshop. We have some ash lumber for doing battens if you’re interested in that let me know. We also have a not-straight 1-1/2” bronze prop shaft that could milled down into a smaller straight shaft I assume.
  • Took a ride around the marina in the dinghy on oar power. Dawn loves to be rowed around like a princess. Winkingsmile

Checks from this week:

Mainmast wiring completed !!!  Fly me to an aircraft carrier; Mission Accomplished!! This was huge. I can’t tell you how many WEEKS I’ve spent working on the wiring in the mainmast to have everything working feels awesome!!

  • The following are now all functional: Aquasignal Foredeck & mastlight (aka steaming or masthead light, OGM LED TriAnchor (Tricolor, Anchor with photodiode & Strobe)
  • The TriAnchor is absolutely awesomely bright. I walked around the dock and it was absolutely the brightest thing in the marina including all the lights on shore.
  • The DC breaker board is labeled properly. I used white P-Touch labels for this, I eventually (read maybe never) want to pretty that up.
  • Every DC (+) wire in the wiring closet is now properly labeled. I love my P-Touch (we call it a Pea-Touch) Industrial Labeler!!

Chris Tutmark did the initial tune on the rig.

Put the outboard on the dinghy and took the Dinghy Princess for a ride last night. The ob fired up on the second pull after sitting on the stern pulpit all winter with no winterization. Yamaha is the awesome!!

2011 WA Vessel Registration sticker affixed

Dawn painted the interior wood around the portholes in the head & shower and put the trim back up as well. Just need to re-attach the drip rails which she sanded and polyurethaned.

Lots and lots of stuff completed… many many pics to take and then some write-ups on some of the systems, how I installed things etc.


Thinking about data

Posted on Tue 06 July 2010 in Geek

I’ve been thinking about the blog, sailing reports, weather reports and all kinds of information I’d like to collect and share. Principally, I’ve been thinking about the data that will soon be running around my NMEA 2000 network. Some of the data will include course, speed, depth, air temperature, water temperature, humidity, barometer, etc. all of kinds of great info and all of it will have location as well. Has anyone out there taken the full output off their NMEA 2000 network and converted it to timelocation sorted KML entries as Custom Data? If I could get to that then I’d at least able to view the data in Google Maps, or easily convert it to a variety of formats.

I’ll have to ping Kurt at UNH and Nomadness about this.