Mastodon

We're looking for the trash fence...

New Chain Locker and Windlass Relocation Complete

Posted on Thu 30 December 2010 in Projects

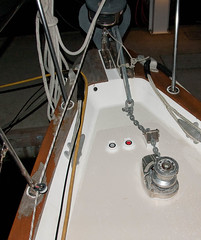
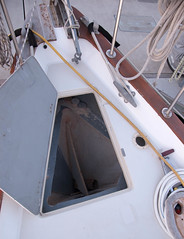
Before Foredeck Before

Main Berth Before

After After

Tonight we marked the chain and loaded it into our new chain locker with the windlass. This project has been over a year in the making since it was November 2009 when we removed the windlass from it’s original location and closed up the holes in the deck.

The reasons for moving the windlass were many, but the main ones were to remove the rubber hose hawse pipe from the middle of the mattress in the v-berth (which prevented any cuddling) and to create a proper chain locker in the bow below the original (and useless) foredeck anchor locker.

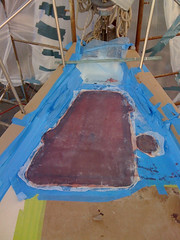
I did most of the demolition and prep work and <<The Yard>> did all the structural and finish work. Here are some shots of the fiberglass work in progress there are more pics on flickr.


DSC_8889

image


DSC_8942

We also installed a bow padeye for attaching an anchor snubber closer to the level of the waterline which is a better angle for the boat to pull on the ground tackle to keep the anchor digging in. It also removes some the up and down motion on the ground tackle as well which should also make the boat rider more comfortable at anchor as well. We used the 1/2” bolts coming into the chain locker to attach an eye nut which I used to attach the bitter end of the chain.

The inside of the locker was prepped, primed and painted by Dawn with Interlux Bilgekote. She used gray primer and white paint to help here see how things were covering. She applied two coats of primer and three coats of paint over the Christmas holiday weekend. She was wearing a full set of coveralls a painters hood and a respirator. I’ve done that when grinding fiberglass and I can tell you it sucks! We originally thought we’d go slap on some paint and go sailing, but it takes 24 hours between coats then you have to sand, clean and put on the next layer. It was not how we planned to spend Christmas, but it looks awesome and I’m confident the fiberglass is well protected!

DSC_8933

Once the paint was dry Dawn literally went inside the chain locker and we shut her into it so she could place two starboard guides on the inside of the bulkhead so our 1/2” inner panel would have a place to rest and line up properly. It basically fits in place like one giant hatch board. This bears all the weight of the chain. I was originally planning this elaborate and over engineered inner hatch that would also be water tight. Instead we put the original cover board back in place with a single screw on the top. We’re going to see how that goes if our toes get wet then I’ll resort to something more complicated. This is inline with the advice from fellow sailors and comparisons to other boats.

In addition to all of that we added proper up and down windlass foot controls (and control box) on the foredeck, port and starboard chain locker drains and just because we were in there doing stuff I replaced the very corroded port and starboard running lights with shiny new ones. We also re-marked our rode, but I’ll save that for another post. There are more posts in the Systems - Ground Tackle category if you want to see more details.

This means we can go sailing and anchor at fun places!! Woo Hoo !!


Installing Ash Battens

Posted on Wed 29 December 2010 in Interior

After purchasing Deep Playa, the first project Patrick and I completed was to tear out all the old vinyl foam that lined the entire hull of the boat. After this was complete we prepped the hull and, in some areas, we painted and installed insulation to cover interior spaces and inside cabinetry.  This makes a really big difference in the comfort level on the boat especially when sleeping near the hull!

Scraping Hull

We decided to beautify the interior by adding wood Ash battens in the v-berth, aft berth and the salon cubby holes. I followed Jerry’s recommendations for preparation and installation of the battens with a few modifications. http://www.pearson424.org/interior/Q424walls.html

Materials

  • 55 - 2” x 3/8” ash battens cut to 82” long
  • Around 10 pieces Fir firring strips 1” x 1”
  • West System Epoxy
  • Reflectix Insulation
  • Varnish

Preparation

I was able to find a local hardwood specialty shop that was able to cut the ash according to my specifications. After receiving the battens I had our buddy, Jim Harris of Classic Wooden Boats, put a ¼ round edge on the battens and had him sand them down. Jim has all the high-end tools and know-how to finish them off beautifully. If you would like to complete the project without outside help, then please feel free to read through Jerry’s detailed instructions for recommended procedures.

I then laid out 20-30 battens at a time to sand and varnish the battens in our workshop. I first sanded them all down using 100 grit sandpaper, both sides and worked my way up to 120, 150 and finished them off with 220 grit. I then vacuumed and wiped them down with a tacky cloth and mineral spirits to remove any debris.

I decided to use a polyurethane varnish with a Satin finish which leaves a nice sheen but not a shiny finish. I applied three coats and sanded lightly with 220 grit sandpaper between coats on both sides of the battens.

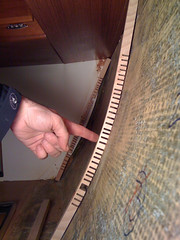
I prepped the hull buy sanding all of the old sticky glue in the areas where the firring strips would be installed. The firring strips will be epoxied to the hull and will provide the surface to fasten the battens. I ensured that the hull was clean and wiped free of dust and residue. As the final step, I wiped them down using Acetone. I first removed all of the trim from the areas and measured the length of the hull and installed three evenly- spaced vertical firring strips in the aft berth and four, each side, in the v-berth. Since some of the trim was going to cover the messy ends of the battens I made sure to include them in the measurements. You don’t want to install the firring strips and then realize the screw heads will look unevenly spaced after the battens are installed. I first tried to kirf the firring strips but then quickly realized that I did not have the skill level or tools to complete the job to satisfaction. After my kirfing was complete, I did not have enough material left to epoxy to the hull.
image

Again, Jerry was obviously much more skilled then I and completed this step on his own. I decided to cut the firring strips into small pieces so they fit snug to the hull. I then thickened up some epoxy and placed the strips on the hull ensuring that they are perpendicular to the berth. I then held them in place with tons of blue painter’s tape. I ensured the strips were straight so that the screw heads lined up after installing the battens. After the epoxy dried I went back and wet down every inch of them with epoxy to ensure that any moisture accumulation behind the battens would not penetrate the Fir strips. To ensure the screw heads lined up straight I took a carpenters’ square and drew a straight line down the middle of each firring strip. This acted as a guide for placing the screws into the battens.

Installation

I then cut pieces of insulation to fit in between each firring strip. I used the insulation tape that is recommended in combination with the insulation to hold the insulation in place. I recommend using Reflectix insulation because it was really easy to use and install. It is eco-friendly and does not require any special handling or protection to install. Reflectix Inc.

I cut the battens to fit starting at the top of the berth underneath the cabinetry and making our way down. I had a foam brush soaked in some varnish to apply to the unvarnished ends of the newly cut battens. Ash wood tends to blacken with age so I dabbed each end and each screw hole with varnish in hopes of preventing this from occurring. I then predrilled the holes through the battens and countersunk the holes. We chose #4 ¾” stainless steel flat head screws. Patrick and I created an assembly line to make the process faster. We would dry fit the batten against the hull. I would drill the holes ensuring that they lined up with the ones above it, then using another drill with a countersink bit, he would countersink the holes I just completed. After this is complete we held up the batten and screwed it into place.

After we completed the process I had to retrofit the old teak trim pieces we removed. I had refinished the varnish on each piece to make it really shine! It took quite a bit of modification to make the varnish trim that surrounds the scupper hose in the aft berth. Since we were pulling everything apart, we decided remove the old hose and replace it with a new one. The new one was less flexible so it stuck out slightly further then the old one.

I repeated this same process in the cubby holes (what we refer to as the “Library”) in the salon.

Some things of note:

I bought way too much Ash wood for the job. I didn’t take into consideration that Jerry’s original project used 1 ½” battens and I decided to go with 2”. So I recommend doing a final measurement on your own to ensure you don’t purchase too much wood.

So if anyone is interested in trying this on their Pearson, or any other boat, please feel free to reach out me. I have some finished Ash battens that you can purchase from me! :0)


DIY Seacock Installation

Posted on Fri 19 November 2010 in Classes and Workshops

I’m in the middle of replacing a gate valve on my boat with a proper seacock and thought I’d share this video from Forespar. It does an excellent job of showing step by step what you need to do.

NOTE: Link lost due to bit rot.


Maretron DSM250 Display Standby Mode Workaround

Posted on Tue 12 October 2010 in Systems - Electronics

After the first night of trying to sleep in the same cabin with the DSM 250 on “low” backlight lead to me turn it off at nights. But this isn’t so good because then the buffer of data is uses to charts graphs is lost.

Turns out you can do this, sort of. The Brightness button (the one that looks like a sun) and the three levels it cycles through are configurable. From any display screen press along:

  1. Enter (to get into the config menus)
  2. Select “Display Settings” and hit Enter.
  3. Select “Backlight” and hit Enter\ At this point you’ll see settings for Low, Medium and High.
  4. Change Low to 0% by selecting that line and hitting Enter.\ Then hit the down arrow till the value is Zero and hit Enter again.
  5. Hit Back until your back at a standard instrument screen.

From here tap the Brightness button.

One of your clicks should turn the screen off completely. It’s probably not off completely in the electrical sense, but it certainly is on low and it’s not emitting light so you can sleep soundly or just have the display be less intrusive.

!!UPDATE!!

I forgot to mention. While the display is dimmed to 0%, the DSM250 is still capturing data which means all the trend charts you want to see (like barometric pressure) will have historical data, instead of being blank like they would be if turned the display completely off.

A great workaround!


Evaluating PC Navigational Software

Posted on Thu 07 October 2010 in Buying Guide

I’m going to start working on a feature comparison of PC based navigation software packages and could use some input from you on what you want to know. Do you have a favorite feature you think should be in all nav programs? Let me know and I’ll try to include it in my research. Here’s what I have so far after just a few minutes:

  • Company
  • Software
  • Website
  • Price
  • MOB
  • RADAR Overlay
  • Tides
  • NMEA 0183
  • NMEA 2000
  • Instruments
  • Custom Depth
  • Ship's Log
  • Maintenance Log
  • Ship Inventory
  • Social Networking
  • Photo Support

The obvious omission is chart format. That list of formats seems really really long, so I’m trying to figure out a way to handle that more efficiently than 30 different checkmarks.


NMEA 2000 & 0183 Interop Testing

Posted on Fri 01 October 2010 in Maretron

The timing of this post is triggered by the fact that all the NMEA big wigs are here in Seattle so I thought I’d take a second and tell you my experience thus far.

Ben over at Panbo has been plugging together a stack of NMEA 2000 gear. I’m playing in more mixed environment. Most of my gear is new Maretron equipment, but I’m also connecting in the following gear that is not NMEA 2000:

  • Standard Horizon DS50 NMEA 0183 Depth Sounder
  • Icom M504 NMEA 0183 Listener only for GPS and Time
  • SCS PTC-IIUSB NMEA 0183 for GPS Data and Weather including navigation data (speed, heading, etc)
  • Various Laptop Software Packages using two different NMEA Gateways
  • Maretron USB100 (0183)
    • NavMonPC (0183)Actisense NGT-1 (2000)
    • Coastal Explorer (2000) (I think)

Here are my experiences thus far:

Depth

I’ve tried connecting the DS50 via a Simrad AT10 (0183 to 2000) gateway and via an Actisense NGW-1. The depth messages are on the network but there is no offset being passed with the data. The Maretron DSM250 will not display the depth and neither will Coastal Explorer. NavMonPC did not either until a new build was released which stills shows depth (DPT) when the offset is missing.

Next Steps

  • I’ve asked Maretron for a similar fix to the DSM250 that I have for NavMonPC.
  • I still need to contact Coastal Explorer.
  • I also plan to hook my DS50 directly to the laptop via serial cable and verify if the DS50 is transmitting the offset and the gateways are stripping it or if it’s not outputting it at all.

Airmail and the SCS PTC-IIUSB

I can see the position data, but no heading, speed or weather information is coming through.

[Next Steps]: Can’t think of any right now, but this isn’t a priority at this time.

ICOM M504

The location is displayed on my M504 display, but the timedate is wrong. Even when I configure the offset for pacific time.

Next Steps

  • Icom Support asked me to turn off RMC messages.
  • I’m working right now (at 00:27!!) with a guy from Actisense on that not sure it’s changing anything or that the config tool is changing what we think it should be.

I have more to say on this, mostly that the SW that is out there is still pretty weak, but I’m tired so I’ll whine about that later. Winking smile


Liferaft Acquired: Revere Offshore Elite

Posted on Fri 01 October 2010 in Systems - Safety

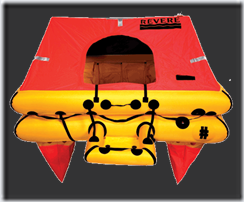
offshore_elite_front_XT

image

You may recall my liferaft feature comparison spreadsheet I posted a few days ago. That little research project helped narrow my focus on a really open ended problem which makes it much more manageable for me to deal with.

After that I setup an EBay search and an RSS subscription on Craigslist for liferafts. It took about 2 days for a 6 person Revere Offshore Elite in a valise to pop-up on my RADAR.

The raft was purchased in February of this year (verified via the SN with Revere directly) and we got a deal I’m very happy with. I was originally only targeting 4 person liferafts because I didn’t think Dawn could lift and deploy a 6 person, however the Revere Offshore Elites weigh less than other rafts at the same capacity rating and that allowed us to take advantage of this deal and get a slightly larger raft in the process.

I’m happy to have another thing checked off the list and hoping to never have to use this.


BoatTech Articles on BoatUS

Posted on Thu 16 September 2010 in Review

Just wanted to take a second and share this link to the BoatTech articles on BoatUS. There are a lot of handy articles on topics like picking docklines, proper bilge pump installation and VHF basics to point out a few. Many but not all of the articles are written by Don Casey.

If you don't have Don's other books (see the Amazon link) you should have them. They are a great series, very straight forward and easy to read.


French Polynesian Cruising Association

Posted on Tue 07 September 2010 in Destinations - French Polynesia

I don’t’ know a ton about this group. I’ve been following their blog which is updated infrequently. But, I wanted to share the link, because for those of you planning to head to French Polynesia, I think it could be a good resource!

Association des Voiliers en Polynésie Association des Voiliers en Polynésie


Starboard! The Movie

Posted on Fri 27 August 2010 in Geek

From the creative genius of Tawn and CB of s/v Palarran.

https://www.youtube.com/watch?v=cSqLjk_30Es