Mastodon

We're looking for the trash fence...

New Portlights

Posted on Mon 22 February 2010 in Destinations - Port Townsend

When we bought our Pearson 424, we knew right off the bat we had to replace the portlights and the teak eyebrow trim along the outsides of the cabin top. The existing portlights were old and leaked causing the interior teak veneer to delaminate, no structural issues. The plastic windows were also hazed over and they just looked poor. At the 2009 Seattle Boat Show we made the first decision towards the beginning of this big project in that we purchased our new portholes from New Found Metals, located in Port Townsend, WA. Its always nice to be able to support local businesses.

The new portlights are either slightly larger (in case of the 5”x12”) or much larger than the existing portlights so there is some work to enlarge the holes once the existing portlights are removed. Doing all of this prep work is actually really easy using the templates provided by New Found Metals. You clamp the template in place, trace your lines and cut out the new hole. You also use the template to drill all the holes for thru bolting the portlight to the outer trim.

One time consuming piece is handling the bolts. You have to custom cut the bolts that attach the portlight to it’s outer trim. Every hull is a different thickness so they can’t really stock every possible length. I used my handy vise, cut them with the Fein Multimaster, cleaned them up with the dremel and a sanding wheel and then used two bolts to ensure the threads were clean. Here’s a video of that process.

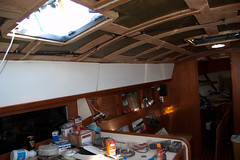
As we’re replacing the portlights, we’re also putting up new wood along the interior teak along the insides of the cabin top. We will match the new headliner to this when we replace that as well. Painting it all white will brighten the boat considerably and visually make the cabin feel a bit taller. We’re using 1/4” plywood, primed on the finished side at the workshop prior to installation. We epoxy the new wood to over the top of the existing wood. That is a pretty involved process of making a paper template, cutting out the new pieces, dry fitting them (which involves a lot of tweaking) then making the cut outs for the portlights and then finally epoxying the new wood in place.

Here are a bunch of photos which roughly chronicle the process. Click thru for larger pics or to see more. They look awesome, the glass is so clean and clear I keep thinking they’re open!

DSC_7485

DSC_7494

image

DSC_7495

image

DSC_7511


Cleaning the Tanks

Posted on Tue 16 February 2010 in Projects

The fresh water system was less that sterile when we bought the boat and we've done a lot of work to raise our water quality. I’ve already talked about replacing all of the plumbing hoses throughout the boat, new faucets, shower, installing a system wide water filter, etc. The last step in all of this is to really clean the tanks.

Pearson 424s have three tanks. 60 Gallons port and starboard under the salon settees and a 50 gallon bow tank. Our bow tank was decommissioned by the P.O. and used as anchor locker. The salon tanks are fiberglass and are structural to the hull, have three internal sections with baffles between each. They are fed by deck fill plates connected to the tanks on the upper foreword end of thanks. There are overflow hoses as well, that I need to go through and ensure they run into the bilge, according to the other P424 owners they were vented into the lockers (lame).

Our port tank has a single 6” aft Beckson deck plate. This is a screw-out plate that is not water or air tight under pressure. The starboard tank has three such plates one in each section of the tank. Eventually, I want to replace all of these with stronger inspection ports and add real gauges so we don’t have to disassemble the settees to look in the inspection port to see if they are full. For now, we’re adding two Seabuilt stainless steel inspection ports to the port tank. I’ll replace the others when there’s not so many other things going on.

The parts have been ordered and I’ll work on getting them installed this coming weekweekend so we can clean the port thank.


Splashdown !

Posted on Thu 11 February 2010 in Pearson 424

Tuesday evening we put Deep Playa back in the water sans rig!! She only spurted a little while I tightened up the stuffing box, which is to be expected since you don’t want to tighten it “too much” and you can’t tell if it’s “too loose” until you’re in the water. The prop shaft is also still not properly adjusted because that also has to be done in the water. So we slowly limped back to our slip and are now tied up at D Dock in beautiful Shilshole Bay Marina. Thanks to CB from sv Palarran for warping into the slip. Turns out sitting in the yard for 4 months did not make me any better at driving the boat. I’m really looking forward to anchoring more then docking!! :-)

The yard is now getting the spars painted then we can run the wiring conduit, attach the rigging and all the new toys and wiring and then we will have our our masts re-stepped and we’ll look like a sailboat again!

We’re happy to be back in the water, up and down the ladder was getting pretty old.


Quick list of successes

Posted on Sun 24 January 2010 in Projects

We’ve been working pretty hard this weekend and got through the following list of things:

  • The new prop shaft from The Prop Shop, Ltd is installed !! It’s very shiny. The prop has been dry fit and hand tightened I need a couple of 12” wrenches to tighten it properly. Included in that is a new coupling, new keys and new stuffing box packing. We used 1/4” Tefpack from Western Pacific Trading
  • All of the scupperscockpit drains (there are 6) now have new 1-1/2” hoses and 316 stainless steel hose clamps. I’ve been working on this slowly ever since we hauled out. These were last replaced in 1999 and the old hose clamps were inferior and rusted. Along with these the galley and head sink drain hoses were replaced as well.
  • The diesel fill hose has been removed. I’m having some issues getting the new hose installed and I’m seeking advice on tight fitting hoses on Cruiser’s Forum. This hose was labeled 1980 and was original (yikes).
  • All of the seacocks have been lubricated.
  • We made some progress on our chainplates. I think were’ about half-way through sanding them all with 100 grit. We only have to sand them about 4 times each with progressively finer and finer grit and then polish them.
  • Dawn has started work on the furring strips for the aft berth. She has to take a 1x1 piece of wood and then kerf it so it will bend against the hull. These will be glassed in and used to attach the ash battens. She plans to line the aft berth and the v-berth in this way. It’s going to look gorgeous.

That’s a pretty good list of things… We wanted to work on installing the new T-Track on the port toerail which Dawn prepped previously, but the weather wasn’t dry enough. We’re going to watch our weather windows and just jump on that at our first chance.

I can definitely see a light at the end of the tunnel!!


Additional Baby Steps

Posted on Fri 22 January 2010 in Destinations - Port Townsend

Dawn and I went to Port Townsend, WA last weekend. We unfortunately did not sail instead we took the land dinghy (Subaru Forester) and all of our standing rigging and chain plates to Port Townsend Rigging to have it inspected and plan for its replacement. Port Townsend Rigging comes highly recommended. In fact, I can’t think of any boat services in Port Townsend that people don’t like. I have not had any work done by PT Rigging in the past and this was my first time meeting them.

I had an email exchange with Lisa to get a ballpark estimate and I had a great phone conversation with her as well. Lisa and Dan were flexible and willing to meet with us on a Saturday which we really appreciated. This would allow them to see what we had and to and allow us to make the gono-go decision.

Lisa and Dan are the nicest people and easy deal with. They explained everything in lots of detail which if you’ve seen my wiring diagram you know I love! Even better, they took the time to answer questions not just about the standing rigging but some of my other rigging projects. They even did the unthinkable which is recommend where we could save a few bucks by reusing components of our existing rigging or where my other plans were unnecessary and costly (e.g., custom fabrication Vs. off the shelf parts).

Big takeaway from that is they’re hired. They’re going to do all of our standing rigging. Dawn and I are going to sand and polish our chain plates. We’ll have more on that process in a future post.


Weekend of Prepping Spars

Posted on Fri 08 January 2010 in Projects

Al Lou Mini Um

Dawn and I have started our annual cleanse diet which kind of messes with you with the first couple of days (headaches, low energy, weird tummy stuff) but now we’re back to more normal energy levels. We’ve still managed to be down at the workshop though cleaning up some of the aluminum ends from the spars.

Once they are cleaned up we’ll take them over to Asko for galvanizing.

This weekend we’re also going to drill tap and dry-fit all of the electronics we plan to attach to the spars. That sounds pretty simple, but first I have to round up all the bases, get bolts, and then I can start the drilling, tapping, etc. When I am done that I’ll give the green light to to do the final prep and paint the spars.

The final plan for the weekend is to complete some more hose installations including the new strainer for the anchor washdown.

Should be a good weekend of getting stuff done and eating super cleanse healthy.


More Wiring

Posted on Thu 07 January 2010 in Projects

Systems - Rigging Slug: more-wiring Status: published

I've been updating the drawing so it's more detailed than the original version. I'm getting to the point of needing to determine the number and size of things like terminal blocks, ring terminals, heat shrink tubing, etc.. Along with this I'm also getting ready to dry fit everything to the spars down at the yard before the final prep and then painting of the spars. I'm spending a lot of money having these things painted and I'd rather bounce the drill off the unpainted sand blasted spars than the newly painted spars.

Mast Wiring


New Year, Same boat projects

Posted on Sat 02 January 2010 in Projects

Ticked a few things off the to do list the past few days.

New Years Eve day, Dawn worked on the masts and booms filling all the holes we don't need anymore with Belzona 1111. Thanks to at for helping us get started. Dawn is really good at these kinds of projects that require being neat and detailed oriented. I'm better at breaking things an making a mess.

The bilge hoses have all been replaced. This took a little longer than planned because I used stiffer hose which added some unforeseen complexity. It also became delayed due to an apparent shortage of 316 SS hose clamps in the size I needed. Fisheries Supply in Seattle is horrible at managing their stock, but their prices are better than West Marine. Included in this a Perko bronze strainer for the manual bilg pump and an inline check-valv on the stern end of the secondaylarge bilge pump. I am considering walling off the aft-most section of the bilge to minimize the area which stays wet. We would place the primary pump in that section but if we had more water than that then it flow over the wall and we would kick on the secondary pump. We also need to put a float switch on the primary bilge pump, currently it is only enabled by the breaker switch.

The Walter Machine RV-20 V-Drive has a raw water cooling chamber on the top of it which is prone to corrosion. Eventually it can corrode through allowing sea water to mix with the oil in the bottom half of the v-drive where all the gears are. This would be bad. Several owners have cleaned up the corrosion and used Marine-Tex to protect the area before hooking everything back up. Some owners (including my surveyor who also owns a Pearson 424) have removed the raw water cooling altogether. The corrosion in my unit is so bad that it damaged one of the bolt holes used to attach the top plate to the v-drive so I am going the route of leaving the unit dry. So now instead the raw cooling water going from the strainer to the v-drive and then to the egine it now goes directly from the strainer to the engine. I will install a temperature gauge on the v-drive to monitor it for overheating and I left the hoses in place so I could hook it up back if it ever did overheat. Eventually we will probably replace the v-drive, but that is not something we wanted to do right now.

I have not finished this yet, but the anchor washdown pump was not protected by a strainer. I purchased all the hoses, clamps and the Sherwood strainer. This will get installed completed tomorrow. I would have finished it today, but I forgot to buy the mounting bracket.

I also capped off the vent thru-hull that used to be part of the holding bag system. I will also being putting a plug on the inside portion of the deck fiting for pumping out. I thought about removing and glassing these closed, but I don't this it's neccesary, capping them of is adequate redundance. I also put a plug in the thru-hull I eventually plan to use for the water maker. It has a ball valve, but I like the added security of the plug as well. This is something we'll do just before we plan to leave.

All in all it was nice to tick a few thing off the list, but we still have a ways to go!


Mast Wiring

Posted on Thu 17 December 2009 in Projects

Mast Wiring

I was going a little crazy trying to remember all of the things we’re wiring into the mast and what kind of wire they needed so I drew it up.

Included in this simple not to scale drawing (my spreaders are not mid-mast) are the wires for the NMEA 2000 instrument, all 2 wire and 3 wire pulls for lights and the PA horn as well as the COAX which is going to be run in the mast. These were run in the mast hanging free and wrapped in foam. As part of the refit we will run PVC conduit inside the mast for the wiring.

Click on the picture for a larger version you can actually see.


Mounting Idea

Posted on Fri 11 December 2009 in Navigation

Maretron WSO100 Mount

I emailed Maretron support when I was thinking about how to mount the WSO100 on my masthead and they sent me some pictures of a customers installation. I assume that’s a 1” piece of stainless steel pipe. Looks pretty good, maybe a tad on the heavy side.

It looks nice though, that’s for sure. There are a few more pics in my flickr account.