Mastodon

We're looking for the trash fence...

Installing Rebedding Chainplates

Posted on Tue 25 May 2010 in Projects

DSC_7136

Before

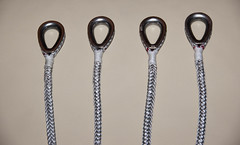
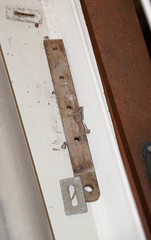
  • The chainplates were previously pulled and cleaned up with a Scrotchbrite pad and water.
  • They were then polished by sanding with progressively finer grades of sand paper starting at 120 grit and going up to 1200 grit.
  • DSC00328 DSC00324 DSC00323 
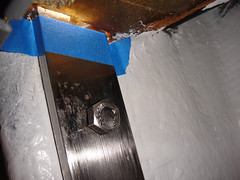
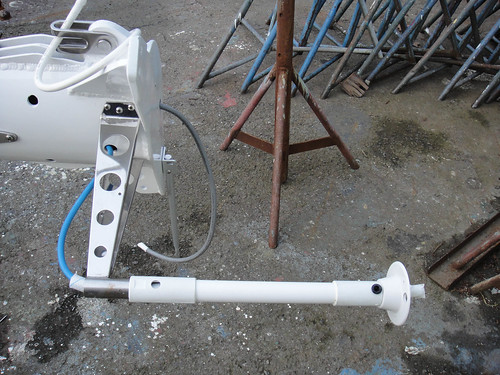
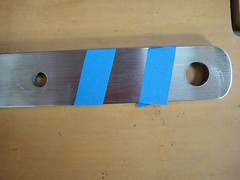
Plates were then dry fitted and marked with tape so we knew how thick the desk was and where to apply the butyl.
  • DSC00342 DSC00338 
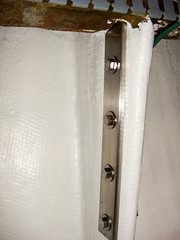
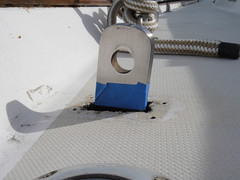
Butyl rope caulk which we got from New Found Metals when we purchased our potlights was wrapped around the chainplate and then it was inserted into the deck again and through bolted. The butyl 
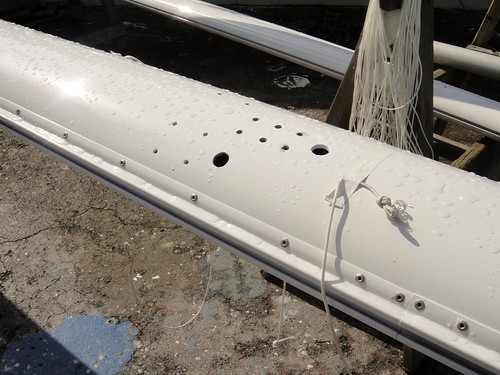
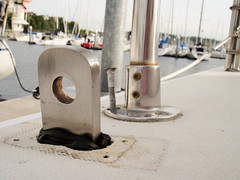
you see sticking out here was pushed down into the deck.
  • image 
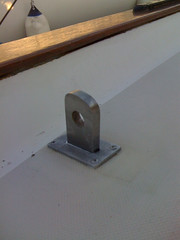
The chainplate covers were then placed down with 3M 4200 and screwed into place.

We’ve had some really good rain and no leaks through the chainplates. The chainplates were previously hidden behind teak enclosures, we plan to leave them open so we can inspect them and notice any issues sooner. Plus look how shiny they are !! Dawn did most of the work on this one, I only did some late night sanding. Did I mention how awesome she is?


Things are coming along !!

Posted on Tue 25 May 2010 in Projects

DSC00338

Dawn has finished re-installing the chainplates. She used leftover butyl from the portlight installation to seal the chainplates as they go through the deck and then put the cover plates on with 4200 and screws. The picture is is before she’s pushed all the butyl in.

She’s also been working to fair up the mast partner (where the mast go through the deck into the salon before attaching to the keel) by laying on epoxy and sanding it down. This seals the core of the deck and provides a smooth surface for when we then seal the mastdeck opening with Spartite. Dawn has been kicking much butt!!

DSC_7576

I’ve been finishing up the electrical installations on the masts, attaching all of the other bits that go up there and attaching the rigging to the masts. Along with that I’ve also been doing some Amsteel splicing for fixed sections of the running rigging. This is a pretty simple bury splice that is secured by thru-stitching and then whipping it. Samson has great splicing instructions on their website, this was a Class II 12 Strand Eye Splice (PDF). I didn’t use a fiddle as they show, I used Brion Toss’ Splicing Wands which are absolutely awesome! You can buy them online or probably at your local chandlery.

DSC00371

At this point I’m a couple of properly sized pins and some thru bolts away from finishing up at the yard. Finding the right length of clevis pins is proving to be more of a pain than I had imagined. I don’t know why manufacturer’s don’t make each pin diameter in all the necessary lengths. Now I know my old pins were so horribly long.

I will will also be having <The Yard> make me a new bolt that thru-bolts the main lower shroud tangs. It’s a custom lathed part. This pic is of the original one after it was cut off. Here is one of each side when it was installed.

All of this is goodness and will let us put the rig back up. I am going to order the new halyards this week as well. Once the rig is up we’ll finish up the booms and mount the winches. The main goal though is to get all of the parts and tools out of 3 places and get them all on to the boat so I can work in one place and not run around so much. Progress happens, and when it does we love it !!


Chainplate Installation

Posted on Mon 10 May 2010 in Projects

This is our chainplate. There are many like it, but this one is ours.

“This is our chainplate. There are many like it, but this one is ours.”

Dawn worked on the chainplates this weekend and here’s proof of progress. For our friends and family who don’t have boats, the chainplates bolt to the boat below decks and are the mechanical connection of the rig (the sail part of the boat) to the hull.

When we took the rig down we pull the chainplates and polished them. Getting them nice and clean not only looks good but the smoother and shinier they are the less likely they are to corrode in the future. It takes a LOT of elbow grease to sand them with progressively finer and finer sand papers all the way down to 1200 grit.

If you look at the picture above you will the part sticking and a plate screwed to the deck. The plates are actually a separate piece of metal. The verticalstructural piece you see sticking up is about 18” long and extends down below decks and it bolted to the boat. Dawn use butyl rope caulk left over from our portlight installation to seal the hole and then put the chainplate covers on with 3M 4200.

This is a sign we’re getting close to restepping the masts which means we’ll have a sailboat again!


Running Rigging – How much line do you need?

Posted on Mon 19 April 2010 in Projects

I just spent a good amount time tonight going over my spreadsheet for the running rigging. This sheet includes every line on the boat both ones I need to replace immediately before the masts go back up (topping lifts, running back, etc) and lines that I can wait to do when we get our sails. It also includes all the blocks, eyes, and shackles. Obviously it also includes the diameter, length of line, type of line, etc.

The thing you also want factor in is the type of splices you’ll be doing and how much length you need for that. For shorter lines this can be a significant percentage portion of the overall length you need.

For example, I need a 6’ x 5/16” Amsteel line with an eye in each end. A single Class 2 12 Strand Eye Splice (NOTE: how long is a fid) in this line takes 16.5” of line  and in this example I’m going to have 2 such splices so while the total working line I’ll end up with will be 6’ long I’ll need 8’ 9” of line in order to make the splice. I am leaving out the distance to wrap the eye, but in this case that is nominal.

Ideally when you were buying line online they’d have calculators that include the splice.


Mounting the Maretron WSO100 Weather Station

Posted on Sun 18 April 2010 in Maretron

DSC00317

A while back I started doing some research about how to mount the Maretron WSO100 weather station to the masthead. The yard had recommended I use a piece of flatbar and I went as far as ordering a piece and roughing it out, but that approach really bothered me. First the instrument would be directly at mast height level and I felt it would block the nav light too much. Secondly I was concerned it would be low enough to snag the spinnaker.

This weekend while rummaging around Second Wave I happened on a Glomex V9173 TV Antenna bracket (look around prices online range from \$30 to over \$100 for new ones) to which I attached a Shakespeare extension mast. The whole thing cost me about \$40 since I bought everything at Second Wave. This setup avoids the problems I mentioned above and the whole thing weighs less than the flat bar. I still need to make or find some grommets to protect the wires where they exit the mast, but my wiring projects are coming along nicely since I was able to solve this problem.


Proof of progress on mast wiring

Posted on Mon 12 April 2010 in Projects

Before – just a bunch of holes and messenger lines for pulling wires.

DSC00271

After

Notice the tangs for the main loweres, spreaders and the new foredecksteaming light. That wire sticking out is the feedline for the new spreader lights.

DSC00295


A little progress always feels good

Posted on Mon 12 April 2010 in Projects

This weekend the weather was nice and we actually made some progress.

Boat side, Dawn check off some good items:

  • Starboard water tank scrubbed, by hand, through those 4”-6” access ports. No she is not available to help on your boat !
  • Finished painting the hull areas under the chainplates
  • Sealed the deck core where the chainplates  go through the hull
  • Started sanding the chainplate cover plates

WHEW ! Dawn is awesome!!! All of this is in preparation for installing the chainplates which will be weather dependent, but something I hope we can do next weekend.

At the yard, I was able to make progress on the mast wiring:

  • Finished mounting the foredecksteaming light
  • Finished mounting all of the tangs on the masts
  • On the spreaders:
  • Mounted the padeyes and flag halyard blocks
  • Pulled the wires through the spreaders for the Dr. Led Kevin Spreader Lightimage

The general wiring strategy has also made a bit of progress. The spreader lights are going to be fed from a single in-mast feed line. The wires in the spreader will be soldered to the feedline, shrink wrapped and supported by a linewire (TBD) that will span the connection. This will put the weight bearing back to the wire and not the soldered connection. The lights will be connected to the line inside the spreader with a disconnect so if the spreader ever needs to be removed it can be done without cutting the wires. *gasp*

At the masthead I’m pretty much ready to start wiring up the masthead light and the VHF. I only need some grommets to protect the wires where they exit the mast. I’m still not happy with how I’m planning to mount the Maretron WSO100 Weather Stationimage

which is so massive I’m actually thinking I’d be better off returning that and going with the Airmar PB200 which is not wide but is taller. The problem I’m having is how to mount this without adding 20lbs of stainless to the masthead and not blocking the nav light significantly.

So, while we still have a lot of portlight rebedding in our future this weekend we made some great progress… feels good!


It’s all about the angles

Posted on Mon 05 April 2010 in Projects

Since I wrote the last post I was thinking about how to pull those damn wires. I was able to pull one of the wires tonight. I used the messenger line to pull the wire to the exit in the conduit and then I used a second messenger line that I pulled from the masthead inside the mast to pull the wire out of the conduit and up into the mast. This took a bit of time and I had to use a stiff wire to pull on the wire as it exited the conduit. I then used the original messenger line to pull the wire back out the proper exit hole in the mast. Very slow going, but I think I’ve got a strategy to pull the other wires now.


Setbacks and Problems

Posted on Mon 05 April 2010 in Projects

Systems - Hull Slug: setbacks-and-problems Status: published

This week was full of unexpected issues and problems and very little movement forward on projects.

It started out when we noticed the some leaking with our newly installed portlights, which is fine really, a bit of tweaking was expected. However the leak got into the new wood (which was not marine grade) and caused it to swell. So we’re going to have pull down the new cabin top wood and re-seat the portlights to do that. We are not looking forward to that as the new wood was put up with epoxy, much grinding or demolition is going to be involved in that. New marine grade plywood has been ordered, if you learn one thing from me do not skimp on materials. I don’t normally skimp we did this one time and it bit us hard. Take the time to do it right and use the right materials.

This next one really pisses me off. When I had the yard install the conduit in the mast I also specified that they pull messenger lines to the masthead, spreaders and foredecksteaming light. Well they did that but they didn’t make the holes big enough for the wire. I didn’t specify a size and they didn’t ask so this is really a communication problem (one of many with the yard) but I’m not sure why they would drill any holes without explicitly knowing what size. So, I had to drill new holes in the conduit and snake new messenger lines. Once that was done I find out that I still can’t get the wire to pull through because at the angle I’m pulling (90 degrees right out the hole) all I can do is flex the tubing once the wire has exited. I can’t get any more vertical pull. That lead to an almost complete meltdown on my part. I was thinking I’d had to eat the cost the boat cable and pull primary wires instead. Now I’m thinking maybe I can pull back several feet of the insulation and still pull the wire. We’ll see. I’m sure it’s going to be another week of dinking around with that whereas I expected to be done pulling wires this weekend.

Dawn did make progress on some painting though. When we originally pulled down the hull lining and painted we left all the teak in place that covered the chainplates. We have since removed that teak and pulled the chainplates to clean them up and we’ve decided we’re going to not re-install that teak instead leaving the chainplates uncovered so we can see them and any leaking or corrosion issues. So Dawn has been painting that exposed fiberglass white to match the areas we had previously painted white. This is good because now I can start rebedding the chainplates. I’ll have an entire post on that process.

I didn’t really want to write this post, but I figured it was important so you can all learn from our mistakes and see that doing a refit like this is a lot of work and despite planning things will go awry. So with that unpleasantness behind us we are ready to kick much but in the next couple of weeks with our complete focus on everything needed to re-step the masts.


Portlights and Rigging

Posted on Fri 19 March 2010 in Projects

Since our wedding we’ve not slowed down a bit on our refit. Today the yard completed installing the wiring conduit in both masts, re-attaching the mail sail track and the new solent tang. Next steps are all on us to pull wire through the conduits, install all the new masthead electronics, spreader lights, and re-attach all of the standing rigging, including pulling a new forestay through the furler.

I’m sure this is going to take longer than the the two weeks in my head right now, but the best part is I feel all the work is in our hands and I can see the daylight at the end of the tunnel!!

Along the way Dawn and I have also replaced 7 of the 10 portlights, amongst other things, and we’re in the middle of re-doing number 8 and should finish this weekend (maybe number 9 too). We’ll have a detailed post on the portlights in the future, but let me just repeat myself; New Found Metals… GORGEOUS and drip free!!!