Mastodon

We're looking for the trash fence...

Shilshole Dock Captains Meeting

Posted on Tue 09 June 2009 in Destinations - Shilshole Bay Marina

I went to the Shilshole Bay Marina Dock Captains meeting tonight, this is part of the Washington Liveaboard Association. Amongst the dock captains there were also non-liveaboards in attendance such as myself. In attendance at the meeting (I’m going to butcher some name here) were the Marina Manager (Sharon), her boss Darlene from the Port, Joseppi to report on marina security (not sure on that) and Cathy Glees (?) to report on emergency preparedness also from the Port (but just the wet part, not the flying part she noted).

Security

We kicked off with Joseppi on security at the Marina. He reported no major incidences have made it to his desk. The attendees indicated one car break-in recently and a report of transients roaming C Dock with a FOB for entry who were ushered away by Port Security. Main takeaways from this are that if you loose your key FOB report it to the Marina ASAP, they can turn them off within minutes. Also, if you have any break-ins or car damage I would also report those to the marina as well.

Joseppi also indicated there is a functioning notification list for doc captains, and that one for the general public is in the works as well.

Emergency Preparedness

Cathy Glees(?) spoke next on emergency preparedness. Aside form the general “be prepared” message, she spoke specifically about two things I felt were worth repeating. The Port is looking to work with HAM Radio Operators who want to be involved in emergency communication efforts. She mentions ARES and RACES, so I assume the port is working with ARESRACES of King County. There are soo many radios down here I’m sure some of you would love to help out. I may look into it myself even!

Secondly, the port is working with King County’s Community Emergency Response Team (CERT) effort and is looking for volunteers (liveaboards I assume to) to attend training sessions. The basic idea behind this is that if a large natural disaster occurred and emergency services were overwhelmed it would be useful to have people out in the community who were comfortable with using fire extinguishers, could search a building, help out their neighbors, etc. The training sounded pretty cool and it involved putting out real fires and doing simulated searches. As with everything contact the marina office for more information.

Liability Insurance Requirements

The big topic of the night was the coming mandatory liability insurance requirements for all of the water properties in the Port of Seattle (i.e., all the marinas recreational and commercial). The exact specifics will be coming in the mail in July, but at a high level it works like this:

  • Policy goes into effect 1 October 2009
  • Boats over 16’ moored in the water with engines have to carry \$300,000 of liability
  • Boats on the dry moorage regardless of size which use the hoist, also have to have \$300,000 of liability
  • Proof of insurance must be provided by making adding the Port of Seattle as a certificate holder. This will mean they get notified if you change, renew, let your policy lapse, etc.

That summary covers 99% of us, if you have a 100’ canoe with no motor call the marina or wait for the mailing in July for all the corner cases.

The Port seemed to be prepared more for people to be upset about the requirement, but most people were complaining about the wait till October, they’d rather see it go in effect immediately. I was kind of shocked by that. I agree in that I’m surprised they don’t require it already, but I completely understand that the Port can’t make things required over night.

They also said several times ”This is where we’re starting.” so you can expect that over time the requirements will go up and at a minimum I’d expect them to add wreck recovery and pollution in the not so distance future.


Plumbing Upgrade and Starter complete

Posted on Sun 07 June 2009 in Pearson 424

Raw Water Strainer

This weekend I finished installing the starter. Along the way I decided to replace the bonding wire on the starter to the v-drive with tinned wire because the existing wire was corroded. As I was doing this, I also decided to replace the bonding wire from the v-drive to the raw water strainer because it had broken a few months back. Removing the nut on the raw water strainer lead to the strainer breaking.  The strainer (bronze) was bolted to an aluminum bracket with stainless steel screws and it had started to bend at the hanger points. I was planning to replace this fall when I haul out, but turns out I needed to do it today. I put a board on that aluminum bracket and put in a new raw water strainer. All in all it was pretty simple, the new fittings lined up a bit differently, but the new strainer looks great and will provide years of reliable service! I have one more bonding wire to put in, just need a 8 AWG to number 10 screw ring terminal to check that one off the list.

DSC_4505

I also finished installing the starter this weekend after I painted it and let it dry. It pretty much popped right in, I fastened in all the bolts to the block, put the new bonding wires on and then hooked up the battery cables and starter switch. She started up on the first try and water ran well through the exhaust. Everything is look good!

Shower mixer and nozzle mount

Finally, I finished our plumbing upgrade as well by putting in a new shower mixer valve and handheld wall mount sprayer. The original faucet was a 4” on center individual knobs for hot and cold and had a fitting for the shower nozzle right on the faucet. When I pulled this off the wall I was left with two holes in the whole. I put a Shurflo mixer volume control in the bottom hole and a wall mount for the shower nozzle in the top hole. This completes a project I started last summer!


Opening Day (for us)

Posted on Fri 05 June 2009 in Destinations - Puget Sound

BlakeIsland-1 We took our first overnight sail of the year to Blake Island with some new friends on Tip Toe and L’Orien last weekend. Our goal was to drop the anchor and sleep aboard. I wanted to see the windlass was working properly, practice our anchoring, etc., etc. The whole thing went smoothly and we had a good time to boot, much drinking, roasting of marshmallows and potlucking and drinking. Sailor Jerry is definitely the drink of choice! I didn’t take that many pictures, but a lot of what I did take didn’t come out very well. I’m getting pickier the more I learn about photography. Check the flickr for more pics. I was completely stoked that the windlass worked flawlessly as well!

While we were over at Blake Island we also took the dinghy ashore and found a geocache, it’s not showing up as logged right now, I just re-logged it. Twitter will get updated as well when we geocache.


My Little Friend the Starter Motor

Posted on Fri 05 June 2009 in Pearson 424

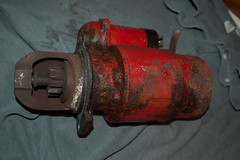
DSC_4476For about two months now we’ve had intermittent luck getting our engine (Westerbeke 58 circa 1981) to start. I at first assumed I had been a batter minder and screwed those up so I did a bunch of tests and they seemed ok. I then started tracing wires and reading up on troubleshooting starting diesel motors in Nigel Calder’s book. That lead the section on bypassing the starter switch and the solenoid itself using a screwdriver. I won’t go into that too much, just to say, its awesome when you do it and a bit scary. ;-) Using that method for the past couple of weeks we’ve been able to get her started. The workaround pointed clearly to a solenoid failure. The plan for repair was to pull the starter and the attached solenoid and either replace them or get them rebuilt.

I started out (no pun intended) by calling up my local Westerbeke dealer Gallery Marine Services and asking them if they did this kind of work. They said “sure we can send it out” and I said can I just contact the place you send them and he totally coughed up Blanchard Auto Electric. I though this was very cool, they could have easily said, “bring it in” and charged me extra. I’ve not done any business with them really but Gallery Marine Services seems like an good place thus far!

I took my starter over to Blanchard Auto Electric and even MORE great service ensued! I walk in and talk to the proverbial guy at the counter. He looks some stuff up in the computer, looks in some books and says well you have two options for a new one. One costs \$260 and the other \$160 (numbers are approximate recollections) and then goes, go through that door into the shop, follow the yellow line on the floor and ask Todd if the one you have now is worth rebuilding. I go back and see Todd who is very much deep in the shop behind a wall of starter motors of all sizes. The only way he could looked more prophetic would have been had he been chanting incantations over a boiling pot of oil and diesel parts. Todd and I talked about the merits of the \$100 price difference and he wanted to tell me to just go ahead and buy the cheaper one, but he knew they had recently changed ownership and wasn’t sure if his past experience would reflect on current quality. So Todd looks at my starter and says let me take a look at tomorrow and I’ll let you know if what you have is worth rebuilding.

I drop my 40lb starter off with Todd and go to work thinking I’d get a call the next morning. Three hours later the same day Todd calls me up and goes, “Well I broke one the corroded bolts on your starter trying to get back open, but I was able to get it apart and the starter is perfectly fine. I put a new solenoid on the starter and you’ll be good to go, come down and pick it up.”

The grand total was like \$85 for everything, totally awesome experience with Blanchard Auto Electric.

All I have to do now is knock the rust off of the starter with a wire wheel on my new Bench Grinder (ah toys!), paint it again and reinstall it, that should be finished tonight if not Saturday and we should be back to dependable starting!


Update on the Dinghy

Posted on Fri 05 June 2009 in Systems - Dinghy

I was looking around the site and noticed I owed an update on the Dinghy. All of our experience with the dinghy at that point had been inside the break water of the marina, where I couldn’t open the throttle wide open. Well it turns out, that when you do open the throttle wide open that in 15-20 seconds (depending on the sea state) that the dinghy will plane up and then it really goes! Dawn and I have been able to get up on a plane, which is perfect! The other thing I did was adjust the motor angle a bit. As the motor swings down there is an adjustable bar on the back that sets how far the motor tilts updown in relation to the transom of the dinghy. I set it one not high so the motor sits one click higher. This has the effect of putting the motor weight a litlte more forward and prop a little more downward so we don’t push quite as a big wall of water when we’re at less than full throttle. I still think it will be worthwhile to add a foil to the motor which will create more lift and allow us to plane more quickly.

Anyway, its nice to know things are working as expected after we practices and educated ourselves a bit more.


Engine sound proofing

Posted on Sat 23 May 2009 in Interior

DSC_4132

Today I got most of the new sound insulation installed on the engine cover. The old soundproofing was flaking and falling off the boards to which it was attached. The new material is a vinyl foam insulation with a silver Mylar finish from Sound Tec NW. The material is about 2" inches thick with two layers of foam sandwiching a rubber sound and vibration barrier material that is 2 pounds per square foot.

Installation was pretty simple. I took the surround to the workshop (more on that later) and made cardboard templates of each side and the lid. Next I traced teh templates onto the material which I cut using a SHARP drywall razor blade held in my hand with a duct taped finger so I could push really hard. This was pretty easy but I have pretty resilient hands. I think someone else might want to find a better way to cut it. Anyway, for me not a problem. The reason the blade was not in a knife was I need to use the full 2” length of the blade.

Next I dry fit everything together in the shop made a few tweaks and then took it to the boat. Once on the boat again I dry fit everything to make sure it all fit. That out of the way I used spray adhesive putting two coats on the wood and the foam before mating the two together. You need to be really carefully when you do that because the glue is very sticky and separating the two would have been very hard if not impossible with out damaging the foam.

Once the glue setup, which was pretty much instantaneously, I took #9 2-1/2” screws and matching fender washers and attached the foam to the wood. Before placing the screws in the foam I drilled them into a candle to wax the screws. This was a tip from Dave the Sound Tec NW guy. This kept the screws from gripping the foam and tearing it. The screws and fender washers went in without a hitch and I put them in just enough to quilt the Mylar and not so much that I went through the boards.

As you can see from the picture above the material looks great and I can’t wait to fire up the engine. There’s one additional picture on Flickr as well where you can see the individual layers of material. You’ll notice in that picture that only 2 of the three sides are installed. That third side would be impinged upon by the hydraulic prop-brake on my engine (right where the dark spot is) so I either need to remove that brake (which I plan to do eventually) or I need to cut out a window in the insulation so the brake has the room it needs. I also need to finish off the edges with the matching 2” Mylar tape, but that it what we call “detail work” and Dawn is better at that than I am.

Dave from Sound Tec NW was very helpful and easy to work with, I would definitely recommend talking to him if you’re looking to do a similar project. I bought a full sheet of the material and the tape for just under \$200.


Instrumentation and Electronics

Posted on Tue 21 April 2009 in Geek

I have some older electronics on the boat which draw a lot power, have horrible or no displays and I'm geek I have to have the new newness. Here's a brief overview I wrote while I was eating lunch to get some of my thoughts written down so my mind would stop racing. As a general rule, I've come to view the overall system in two main sections.

The general purpose NMEA 2000 bus for gathering a displaying information via multi-purpose and multi-vendor displays and data sending units. E.g.: weather, dc usage, wind, location, etc.. These components all should interop with the exception that they need their vendor specific display for configuration. These items feed into the Navigational Components as well as other systems like the DSC on the VHF and to the PC for other applications as well like SSB position and weather reports.  For the General Purpose instrumentation I plan to use Maretron components and one DSM 250 (color) display in the nav station for configuration of those devices. We will also have one or two multi-function displays in the cockpit. I'm not yet sure what brand or model. I would include engine sensors in this category but I have no plans to wire up my 1981 Weterbeke 58 (probably can't) and I'm not currently planning on doing a repower. The sending units will include:

  • GPS100 GPS (1)
  • WSO-100 Wind and Weather (1)
  • SSC200 Compass (1)
  • DCM1000 DC Monitor for each battery bank and Solar Panels (3)
  • USB1000 USB Gateway to connect to PC (1)
  • DSM 250 color display (1)
  • TLM100 Tank Level Monitors for both fresh water tanks and the diesel tank (3)
  • NMEA 0183 Adapter for connecting VHF to Network (1) (maybe the GPS can do this automagically)

Beyond the general purpose systems, the Navigational components (RADAR, Chart plotter, PC Nav Software and Autopilot) must all be of the same brand and compatible in order to get ChartRadar overly on the plotter and the PC as well as single point control of the auto-pilot (i.e, the ability to change course from the PC Or the Chart plotter. To that end, I plan to go exclusively with Raymarine. I'm basing a lot of this on the survey results from the SSCA ( >50% of member surveyed use Raymarine) and hands-on experience at trade shows. I will be using the Navionics Gold cards for charts. I see no need to have the 'looks cool' 3D bathospheric views since they are based on such minimal data especially where we plan to Cruise (S. Pacific). I'm less resolved about what models on these items but the basic components will be:

  • Chartplotter - I'm guessing the C120 widescreen, but I need to dig into the differences. The E does not yet appear to be any better for my needs than the E.
  • RADAR - 24" HD radome model. Big decision here I think is 2kw24nm or 4kw48nm.
  • Autopilot - Need to think this through more. Not sure how this and the Capehorn windvane will interact yet. We might be able to use a tiller autopilot and the windvane quadrant... save some \$ and could afford to carry a full spare maybe... ??
  • Depth Sounder Fish Finder - This is just for geeky fun. I like the idea of being able to see contour information, not really for fishing. This integrates with the chartplotter and PC Software.
  • PC Software - Raytech RNS. Rosepoint Nav really has the best software, but I want a dedicated charplotter AND a PC and they have no solution for that.

Open Issues

Cabling

I think I'm settled on Maretron Mid size cable for the backbone and their smaller cable for all the drops to the sending units and non-Raymarine components. I’m guessing that I will run the main bus from starting at the spreaders on the main mast and ending at the spreaders on the mizzen mast. I think that will be far enough to let me run the lighter weight cables to the mastheads where needed. The run from the main will go throughundernear the nav station and then along the foreword end of the cockpit which before heading up the mizzen, again this will let me add displays and reach the batteries.

I'm not sure if I'll need a separate smaller bus for the Raymarine Seatalk HS network. I think I do since at a minimum the RADAR and chartplotter and PC don't talk over the NMEA 2000 bus.

AIS

We will add AIS closer to our departure time. I'm 99.9% sure I'll go with Raymarine again with the thought that it is all about the ability to overlay the information.

The next step is going to be to draw this up and start taking to sales reps here in Seattle looking for the best prices and service.

If you have any thoughts on my my overall plans feel free to chime in. I’m particularly interested if there are any known Raymarine Maretron interop issues.


Strictly Sail Pacific

Posted on Thu 16 April 2009 in Boat Shows

Dawn and I are headed down to Oaklands for the Strictly Sail Pacific show this weekend. It partially just to get away and partially to get stuff done. Although as usual when you plan to leave rainy Seattle its going to be beautiful in Seattle during that same window. Oh well... at least we won't have to make the bed.

Here some of the things we're going to be looking into at the show:

  • CQR Anchor and Bow Roller - We need a 60 pounder to go with our undersized 35lb Bruce
  • ICOM VHF - We sold our cheap VHF and I'm set on ICOM. I just need to decide between the 504 and 604 and of course we're looking for a deal!
  • NEMA 2K - I'm not ready to do all of this all at once so what's the best place to start. Can I get a breakout box a GPA antenna and a USB module as my starting point?
  • RADAR Chartplotte Nav Software - At some point we nee dto upgrade our old power hungry RADAR and when you pick your RADAR you're also picking your chartplotter and nav software (if you want to do any overlays) because RADARs are all proprietary and only work with their brand plotters and software. At least that's what I recall the speaker from Rose Point Navigation saying at the Seattle boat show.

That's a lot of the big stuff, there's lot of small stuff too.

I'll be twittering deals and cool stuff as I move around the floor. My twitter account is DeepPlaya. Another good account to follow is StrictlySailPac. If you're also going be tweeting at the show use the tag #SSP09 on your posts so we can all follow along with each other.


New Puget Sound Links Page

Posted on Tue 17 February 2009 in Destinations - Puget Sound

I added a new page to the site, which is basically a cut and paste from one of old sites (the three generations of the site old). It has has some useful links but the thing I usually like to check out is the West Point weather information. I can look at that while I'm at work and feel bad that I'm stuck in the office and not out sailing. ;-)

Anyway, here's a direct link: https://www.deepplaya.com/page/Puget-Sound-Sailing-Links.aspx, but you can also just go to www.DeepPlaya.com and look at the Pages links on the left hand side.

BTW, today its sunny and 12kts of wind, definitely a day I'd rathe not be in the office. This weekend I'm going to be changing filters and fluids so we can start the engine and leave the dock when we fill like it. The sailing is just around the corner!!


Update on our schooling

Posted on Tue 10 February 2009 in Classes and Workshops

I mentioned before that Dawn and I are taking a Marine Diesel Class and I’m taking a Marine Electrical class at Seattle Maritime Academy. Well there’s only one more day of the electrical class left and we’re about halfway through the diesel class.

The Electrical class has covered all the basics of electrical theory which centers around Ohm’s Law. We’ve built some simple circuits on a bread board and tested voltage, resistance, etc with a volt meter. We’ve also done a bunch of calculations to determine wire sizes needed in certain applications. Last night we were a little more hands on and practiced some soldering. I’d show you the results but they’re not that interesting, instead check out these videos.

Intro to Ohm’s Law

How and Why to Solder Correctly