Mastodon

We're looking for the trash fence...

DeepPC Update–Investigating Shuttle PC X50 V2 All-In-One suitability

Posted on Fri 20 August 2010 in Geek

image

I read A LOT of news sites a lot of them technology related and via that I stumbled on the Shuttle PC X50 V2 All-In-One which recently came out.

This is an Intel D510 Dual Core which is the next generation ATOM processors used in all those low power netbooks. It also happens to be just as powerful as the 14” laptop I use now (but which has a cracked screen) but the X50 can have 4GB of RAM and my laptop only 2GB. Basically its MORE than powerful enough to not only meet my navigational needs, but at 40W I’m not sure I could find a separate PC and touch screen Monitor to run more efficiently than it either. The SC/DC brick it uses outputs 19v @2.1A so I’ll need a DC regulator to take my 12V system and step it up to the 19V. I’m currently looking at the Carnetix CNX-P1900 PSU to do this. I have a question in to the Carnetix forum to make sure I’m understanding everything correctly. The P1900 can handle up to 140W and I only need 40W so maybe I could go with a better choice, not sure yet.

Another cool thing about the P1900 is it has two additional outputs one 12v and the other 5v. The 5v can be used to provide power to a USB HUB if I need that. The other 12v could be used to power an additional monitor or maybe an external storage drive in the future.

Right now I’m thinking this might be the winning combo.  I’ll let you know if the technical details work out.


Installing Maretron NMEA 2000 connector on bulk Maretron Mid (Blue) Cable

Posted on Tue 10 August 2010 in Geek

Here’s a quick step by step on how to use the Maretron field installable connectors. These are useful when you want to run a wire in a mast or through the deck and you don’t want to use a bulkhead fitting but you’d rather use something like a Blue Sea cable clam. There are NO instructions with these fittings so I hope you find this useful.

Maretron NMEA 2000 connector

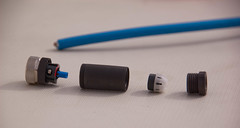
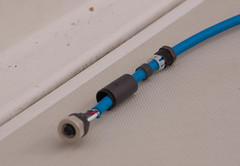
Here’s a shot of the disassembled connector and the raw end of the bulk wire. The white fitting and it’s rubber gasket give this fitting a snug water resistant (proof?) fit.

Maretron NMEA 2000 connector

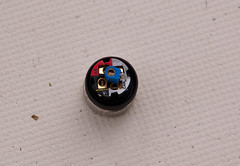
This is a shot of the little tiny holes and screws you’re going to be using to attach the wires to the connector. Everything it very well designed; the color coding makes this a snap. Note that the blue connection is stands approximately 1/4” proud of the other fittings.

Maretron NMEA 2000 connector

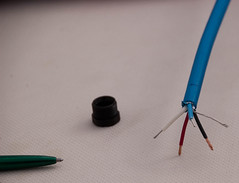
You need to strip back the outer insulation and the foil around the wires. The blue wire should be a bit shorter than the others since it doesn’t have to reach as far as the other wires.

Maretron NMEA 2000 connector

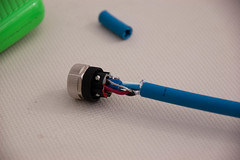
Here’s a shot with all of the wires attached to the connector.

Maretron NMEA 2000 connector

Notice in the that previous picture none of these other pieces are visible. they all need to be placed on the wire BEFORE you spend 10 minutes getting the wires attached and all the screws tightened. If you’re lucky and you don’t have a connector on the other end, you can slide them all the way along the wire like I did. DOH!

Maretron NMEA 2000 connector

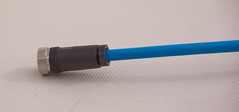
I started by tightening the body to the very end of the connector (the left side in this pic). I then worked on the final end fitting where the wire extends out. When you got to tighten everything up it will be a tad difficult to get the end fitting to tighten against the white cone and rubber bushing. I used the small screw driver to work the cone down as far as a I could. be careful, you can break the cone if you push too hard. You will figure it out though. I then used a Knipex Pliers Wrenches (which I LOVE but a crescent wrench would work) to hold the connector body while I bottomed all of the threads.

It’s obviously a lot easier to work with the factory installed connectors but where necessary the field installable connectors are pretty easy to work with and they look solid to me.


RIP: Signet System 4000

Posted on Sat 07 August 2010 in Systems - Electronics

20100806-DSC_8810

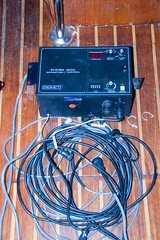
Here’s a shot of the Signet System 4000 instruments package which I finally removed. I can’t find anything out about this on the internet. The big black box was mounted on the electrical panel, the remaining hole is approximately 12”x8”! Did I mention the “display” feature on this 12”x8” are those four red single digit displays (about 1”x2”). At one time there were depth, wind and knot meters. When I purchased the boat only the wind and knot meters were operational. I pulled out all of the wiring and the head unit. I also think at some point there was a pedestal mounted display of some kind because I also pulled a wire labeled display out from under the cockpit that ran up into the pedestal.

I’m going to jury rig the Maretron DSM250 into that huge hole and at some point replace the entire wood panel holding all of the electrical and electronics.


Maretron NMEA 2000 Network and Instruments Installations

Posted on Fri 06 August 2010 in Maretron

20100806-DSC_8802

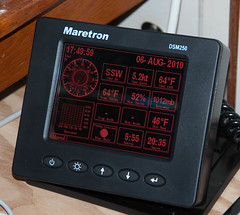
There’s a shot of my Maretron DSM250 (in red on block mode) displaying data from my NMEA 200 network I finished roughing in last night (or I guess this morning) about 0200. I’m calling it a rough-in because I still need to go back and secure all the wiring, mount the display and the GPS, etc. but I was to plug it all together, fire it up and it worked right out of the gate!

20100806-DSC_8803

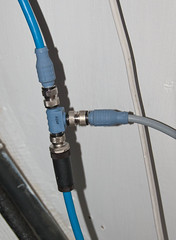
Here’s a shot of the a “T” installed showing the backbone in blue and the drop cable in grey. The black fitting is a field installed fitting whereas the other two are factory pre-installed fittings. The field installable connector has some pretty small screws and was a tad tricky to line everything up, but that is probably due to my large meat hooks. I was able to do it just fine. The waterproof fitting that goes over it all was very tight and I’m sure it has a great seal.

right now I have the following in my system:

I plan to add a depthspeedtemperature gauge to replace my Standard Horizon DS50 depth only unit, but I’m waiting for Airmar’s DST900 to come out (it’s a year late according to rumor) which has the D/S/T and no moving parts! That will be awesome! For now, I’m going to Magruber the DS50 onto the network and maybe if that works fine I’ll just live with that (hurry up Airmar!). We also want to add a rudder angle indicator. I just haven’t gotten to that yet.

Tonight I’ll secure all the wiring and figure out where the GPS will be placed.


NMEA 2000 wiring planning

Posted on Sat 31 July 2010 in Projects

Maretron Micro Network Diagram I’ve mostly been working on the rigging lately, but tonight I’m thinking about the NEMA 2000 powertap installation. The Maretron powertap looks like a normal NMEA 2000 T but it has MIDMicro cord coming out of T which you wire up to the DC power system in your boat along with a 4amp fuse (See yellow powertap in the picture). Maretron has a good knowledgebase article on how to do the install but in summary you wire a couple of wires to the 4amp fuse and DC +and the rest to DC –.

I have some other DC wiring I need to clean up that is wired directly off the batteries with no fuses and I don’t want to use a bunch of inline fuses, so I’m going to use a Blue Sea Fuse Block to fuse all these individual items, but do so in a way where I have a single spot to do troubleshooting and add-on future circuits.

I’m hoping to pick up the fuse block tomorrow so I can put in the T which is the first step to getting my NMEA2000 instruments online.


Thinking about data

Posted on Tue 06 July 2010 in Geek

I’ve been thinking about the blog, sailing reports, weather reports and all kinds of information I’d like to collect and share. Principally, I’ve been thinking about the data that will soon be running around my NMEA 2000 network. Some of the data will include course, speed, depth, air temperature, water temperature, humidity, barometer, etc. all of kinds of great info and all of it will have location as well. Has anyone out there taken the full output off their NMEA 2000 network and converted it to timelocation sorted KML entries as Custom Data? If I could get to that then I’d at least able to view the data in Google Maps, or easily convert it to a variety of formats.

I’ll have to ping Kurt at UNH and Nomadness about this.


Mounting the Maretron WSO100 Weather Station

Posted on Sun 18 April 2010 in Maretron

DSC00317

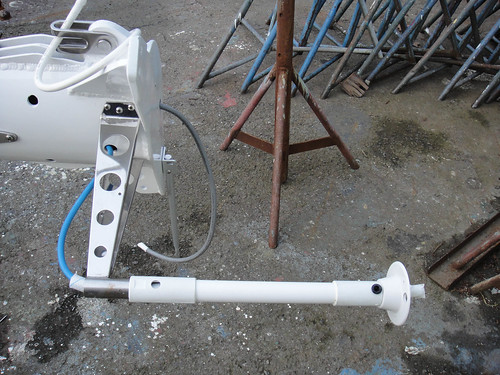
A while back I started doing some research about how to mount the Maretron WSO100 weather station to the masthead. The yard had recommended I use a piece of flatbar and I went as far as ordering a piece and roughing it out, but that approach really bothered me. First the instrument would be directly at mast height level and I felt it would block the nav light too much. Secondly I was concerned it would be low enough to snag the spinnaker.

This weekend while rummaging around Second Wave I happened on a Glomex V9173 TV Antenna bracket (look around prices online range from \$30 to over \$100 for new ones) to which I attached a Shakespeare extension mast. The whole thing cost me about \$40 since I bought everything at Second Wave. This setup avoids the problems I mentioned above and the whole thing weighs less than the flat bar. I still need to make or find some grommets to protect the wires where they exit the mast, but my wiring projects are coming along nicely since I was able to solve this problem.


Setbacks and Problems

Posted on Mon 05 April 2010 in Projects

Systems - Hull Slug: setbacks-and-problems Status: published

This week was full of unexpected issues and problems and very little movement forward on projects.

It started out when we noticed the some leaking with our newly installed portlights, which is fine really, a bit of tweaking was expected. However the leak got into the new wood (which was not marine grade) and caused it to swell. So we’re going to have pull down the new cabin top wood and re-seat the portlights to do that. We are not looking forward to that as the new wood was put up with epoxy, much grinding or demolition is going to be involved in that. New marine grade plywood has been ordered, if you learn one thing from me do not skimp on materials. I don’t normally skimp we did this one time and it bit us hard. Take the time to do it right and use the right materials.

This next one really pisses me off. When I had the yard install the conduit in the mast I also specified that they pull messenger lines to the masthead, spreaders and foredecksteaming light. Well they did that but they didn’t make the holes big enough for the wire. I didn’t specify a size and they didn’t ask so this is really a communication problem (one of many with the yard) but I’m not sure why they would drill any holes without explicitly knowing what size. So, I had to drill new holes in the conduit and snake new messenger lines. Once that was done I find out that I still can’t get the wire to pull through because at the angle I’m pulling (90 degrees right out the hole) all I can do is flex the tubing once the wire has exited. I can’t get any more vertical pull. That lead to an almost complete meltdown on my part. I was thinking I’d had to eat the cost the boat cable and pull primary wires instead. Now I’m thinking maybe I can pull back several feet of the insulation and still pull the wire. We’ll see. I’m sure it’s going to be another week of dinking around with that whereas I expected to be done pulling wires this weekend.

Dawn did make progress on some painting though. When we originally pulled down the hull lining and painted we left all the teak in place that covered the chainplates. We have since removed that teak and pulled the chainplates to clean them up and we’ve decided we’re going to not re-install that teak instead leaving the chainplates uncovered so we can see them and any leaking or corrosion issues. So Dawn has been painting that exposed fiberglass white to match the areas we had previously painted white. This is good because now I can start rebedding the chainplates. I’ll have an entire post on that process.

I didn’t really want to write this post, but I figured it was important so you can all learn from our mistakes and see that doing a refit like this is a lot of work and despite planning things will go awry. So with that unpleasantness behind us we are ready to kick much but in the next couple of weeks with our complete focus on everything needed to re-step the masts.


Weekend of Prepping Spars

Posted on Fri 08 January 2010 in Projects

Al Lou Mini Um

Dawn and I have started our annual cleanse diet which kind of messes with you with the first couple of days (headaches, low energy, weird tummy stuff) but now we’re back to more normal energy levels. We’ve still managed to be down at the workshop though cleaning up some of the aluminum ends from the spars.

Once they are cleaned up we’ll take them over to Asko for galvanizing.

This weekend we’re also going to drill tap and dry-fit all of the electronics we plan to attach to the spars. That sounds pretty simple, but first I have to round up all the bases, get bolts, and then I can start the drilling, tapping, etc. When I am done that I’ll give the green light to to do the final prep and paint the spars.

The final plan for the weekend is to complete some more hose installations including the new strainer for the anchor washdown.

Should be a good weekend of getting stuff done and eating super cleanse healthy.


More Wiring

Posted on Thu 07 January 2010 in Projects

Systems - Rigging Slug: more-wiring Status: published

I've been updating the drawing so it's more detailed than the original version. I'm getting to the point of needing to determine the number and size of things like terminal blocks, ring terminals, heat shrink tubing, etc.. Along with this I'm also getting ready to dry fit everything to the spars down at the yard before the final prep and then painting of the spars. I'm spending a lot of money having these things painted and I'd rather bounce the drill off the unpainted sand blasted spars than the newly painted spars.

Mast Wiring