Mastodon

We're looking for the trash fence...

Checking things off the list

Posted on Fri 09 July 2010 in Projects

More checks from the 4thof July 3 day weekend:

  • Dr LED Kevin spreader lights wired and functional. They need to be aimed to point at the proper deck area still.
  • Cleaned up a lot of stuff. There has been a lot of extra tools and supplies on the boat. Some of it is extra gear we will sell at the next Fisheries Swap Meet, the rest of it was recycled, trashed, or now at the workshop. We have some ash lumber for doing battens if you’re interested in that let me know. We also have a not-straight 1-1/2” bronze prop shaft that could milled down into a smaller straight shaft I assume.
  • Took a ride around the marina in the dinghy on oar power. Dawn loves to be rowed around like a princess. Winkingsmile

Checks from this week:

Mainmast wiring completed !!!  Fly me to an aircraft carrier; Mission Accomplished!! This was huge. I can’t tell you how many WEEKS I’ve spent working on the wiring in the mainmast to have everything working feels awesome!!

  • The following are now all functional: Aquasignal Foredeck & mastlight (aka steaming or masthead light, OGM LED TriAnchor (Tricolor, Anchor with photodiode & Strobe)
  • The TriAnchor is absolutely awesomely bright. I walked around the dock and it was absolutely the brightest thing in the marina including all the lights on shore.
  • The DC breaker board is labeled properly. I used white P-Touch labels for this, I eventually (read maybe never) want to pretty that up.
  • Every DC (+) wire in the wiring closet is now properly labeled. I love my P-Touch (we call it a Pea-Touch) Industrial Labeler!!

Chris Tutmark did the initial tune on the rig.

Put the outboard on the dinghy and took the Dinghy Princess for a ride last night. The ob fired up on the second pull after sitting on the stern pulpit all winter with no winterization. Yamaha is the awesome!!

2011 WA Vessel Registration sticker affixed

Dawn painted the interior wood around the portholes in the head & shower and put the trim back up as well. Just need to re-attach the drip rails which she sanded and polyurethaned.

Lots and lots of stuff completed… many many pics to take and then some write-ups on some of the systems, how I installed things etc.


Proof of progress on mast wiring

Posted on Mon 12 April 2010 in Projects

Before – just a bunch of holes and messenger lines for pulling wires.

DSC00271

After

Notice the tangs for the main loweres, spreaders and the new foredecksteaming light. That wire sticking out is the feedline for the new spreader lights.

DSC00295


A little progress always feels good

Posted on Mon 12 April 2010 in Projects

This weekend the weather was nice and we actually made some progress.

Boat side, Dawn check off some good items:

  • Starboard water tank scrubbed, by hand, through those 4”-6” access ports. No she is not available to help on your boat !
  • Finished painting the hull areas under the chainplates
  • Sealed the deck core where the chainplates  go through the hull
  • Started sanding the chainplate cover plates

WHEW ! Dawn is awesome!!! All of this is in preparation for installing the chainplates which will be weather dependent, but something I hope we can do next weekend.

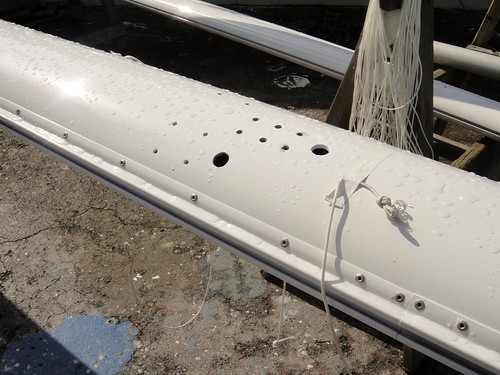
At the yard, I was able to make progress on the mast wiring:

  • Finished mounting the foredecksteaming light
  • Finished mounting all of the tangs on the masts
  • On the spreaders:
  • Mounted the padeyes and flag halyard blocks
  • Pulled the wires through the spreaders for the Dr. Led Kevin Spreader Lightimage

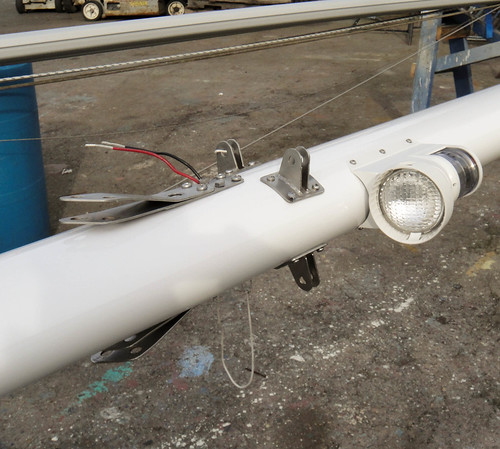
The general wiring strategy has also made a bit of progress. The spreader lights are going to be fed from a single in-mast feed line. The wires in the spreader will be soldered to the feedline, shrink wrapped and supported by a linewire (TBD) that will span the connection. This will put the weight bearing back to the wire and not the soldered connection. The lights will be connected to the line inside the spreader with a disconnect so if the spreader ever needs to be removed it can be done without cutting the wires. *gasp*

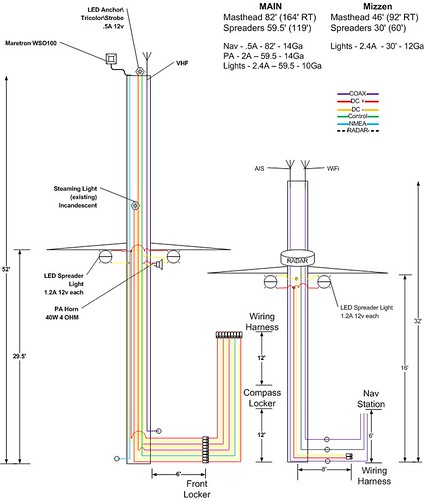
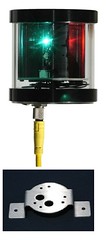
At the masthead I’m pretty much ready to start wiring up the masthead light and the VHF. I only need some grommets to protect the wires where they exit the mast. I’m still not happy with how I’m planning to mount the Maretron WSO100 Weather Stationimage

which is so massive I’m actually thinking I’d be better off returning that and going with the Airmar PB200 which is not wide but is taller. The problem I’m having is how to mount this without adding 20lbs of stainless to the masthead and not blocking the nav light significantly.

So, while we still have a lot of portlight rebedding in our future this weekend we made some great progress… feels good!


It’s all about the angles

Posted on Mon 05 April 2010 in Projects

Since I wrote the last post I was thinking about how to pull those damn wires. I was able to pull one of the wires tonight. I used the messenger line to pull the wire to the exit in the conduit and then I used a second messenger line that I pulled from the masthead inside the mast to pull the wire out of the conduit and up into the mast. This took a bit of time and I had to use a stiff wire to pull on the wire as it exited the conduit. I then used the original messenger line to pull the wire back out the proper exit hole in the mast. Very slow going, but I think I’ve got a strategy to pull the other wires now.


Setbacks and Problems

Posted on Mon 05 April 2010 in Projects

Systems - Hull Slug: setbacks-and-problems Status: published

This week was full of unexpected issues and problems and very little movement forward on projects.

It started out when we noticed the some leaking with our newly installed portlights, which is fine really, a bit of tweaking was expected. However the leak got into the new wood (which was not marine grade) and caused it to swell. So we’re going to have pull down the new cabin top wood and re-seat the portlights to do that. We are not looking forward to that as the new wood was put up with epoxy, much grinding or demolition is going to be involved in that. New marine grade plywood has been ordered, if you learn one thing from me do not skimp on materials. I don’t normally skimp we did this one time and it bit us hard. Take the time to do it right and use the right materials.

This next one really pisses me off. When I had the yard install the conduit in the mast I also specified that they pull messenger lines to the masthead, spreaders and foredecksteaming light. Well they did that but they didn’t make the holes big enough for the wire. I didn’t specify a size and they didn’t ask so this is really a communication problem (one of many with the yard) but I’m not sure why they would drill any holes without explicitly knowing what size. So, I had to drill new holes in the conduit and snake new messenger lines. Once that was done I find out that I still can’t get the wire to pull through because at the angle I’m pulling (90 degrees right out the hole) all I can do is flex the tubing once the wire has exited. I can’t get any more vertical pull. That lead to an almost complete meltdown on my part. I was thinking I’d had to eat the cost the boat cable and pull primary wires instead. Now I’m thinking maybe I can pull back several feet of the insulation and still pull the wire. We’ll see. I’m sure it’s going to be another week of dinking around with that whereas I expected to be done pulling wires this weekend.

Dawn did make progress on some painting though. When we originally pulled down the hull lining and painted we left all the teak in place that covered the chainplates. We have since removed that teak and pulled the chainplates to clean them up and we’ve decided we’re going to not re-install that teak instead leaving the chainplates uncovered so we can see them and any leaking or corrosion issues. So Dawn has been painting that exposed fiberglass white to match the areas we had previously painted white. This is good because now I can start rebedding the chainplates. I’ll have an entire post on that process.

I didn’t really want to write this post, but I figured it was important so you can all learn from our mistakes and see that doing a refit like this is a lot of work and despite planning things will go awry. So with that unpleasantness behind us we are ready to kick much but in the next couple of weeks with our complete focus on everything needed to re-step the masts.


More Wiring

Posted on Thu 07 January 2010 in Projects

Systems - Rigging Slug: more-wiring Status: published

I've been updating the drawing so it's more detailed than the original version. I'm getting to the point of needing to determine the number and size of things like terminal blocks, ring terminals, heat shrink tubing, etc.. Along with this I'm also getting ready to dry fit everything to the spars down at the yard before the final prep and then painting of the spars. I'm spending a lot of money having these things painted and I'd rather bounce the drill off the unpainted sand blasted spars than the newly painted spars.

Mast Wiring


Mast Wiring

Posted on Thu 17 December 2009 in Projects

Mast Wiring

I was going a little crazy trying to remember all of the things we’re wiring into the mast and what kind of wire they needed so I drew it up.

Included in this simple not to scale drawing (my spreaders are not mid-mast) are the wires for the NMEA 2000 instrument, all 2 wire and 3 wire pulls for lights and the PA horn as well as the COAX which is going to be run in the mast. These were run in the mast hanging free and wrapped in foam. As part of the refit we will run PVC conduit inside the mast for the wiring.

Click on the picture for a larger version you can actually see.


Lots of stuff on the masthead

Posted on Thu 10 December 2009 in Navigation

I plan to put a Maretron NMEA 2000 weather station on my masthead and replace my incandescent bulb nav lights with this ORCA Green Machine LED navanchor light. Everything seems great but now I’m thinking how am I going to get these two on the masthead and not have them interfere with each other.

OGM-LED-Mount

The OGM is 2.7” in diameter and 2.7” tall.

WSO100-Mount

The Maretron WSO100 is 4.25” in diameter and 3.45” tall.

Ideally you could stack them, but I’m not sure how you’d route the wire around or thru so it didn't interfere with the functionality of the weather station or the visibility of the light.

I’m sure someone else has done this, another research project…


Dive! Dive! Dive!

Posted on Tue 21 July 2009 in Electrolysis

OK, we’re not in a submarine about to be imploded by a depth charge, we just need to have new zincs put on our prop shaft. Phil checked and verified we had no zincs remaining and then cleaned the shaft while snorkeling over the 4th of July weekend. He has also offered to put the zincs on, but he’s out of town and I was getting a bit freaked by the whole thing so I called Marina Dive Services of Puget Sound (AKA Morgan) based solely on his sign on the bulletin board at the Marina.

He should up promptly, suited up, dove in, scrubbed the shaft and put on the zincs. He also scrubbed the waterline to remove the chin beard Deep Playa had been growing on her bow. I would definitely recommend him, let me know if you want his number or email.

Here’s a video of Morgan cleaning the shaft and prop that I made with my Flip camcorder and waterproof case. I was just laying on the dock with my hand in the water. It was a sunny day, low tide and there was a minimum of crap floating in the water.

Still shots will come later when I process them.


Plumbing Upgrade and Starter complete

Posted on Sun 07 June 2009 in Pearson 424

Raw Water Strainer

This weekend I finished installing the starter. Along the way I decided to replace the bonding wire on the starter to the v-drive with tinned wire because the existing wire was corroded. As I was doing this, I also decided to replace the bonding wire from the v-drive to the raw water strainer because it had broken a few months back. Removing the nut on the raw water strainer lead to the strainer breaking.  The strainer (bronze) was bolted to an aluminum bracket with stainless steel screws and it had started to bend at the hanger points. I was planning to replace this fall when I haul out, but turns out I needed to do it today. I put a board on that aluminum bracket and put in a new raw water strainer. All in all it was pretty simple, the new fittings lined up a bit differently, but the new strainer looks great and will provide years of reliable service! I have one more bonding wire to put in, just need a 8 AWG to number 10 screw ring terminal to check that one off the list.

DSC_4505

I also finished installing the starter this weekend after I painted it and let it dry. It pretty much popped right in, I fastened in all the bolts to the block, put the new bonding wires on and then hooked up the battery cables and starter switch. She started up on the first try and water ran well through the exhaust. Everything is look good!

Shower mixer and nozzle mount

Finally, I finished our plumbing upgrade as well by putting in a new shower mixer valve and handheld wall mount sprayer. The original faucet was a 4” on center individual knobs for hot and cold and had a fitting for the shower nozzle right on the faucet. When I pulled this off the wall I was left with two holes in the whole. I put a Shurflo mixer volume control in the bottom hole and a wall mount for the shower nozzle in the top hole. This completes a project I started last summer!