Mastodon

We're looking for the trash fence...

Proof of progress on mast wiring

Posted on Mon 12 April 2010 in Projects

Before – just a bunch of holes and messenger lines for pulling wires.

DSC00271

After

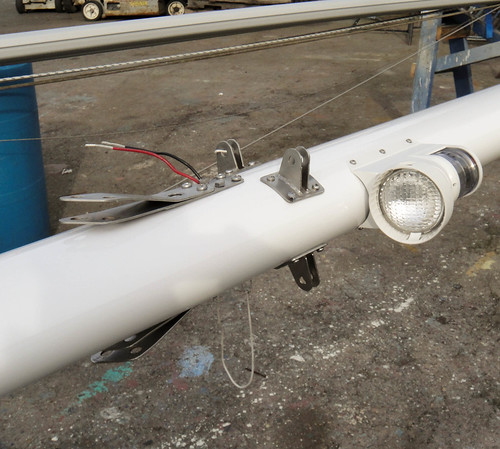
Notice the tangs for the main loweres, spreaders and the new foredecksteaming light. That wire sticking out is the feedline for the new spreader lights.

DSC00295


A little progress always feels good

Posted on Mon 12 April 2010 in Projects

This weekend the weather was nice and we actually made some progress.

Boat side, Dawn check off some good items:

  • Starboard water tank scrubbed, by hand, through those 4”-6” access ports. No she is not available to help on your boat !
  • Finished painting the hull areas under the chainplates
  • Sealed the deck core where the chainplates  go through the hull
  • Started sanding the chainplate cover plates

WHEW ! Dawn is awesome!!! All of this is in preparation for installing the chainplates which will be weather dependent, but something I hope we can do next weekend.

At the yard, I was able to make progress on the mast wiring:

  • Finished mounting the foredecksteaming light
  • Finished mounting all of the tangs on the masts
  • On the spreaders:
  • Mounted the padeyes and flag halyard blocks
  • Pulled the wires through the spreaders for the Dr. Led Kevin Spreader Lightimage

The general wiring strategy has also made a bit of progress. The spreader lights are going to be fed from a single in-mast feed line. The wires in the spreader will be soldered to the feedline, shrink wrapped and supported by a linewire (TBD) that will span the connection. This will put the weight bearing back to the wire and not the soldered connection. The lights will be connected to the line inside the spreader with a disconnect so if the spreader ever needs to be removed it can be done without cutting the wires. *gasp*

At the masthead I’m pretty much ready to start wiring up the masthead light and the VHF. I only need some grommets to protect the wires where they exit the mast. I’m still not happy with how I’m planning to mount the Maretron WSO100 Weather Stationimage

which is so massive I’m actually thinking I’d be better off returning that and going with the Airmar PB200 which is not wide but is taller. The problem I’m having is how to mount this without adding 20lbs of stainless to the masthead and not blocking the nav light significantly.

So, while we still have a lot of portlight rebedding in our future this weekend we made some great progress… feels good!


Additional Baby Steps

Posted on Fri 22 January 2010 in Destinations - Port Townsend

Dawn and I went to Port Townsend, WA last weekend. We unfortunately did not sail instead we took the land dinghy (Subaru Forester) and all of our standing rigging and chain plates to Port Townsend Rigging to have it inspected and plan for its replacement. Port Townsend Rigging comes highly recommended. In fact, I can’t think of any boat services in Port Townsend that people don’t like. I have not had any work done by PT Rigging in the past and this was my first time meeting them.

I had an email exchange with Lisa to get a ballpark estimate and I had a great phone conversation with her as well. Lisa and Dan were flexible and willing to meet with us on a Saturday which we really appreciated. This would allow them to see what we had and to and allow us to make the gono-go decision.

Lisa and Dan are the nicest people and easy deal with. They explained everything in lots of detail which if you’ve seen my wiring diagram you know I love! Even better, they took the time to answer questions not just about the standing rigging but some of my other rigging projects. They even did the unthinkable which is recommend where we could save a few bucks by reusing components of our existing rigging or where my other plans were unnecessary and costly (e.g., custom fabrication Vs. off the shelf parts).

Big takeaway from that is they’re hired. They’re going to do all of our standing rigging. Dawn and I are going to sand and polish our chain plates. We’ll have more on that process in a future post.


Weekend of Prepping Spars

Posted on Fri 08 January 2010 in Projects

Al Lou Mini Um

Dawn and I have started our annual cleanse diet which kind of messes with you with the first couple of days (headaches, low energy, weird tummy stuff) but now we’re back to more normal energy levels. We’ve still managed to be down at the workshop though cleaning up some of the aluminum ends from the spars.

Once they are cleaned up we’ll take them over to Asko for galvanizing.

This weekend we’re also going to drill tap and dry-fit all of the electronics we plan to attach to the spars. That sounds pretty simple, but first I have to round up all the bases, get bolts, and then I can start the drilling, tapping, etc. When I am done that I’ll give the green light to to do the final prep and paint the spars.

The final plan for the weekend is to complete some more hose installations including the new strainer for the anchor washdown.

Should be a good weekend of getting stuff done and eating super cleanse healthy.


The Refit begins !

Posted on Fri 13 November 2009 in Projects

If you follow @DeepPlaya on twitter you know a lot of this stuff, but for those of you who only read the blog here’s the full scoop.

Wednesday afternoon we moved Deep Playa over to A dock where <The Yard> uses the fixed mount haul out cranes (you could pull your dinghy this way) to remove masts. Because the cranes are fixed height you have to time all of this with the right tide to allow them to lift or lower your masts successfully. We got there right on time which in boatyard time means we were early. We milled around then docked and went to work. Basics steps to de-rigging your boat are as follows:

  1. Remove all of your sails and running rigging
  2. Unhook all of your mast lead wiring. This may require cutting some wires, you can add a terminal strip afterwards.\ You might want to lift the mast and see if there any connectors within the mast instead of cutting directly.
  3. Remove any boots around the mast if it is keel stepped
  4. Attach crane to the mast and snug it slightly so it will keep anything from falling over
  5. Pull all the cotter pins from the rig and loosen all the turnbuckles. Depending on your rig some can be removed before others.
  6. Snug the crane
  7. Completely [remove] disconnect all the standing rigging (Thanks Tom for the clarification)
  8. Lift the mast off of it’s step, being careful to lead all the wires cleanly out.
  9. Put the masts on a cart and take them to the yard or lower and fasten them on deck.

So, that’s the ideal way to do things assuming everything goes perfectly. I did not remove my wiring before I got there so I had to quickly do that. I ended up cutting the thick data wire to the RADAR (which I plan to upgrade) only to learn there was a connecter under the mizzenmast. The main could not be picked form its maststep. The aluminum mast was fused to the steel step, horrible combination of metals.

Because they couldn’t get the main out and it was dark we had to wait to finish pulling the rig until the following morning. They managed to get the mast out by grinding off the bolt heads holding the main maststep to the boat, then the pulled the whole mast, step and all up a few feet and knocked the step off the mast with a hammer. With the step removed the whole thing slide right out.

Now that the rig is down the boat was hauled and setup on jacks in the yard.

I spent the remainder of the day removing hardware from the masts. This went much better than the booms. There was a lot more hardware that easily unscrewed. I still have quite a bit left to do, but it feels good to be making progress rather than waiting to start.

You can see more pics of the refit as it goes along in our 2009 Refit set on Flickr.


Cleaning the Boom for Refinishing

Posted on Mon 12 October 2009 in Systems - Rigging

It has lasers

Main & mizzen boomsdo

As part of “The Refit” we’re going to have the spars refinished. In order to that you have to remove all of the hardware from the spars (masts, booms, spreaders). You can pay \$80 an hour to have to the yard do it, or you can buy a \$180 drill press and spend a lot of your own hours doing it. Since we have a workshop, that’s pretty much a no brainer. The Ryobi Drill press was acquired along with some cobalt drill bits (\$45!!!). The drill bits were worth it. They have definitely held up and I’m am very abusive to drill bits. When working with metal you need to let the bits cool down more than I do. when I using standard bits they were burning up lik emad; these are holding up very well.

I broke it

We haven’t pulled the entire rig, just the sails, running rigging and booms. I’ve completely removed all the hardware from bottom booms and only had one real oopsy and that was when I broke the off a piece of the boom end cap that holds the outhaul. I’m not even sure these cast aluminum caps are going to be worth re-using so I’m not that concerned about it to be honest.

Thus far everything has been going pretty well the booms were a good step project to working on the masts when we have the rigged pulled.


Let the Refit Begin

Posted on Mon 14 September 2009 in Interior

I’ve been working on a document describing the refit we plan to do on Deep Playa. I thought it would be good to share it with all of you and see if anyone has feedback but also so others might benefit from seeing what I’m doing.

Here’s the first half of the document, still lots of specifics to figure out, but a good start.

Overview

This refit plan for Deep Playa includes replacing the standing rigging, re-bedding and improving the deck hardware, replacing and improving the running rigging, and new bottom paint and hull polishing.

This section will cover the highlights of the projects by area (Rig, Hull, etc) but the meat of the document with all the details will cover the projects in the phases they will be carried out.

This document will be reviewed with several yards and riggers for additional input and to help select who will do the work.

We like to do our own work where it makes sense (saves us money, teaches us key maintenance or survival skills) but there are times where specific expertise or time consuming work makes more sense to be done by a professional . To what degree we do things ourselves is to be determined.

Standing Rigging

The wire rope standing rigging appears to be original and it is overdue to be replaced. Replacing it involves dropping both masts, replacing all of the wire rope, inspecting an possibly replacing the chain plates, inspecting and possibly refinishing the spars, having new wire rope rigging made and then re-rigging the boat. At the same time any electrical, communications or running rigging projects that affect the standing rigging and the spars need to be done as well.

Planned Upgrades

  • Adding a isolators to the main backstay for the SSB antenna
  • Conduit for in-mast wiring
  • Strong Track
  • Running Rigging Related
  • Route all halyards internally
  • Add Spinnaker and Mizzen staysail halyards
  • Rope clutches for main, mizzen, jib spinnaker and mizzen staysail halyards
  • Inspect sheaves and probably replace, internal routing probably changes them all together
  • Spreader Boots
  • Electronics & Communications

Main

  • Masthead NMEA 2000 weather station
  • Masthead VHF Antenna
  • Masthead LED Anchor and Nav Lights
  • Masthead Davis Windex
  • Spreader LED lights
  • Foredeck Light
  • Hailer Mount
  • Ensure the crane has all that is necessary for planned sails
  • Spinnaker halyard

Mizzen

  • Masthead NMEA 2000 GPS
  • Masthead AIS (backup VHF) Antenna
  • Spreader LED lights
  • Foreword Light
  • Self leveling Radar Mount
  • Ensure the crane has all that is necessary for planned sails
  • Mizzen staysail halyard

Open Issues

  • Refinishing the spars – What’s the cost
  • How many things that are bolted to the spars need replacing?
  • Main and Mizzen reefing are a mess
  • Rigger needs to be identified
  • Rigging Inspection Needed

Running Rigging

All of the lines for the running rigging except for the Jib Halyard and the Mizzen Sheet are in a very sad state and need to be replaced. In addition to that there are several very flawed installations such as the main sheet winch and main traveler which are also functioning poorly. At this point based on pricing and helpfulness I am plan to use Garhauer almost exclusively.

Planned Upgrades

  • Move main sheet winch inboard
  • Replace main traveler
  • Add rigid boom vang
  • Increase main sheet purchase

Open Issues

  • Can I get a bulk discount from Garhauer?
  • Should we do this before we make decisions on our sail maker?

Deck Hardware

Beyond the rigging fittings which will be pulled and rebedded all other deck mounted hardware will be rebedded as part of this the lifelines will be moved to the toe rail as well.

Planned Upgrades

  • New Garhauer toe rail mounts for life lines
  • New lifelines and fittings
  • Bow trim piece is broken and needs to be replaced
  • Moving the windlass foreword and the hawse pipe out of the berth
  • Add additional bow roller

Open Issues

  • Will we use wire rope or line for the lifelines?
  • Should we add any fittings for jack lines?
  • Can we afford new stern pulpits placed on the toe rail? Would include:
  • Bimini
  • Solar Panel mounts
  • Stern reel mount
  • Close the Bow Tank Hole?
  • Will a horizontal windlass be needed
  • Can the existing windlass handle two anchors
  • Will the toe rail track need to be shortened to accommodate the lifeline changes

Hull Work

The main two parts of this project are new bottom paint and polishing the gel coat. In addition to that we want to evaluate all the thru-hulls and see if any might be eliminated as well as make modifications to our ground tackle management.

Planned Upgrades

  • Remove unused thru hulls
  • Toilet overboar
  • Toilet intake
  • Stainless steel on the bow to protect hull from anchors
  • Bow padeye for anchor snubber
  • Rebed and inspect starboard hatch
  • Combine knot meter and transducer
  • Inspect cutlass bearing and plan to replace
  • Upgrade transducer to one with temperature, maybe not a thru-hull; maybe add or instead use fish finder type.

Open Issues

  • Do we “plug” or glass closed unused thru-hulls?
  • Should we close off the galley sink intake?
  • Is the crazing in the gel coat around the hull a problem or just an age issue? Will polishing clean it up? Should we even care?
  • What Hull paint should we use? Need to look at the PS articles and compare NW to CA paint results

Headliner, Portholes and Hatches

Removing the headliner is a necessity todo all the other work; we plan tO replace it at the same time as well. The damaged teak along the cabin top will be covered so it blends with the new white headliner as well to create a visual lift to the salon. The leaky and sealed closed portholes will also be replaced with the New Found Metals portholes we acquired this summer. The hatches are also questionable (the aluminum is brittle in places) and leaky they will be replaces as well while the headliner is out. In the final installation the teak colored strips holding up the headliner will be painted white to blend them with the headliner.

Planned Upgrades

  • New Found Metals Portholes
  • Replace hatches
  • New headliner
  • New cabin top wood (cover up teak)

Open Issues

  • Brand of hatches TBD, New Found Metals is supposed to be making hatches this fall
  • Headliner material is TBD, Originally wainscoting was the plan, are we really over that?

Boat Math

Posted on Tue 21 October 2008 in Classes and Workshops

NOTE: I have updated this entry with accurate chainplate beam measurements.

Here’s some hardcore math as an outcome of my time at the Brion Toss Rigging workshop this past weekend. The point of this exercise is to be able to determine the loads and thus the wire sizes needed for the standing portion of the rigging on my Pearson 424.

Feel free to leave a comment if I messed anything up. I’m sure I did, see the footnotes for caveats and sources.

My Formulas

  • Main Shroud Load = (RM30 * 1.5) / .5 (Beam at the Main Chainplates)
  • Single Spreader Double Lower Main Shrouds
    • Upper Shroud Load – 45% Main Shroud Load
    • Lower Shroud Load – 32.5% Main Shroud Load
  • Mizzen Shroud Load = (RM30 * 0.5) / .5 (Beam at the Mizzen Chainplates)[1]
  • Single Spreader Single Lower Mizzen Shrouds[2]
    • Upper Shroud Load – 45% Main Shroud Load
    • Lower Shroud Load – 50% Main Shroud Load
  • Wire Rating Requirements = The Specific Shroud Load * SafetyFactor

My Inputs

  • DWL = 33’ 8”
  • RM30 = 47000 lbs[3]
  • Beam at the Main Chainplate = 9.54'
  • Beam at the Mizzen Chainplate = 10.83'
  • Safety Factor 2.75[5]

My Findings

  • Main Shroud Load = 14,465 Lbs
  • Upper Main Shroud Load = 17,900 Lbs
  • Lower Main Shrouds Load = 12,928 Lbs
  • Mizzen Shroud Load = 4,246 Lbs
  • Upper Mizzen Shroud Load = 5,254 Lbs
  • Lower Mizzen Shroud Load = 6,423 Lbs

[1] This formula is not in the Rigger’s Apprentice. Brion Toss provided at his workshop 18 October 2008

[2] I have assumed that the load per wire ratios for mizzen mast shrouds are the same as those for main mast shrouds with the same numbers of shrouds and spreaders as in figure 5-25 pg. 138 in the Rigger’s Apprentice.

[3] I derived this number from the RM30 table Figure 5-24 pg. 136 in the Rigger’s Apprentice.

[5] Brion supplied this as a fairly standard constant used in rigging at his workshop 18 October 2008


Brion Toss Rigging Workshop

Posted on Sat 18 October 2008 in Classes and Workshops

image I am in Port Townsend this weekend attending the Brion Toss Rigging Workshop. At the end of day one, its been very worthwhile thus far. The basic flow of the class thus far has been to walk through the systems of a rig, explain what they are, how to think about them in terms of the entire rig, how to inspect them, etc. Obviously the point isn’t to make you an expert in 2 days, but I’m feeling like at the end of this I’ll be a much better informed consumer when we do our re-rig and I think there are aspects of it I could do myself in consultation with someone who is a rigger by profession.

In addition to the classroom there has some hands-on and dock-walking. Its one thing to talk about chain plates, clevis pins, wire and fair leads and then to go look at an actual boat. The hands on activities, drilling a hole in a spar (I never got my entry and exit holes to line-up), knot tying for going up the mast, and splicing an eye into three-strand braid were great. The splicing part was particularly awesome because it took something that I thought was witchcraft and proved to me that I could definitely learn do it and it.

As a rock climber I found some of the knots and practices used in going aloft to be a little riskier than what I am used to and the terminology to be confusing but that’s fine and I’ll probably adapt some of my climbing into my own practices. For instance they will hoist a ratcheting block to allow the person going aloft to raise themselves (using a another halyard as a backup) and using a carabiner hitch to tie-off when at the top. I think I’d rather have a something like a Gris-gris instead, but Brion did mention that could also be an option when were out on the dock so its not like the two are odds with each other. Also people climbed using two carabiners as a belay device for a long time before any specialized devices were made so really for me I think its just a comfort thing for me to use what I’m used to (i.e., they are right too).

We ended the day talking about wire sizes and how to calculate what you need on your boat for shrouds, stays as well as how to calculate chainplate dimensions. That was really interesting and the formulas are pretty simple. I’ll try to work up all the numbers for a Pearson 424 tonight as I’m reviewing my notes.

Its been a great first day and I’m looking forward to tomorrow. I’m off to roam Port Townsend for awhile before dinner.

[gpress map_position="48.11749711017371, -122.75229328459473" marker_title="My Map" map_type="SATELLITE" map_zoom="13"]