Mastodon

We're looking for the trash fence...

Securing the Bilge Pumps

Posted on Mon 25 July 2011 in Systems - Plumbing

“They” say you should ensure your bilge pumps are secured so they can’t flip over, stop working, etc. Deep Playa has two electric and a manual bilge pump non of which were secured. I added an automatic switch to one of the electric pumps and secured the float switch and the two electric pumps.

I used 1/4”-20 threaded posts which were fixed to bases the size of a fender washer. We cleaned the bilge real good and used 5200 to secure these posts to the floor of the bilge. It was a pretty easy project and gives a little more faith in our bilge pump setup.

Bilge pump mounting posts


Spectra Capehorn Extreme Mounting Location

Posted on Wed 18 May 2011 in Systems - Plumbing

Capehorn Spectra Extreme Mounting Location

Last night after about 2.5 hours in the sewer I finished mounting the Spectra Capehorn Extreme membrane and clark pump unit. The unit is mounted on a piece of 3/4" marine grade plywood with 1/4"-20 machine screws and tee-nuts on the back, or in this case the top of the board. I took the unit into the sewer and propped it up on tupperware containers to get it roughly into place. As I laid on my side in the sewer I marked the final location.

The board itself is mounted to two cross-beams supporting the salon floor. I originally had planned to mark the location, pull the unit out, remove the board, then mount the board alone and then screw the unit back to the board. As I had everything in place, I realized getting to the machine screws was going to be a lot harder than getting to the lag bolts so I decided to mount it en masse, with the unit attached to the board.

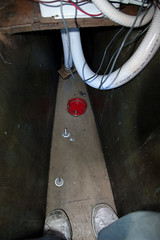
Putting in the aft bolts (the ones you see in the pic) was fairly easy as the sewer is deep and there is a decent amount of room between the rear edge of the watermaker and the refrigerator compressor which sits aft (and out of frame) of the watermaker. Because the sewer is not as deep as you go forward and the mast and maststep impede access, the forward lag bolts are not as easy to reach. Given the impinged space I was only able to get 5 bolts into the board. The forward outer most corner is not bolted. However, the frame of the unit is wedged between the joists and the hull so it's not going anywhere and there is not room for it to wiggle.

I have some concerns that the fact the unit is wedged will cause a lot of noise to be transferred to the boat, but I won't know about that until we turn it on. If it needs to be moved I think the only option will be to angle it more or to find a completely different location. Hopefully it will be fine where it is.

This project isn't done yet, but this was a big step. The membrane is about 40" long and it either takes up an entire settee or the entire workbench in the aft cabin, so just getting it out of the way makes the boat tremendously more pleasurable to liveaboard especially since the other settee is covered with the contents of the hanging locker where all the pumps and controls for the watermaker are installed.

Next steps are to finish all the plumbing and then setup a test run with Emerald Harbor Marine who will come out and look things over before we power it on for the first time. Sooo clooooose to done... ;-)


Spectra Capehorn Extreme Unboxing Video

Posted on Thu 05 May 2011 in Systems - Plumbing

Around the time of the Seattle Boat Show I announced we purchased a Spectra Capehorn Extreme. Since I had just broken my clavicle though, we delayed delivery for several months. Now it’s here and you can watch the unboxing video in all it’s glory!

I’m actually cruising along on the installation, but I’ll save information on that for another post once I get some pictures taken.


Watermaker Decision–Spectra Cape Horn Extreme

Posted on Sun 23 January 2011 in Boat Shows

I woke up this morning feeling pretty good that with the options I had narrowed myself down to that ultimately none of them would be “the wrong decision”. By that I mean, I felt pretty confident they’d all work reliably and I really what I needed to focus on was how I wanted to run the boat and her systems. I decided I want to run on DC augmented when needed by the generator, not rely exclusively on the generator. I’m sure others would be fine relying on the generator though. My main concern was figuring out a way to mount and run the Honda EU2000 while on an ocean passage. I’m sure it could be done, but I just decided I didn’t want to be doing that and that eliminated the AC option for me.

Once I had narrowed my choices down to the DC options, I decided to go with Spectra based on their wide spread usage and claims of great support when issues arise. It also helps that Jack on s/v Whoosh (another P424) did some excellent research on this topic. In order to enhance the high-end output which we could utilize when we are running the generator we decided to go with the Spectra Cape Horn Extreme (CHE).

The Spectra CHE (or Ché as I think we’ll call it) is similar to the Ventura 150 200T series. but it has a larger \~40” membrane and two feed pumps which can be run individually or together. Individually they can operate as a lower-amp solution and redundant backups if one is having a problem. Together they can be run to double the fresh water production but at the cost of more power. This high power option will be perfect for when we are running the generator, whereas the single pump will be ideal for passages and when we want to rely only on solar, wind, etc. Ché is designed for the racing circuit and it’s pumps are a tad more resilient and can deal with running dry. On a race boat this might happen when the boat heels over and lifts the thru hull from the water for instance. On a cruising boat its more likely to happen if you suck something up into the strainer or you do something stupid like forget to open a seacock or something.

I’m very happy with our decision, the guys from Emerald Harbor Marine at the Seattle Boat Show were very helpful, I believe we got a fair price and I look forward to working with them further as we do the install.

One less decision to make, whew…


Watermakers–Ya gotta have Faith…

Posted on Sun 23 January 2011 in Boat Shows

I’m deep into my research about water makers, having met with Spectra, Hydrovane, and Village Marine yesterday at the Seattle Boat Show. I’ve also had extensive conversations with CruiseRO. You can see all the makesmodels and specifications of the units I’ve been looking at in my Watermaker Comparison spreadsheet.

The main debate I’m having with myself is DC or AC based systems. A DC based system has to run much longer to make an equivalent amount of water to an AC based system, but you can run it any time without starting a genset. An AC based system would mean running the Honda EU2000 generator anytime we want to make water including on longer passages.

This is feeling more and more like one of those faith or belief based decisions, as opposed to one that’s entirely gallonamp-hour based. One the one hand with a DC based system we have the opportunity to leverage alternative fuels (sun, wind, etc). With the Generator we’re always committed to burning gas, LPG or Natural gas. We also would be committed to managing the generator and running it on long passages (> 1week).

I’m really torn on this one… I’m hoping there’s something I’m not seeing and that you all might have some additional insight to help me make my decision.


Replacing gate valve with proper seacock

Posted on Mon 22 November 2010 in Projects

Gate valve

On the left is a shot of the original thru-hull for my shower sump. It has a bronze thru hull with a gate (common household hose bib) type valve. It is situated above the waterline unless you’re on a port tack then it’s well underwater. I don’t think it’s not up to code, but it made me squeamish so I am replacing it with a marelon thru hull and ball valve seacock.

There’s a great video on YouTube from Forespar about how to mount Marelon seacocks which I posted previously. I am basically following those exact steps.

I removed the old hose from the barb, the valve from the thru hull and the thru hull from the boat.

I then prepped the inside of the hull by sanding it down to clean fiberglass with a 4” Ryobi angle grinder.

I prepared a 1/2” marine grade plywood backing plate by cutting the wood and coating it with West Systems epoxy. This will be an upgrade over the original installation which has no backing plate.

Next I dry fit everything to make sure it would all fit together and be able to be tightened adequately. – CHECK!

I removed all of the pieces and cleaned the outside and inside of the hull with Bio-Solv (a more friendly   acetone substitute) being sure to get all of the old silicone (yes, silicone) sealant off the hull.

Assembly based on the Forespar video (You will need a helping hand)

  1. Coat the outer part of thru-hull with 5200 (I used fast cure) all the way up to point to where the nut tightens
  2. Coat the back of the backing block with 5200
  3. Insert the outer part of the thru hull into the boat noting the orientation of the internal grooves to prevent it from spinning
  4. Insert the interior backing block over the thru hull
  5. Place the nut on the thru hull and tighten by hand
  6. Clean up any excess 5200 which squeezes out
  7. Use pliers or a board inserted into the thru hull to prevent it from spinning as you tighten the nut with pliers. Don’t over do this, just tighten it enough so the thru hull is tight and doesn’t spin (but don’t try too hard). We’re looking for just tight enough….
  8. Clean up all the excess 5200 from the hull, the backing plate and the threads of the thru hull
  9. Let this setup and cure (24 hours for Fast Cure)
  10. Put plumbers tape on the thru hull threads and attached the seacock tightening by hand.
  11. Have someone keep the thru hull from spinning again and using pliers tighten the seacock so it is aligned properly as in your dry fit, but it may not line up exactly as you did during the dry fit. DON”T OVERTIGHTEN IT. (See Note below)
  12. Put plumbers tape on the hose fitting, thread it into end of the seacock, attach the hose and clamp in place.

Drink Beer !

We’ll be finishing off the interior soon with the DuraFlex paint we’ve been using everywhere, but it will have to warm up a bit for that to be completed.

NOTE: Really what happens is while you’re putting the seacock on the thru hull you’ll snap the damn thing off and have to run half-way across town and buy another thru hull (luckily only \$12). You’ll then redo the thing as outlined above.


DIY Seacock Installation

Posted on Fri 19 November 2010 in Classes and Workshops

I’m in the middle of replacing a gate valve on my boat with a proper seacock and thought I’d share this video from Forespar. It does an excellent job of showing step by step what you need to do.

NOTE: Link lost due to bit rot.


Installing Tank Inspection Ports

Posted on Mon 22 February 2010 in Systems - Plumbing

I wrote about cleaning the tanks before, here’s a great shot that sums up installing the Seabuilt inspection port. Using the rubber gasket you pick your spot, find the center and mark all the bolt holes. Then you cut a hole in the tank and drill out all the bolt holes. Clean up the edges of any loose material and you’re done!

The piece on the right hand side folds in-half and slides into the tank. The second gasket and the solid top piece go on top and is held in place with 1/2” nuts and lock washers.

DSC_7493


Cleaning the Tanks

Posted on Tue 16 February 2010 in Projects

The fresh water system was less that sterile when we bought the boat and we've done a lot of work to raise our water quality. I’ve already talked about replacing all of the plumbing hoses throughout the boat, new faucets, shower, installing a system wide water filter, etc. The last step in all of this is to really clean the tanks.

Pearson 424s have three tanks. 60 Gallons port and starboard under the salon settees and a 50 gallon bow tank. Our bow tank was decommissioned by the P.O. and used as anchor locker. The salon tanks are fiberglass and are structural to the hull, have three internal sections with baffles between each. They are fed by deck fill plates connected to the tanks on the upper foreword end of thanks. There are overflow hoses as well, that I need to go through and ensure they run into the bilge, according to the other P424 owners they were vented into the lockers (lame).

Our port tank has a single 6” aft Beckson deck plate. This is a screw-out plate that is not water or air tight under pressure. The starboard tank has three such plates one in each section of the tank. Eventually, I want to replace all of these with stronger inspection ports and add real gauges so we don’t have to disassemble the settees to look in the inspection port to see if they are full. For now, we’re adding two Seabuilt stainless steel inspection ports to the port tank. I’ll replace the others when there’s not so many other things going on.

The parts have been ordered and I’ll work on getting them installed this coming weekweekend so we can clean the port thank.


Weekend of Prepping Spars

Posted on Fri 08 January 2010 in Projects

Al Lou Mini Um

Dawn and I have started our annual cleanse diet which kind of messes with you with the first couple of days (headaches, low energy, weird tummy stuff) but now we’re back to more normal energy levels. We’ve still managed to be down at the workshop though cleaning up some of the aluminum ends from the spars.

Once they are cleaned up we’ll take them over to Asko for galvanizing.

This weekend we’re also going to drill tap and dry-fit all of the electronics we plan to attach to the spars. That sounds pretty simple, but first I have to round up all the bases, get bolts, and then I can start the drilling, tapping, etc. When I am done that I’ll give the green light to to do the final prep and paint the spars.

The final plan for the weekend is to complete some more hose installations including the new strainer for the anchor washdown.

Should be a good weekend of getting stuff done and eating super cleanse healthy.