Replacing gate valve with proper seacock
Posted on Mon 22 November 2010
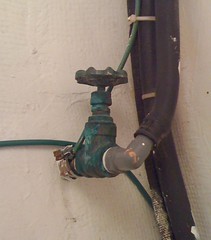
On the left is a shot of the original thru-hull for my shower sump. It has a bronze thru hull with a gate (common household hose bib) type valve. It is situated above the waterline unless you’re on a port tack then it’s well underwater. I don’t think it’s not up to code, but it made me squeamish so I am replacing it with a marelon thru hull and ball valve seacock.
There’s a great video on YouTube from Forespar about how to mount Marelon seacocks which I posted previously. I am basically following those exact steps.
I removed the old hose from the barb, the valve from the thru hull and the thru hull from the boat.
I then prepped the inside of the hull by sanding it down to clean fiberglass with a 4” Ryobi angle grinder.
I prepared a 1/2” marine grade plywood backing plate by cutting the wood and coating it with West Systems epoxy. This will be an upgrade over the original installation which has no backing plate.
Next I dry fit everything to make sure it would all fit together and be able to be tightened adequately. – CHECK!
I removed all of the pieces and cleaned the outside and inside of the hull with Bio-Solv (a more friendly acetone substitute) being sure to get all of the old silicone (yes, silicone) sealant off the hull.
Assembly based on the Forespar video (You will need a helping hand)
- Coat the outer part of thru-hull with 5200 (I used fast cure) all the way up to point to where the nut tightens
- Coat the back of the backing block with 5200
- Insert the outer part of the thru hull into the boat noting the orientation of the internal grooves to prevent it from spinning
- Insert the interior backing block over the thru hull
- Place the nut on the thru hull and tighten by hand
- Clean up any excess 5200 which squeezes out
- Use pliers or a board inserted into the thru hull to prevent it from spinning as you tighten the nut with pliers. Don’t over do this, just tighten it enough so the thru hull is tight and doesn’t spin (but don’t try too hard). We’re looking for just tight enough….
- Clean up all the excess 5200 from the hull, the backing plate and the threads of the thru hull
- Let this setup and cure (24 hours for Fast Cure)
- Put plumbers tape on the thru hull threads and attached the seacock tightening by hand.
- Have someone keep the thru hull from spinning again and using pliers tighten the seacock so it is aligned properly as in your dry fit, but it may not line up exactly as you did during the dry fit. DON”T OVERTIGHTEN IT. (See Note below)
- Put plumbers tape on the hose fitting, thread it into end of the seacock, attach the hose and clamp in place.
Drink Beer !
We’ll be finishing off the interior soon with the DuraFlex paint we’ve been using everywhere, but it will have to warm up a bit for that to be completed.
NOTE: Really what happens is while you’re putting the seacock on the thru hull you’ll snap the damn thing off and have to run half-way across town and buy another thru hull (luckily only \$12). You’ll then redo the thing as outlined above.