Mastodon

We're looking for the trash fence...

Day two .. Bring on the to do !

Posted on Sun 04 July 2010 in Projects

When it comes to list it’s important to remember that length doesn’t matter as much as the magnitude of the accomplishment. Here are today’s magnum sized check marks:

  • Porthole installed in the head and shower. This is the first wave the redo on the portholes. We completely pulled down the drip rail and interior paneling, put up new paneling and (done before today) and installed the portholes with an interior teak ring that allows them to fit better. This was a bigger PITA than planned because one of the “matching” teak trim pieces needed about 3 hours of sanding to fit its matching porthole.
  • Lowered the dinghy from the rafters at the workshop, carted it down to the marina, pumped it up and cleaned it. Dawn took it on a test row and look especially cute doing so!
  • Re-installed the swim ladder. Dawn had some ambitious plans to add teak steps to it, but with the plan to eventually install a wind vane on the stern that didn’t make much sense. We did clean it up though and it looks a lot better.
  • Finally finished off the horrible Ballard organics hand soap which left residue on everything and everyone.
  • Rain and poor attitude lead to a two hour rain delay at Ray’s. don’t’ order that blend they’re offering by the glass. It’s nasty; I sent it back. Just order a bottle of the 2007 Sharecropper’s Cabernet \$30 and easy peasey (no offense Susan).
  • Watched at least 8 firework shows from Golden Gardens. What a great way to wrap up another great day!

Rocking the list…

Posted on Sat 03 July 2010 in Uncategorized

It’s Day one of a three-day-to-do-athon-weekend. Because of my day job, I couldn’t have the rigger come down last week so we are home on the dock for the 4th this year. That gives us time to rock the to do list.

Saturday’s Accomplishments:

  • Finished the ash battens in the aft berth
  • Finished the ash battens in the v-berth
  • Finished the ash battens in all the little open lockers (3 book shelves) in aft berth and salon
  • Teak trim is back in place in the aft berth
  • Teak trim is back in place in the v-berth
  • Main and Mizzen mast track gates polished, isolated from paint with tape and installed with rivets
  • Mizzen and main winch pads covered with isolation tape to protect the the newly shiny masts
  • Mizzen mast winches (2) installed and lubricated
  • Main mast winches (2) installed and lubricated
  • Mizzen Boom installed
  • Mizzen boom gates and mizzen sheet installed
  • Hole drilled in the v-berth foot locker to accommodate new main mast wiring and all wires pulled forward into the wiring harness area. Nothing hooked up yet though.
  • Spinnaker pole dry fitted to mast track - This isn’t done yet, but I verified the pole will definitely fit on the track and the slides to attach it to the track all work fine on the new t-track. This is a HUGE improvement to the usable deck space; way better than storing it on chocks on the stanchions.
  • Dropped the shop-vac (while it was on) off the dock and into Puget Sound - Luckily it also pretty much unplugged simultaneously. I’ll try it tomorrow after it dries out. Fingers
    crossed

Wow, that’s more than I thought… awesome ! The list probably won’t be as long tomorrow, but hopefully we’ll knock off some big projects. Pics will be taken tomorrow as well.


Dremel Tools are Good !

Posted on Tue 29 June 2010 in Projects

DSC_7711

Both sides of this used to look like the right side. A little stainless steel wire brush action with the Dremel and we're approaching nautical beauty. Do you own a boat? Go buy a Dremel tool !


Big Weekend

Posted on Mon 21 June 2010 in Projects

I love to update the blog with checkboxes as we go. Feels good to celebrate the wins and document our progress. As you know we’re working toward stepping our masts on Thursday 24 June.

I got all the pins from Andersen Machine Shop in Port Townsend and they were beautiful. Had a slight mishap with them last week because I put in an incorrect dimension (too long) for some of the pins, but with PT all mail is basically overnight so we were able to send them back have them cut down and get them back in 2 days! I highly recommend Andersen Machine Shop. Olaf is a very nice guy and was very helpful. He made our pins on his CNC machine, they look awesome.  With pins in hand I was able to attach all of the rigging to the masts! I did all that in the pouring “Junary” rain we’re experiencing in Seattle this summer so no pics yet.

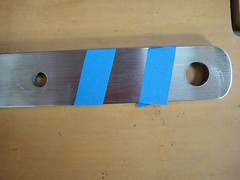
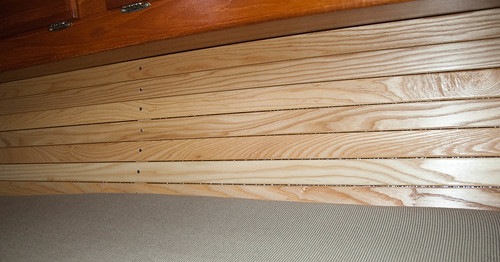
On the boat Dawn has been working on the ash battens to line the aft berth, v-berth and open lockers.

DSC_7633

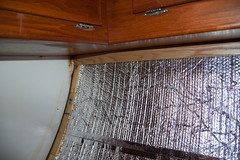
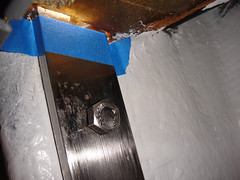
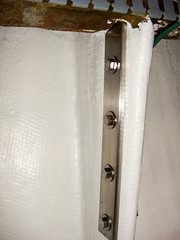
First she’s lining all our lockers with Reflectix Insulation which looks like aluminum foil bubble wrap. We’re laying it in loose along the hull NOT gluing it down. We don’t ever want to have to scrape the hull for a month again. The insulation will keep a tad warmer here in Seattle and a tad cooler in the Tropics. It’s pretty cheap, you can get it at Home Depot and its easy to work with.

Here’s what the battens look like when they are installed. Dawn as always does gorgeous work when I stay out of the way. ;-)

DSC_7635

The only thing left to do before we step the masts on Thursday are to install the mast steps and make some leather grommets for the wiring exits on the main mast. After that I’ll remount the booms and winches along with a couple other things. Right after we tune the rig we should be able to sail again!


The date is set for re-stepping the masts ! ! !

Posted on Thu 17 June 2010 in Projects

I called the yard and set the date for re-stepping the masts ! By this time next week we should have the rig back up !


Custom Clevis Pins Ordered

Posted on Tue 08 June 2010 in Systems - Rigging

I only need this pins and then we can re-step the masts!!

clip_image001

+----------------------+----------------------+----------------------+ | A | .625” (5/8”) | .269” (7/16”) | +----------------------+----------------------+----------------------+ | B | .719” (23/32”) | .563” (9/16”) | +----------------------+----------------------+----------------------+ | C | .125” (1/8”) | .125” (1/8”) | +----------------------+----------------------+----------------------+ | D | .875” (7/8”) | .625” (5/8”) | +----------------------+----------------------+----------------------+ | E | 1.125” (1-1/8”) | .75” (3/4”) | +----------------------+----------------------+----------------------+ | F | .125” (1/8”) | .125” (1/8”) | +----------------------+----------------------+----------------------+ | Material | 316 SS | 316 SS | +----------------------+----------------------+----------------------+ | Quantity | 8 | 6 | +----------------------+----------------------+----------------------+

This post was updated 21 June 2010 with accurate pin size information for the 7/16" pins.


A Little History Lesson about Shilshole & Ballard

Posted on Fri 04 June 2010 in Destinations - Puget Sound


Happy Birthday Admiral Dawn

Posted on Fri 28 May 2010 in Landlubber life

Pirate Dawn

DSC_5478

Munkynap

Happy 29th Birthday (again?) ! Love, Cpt. Peaboy

P.s. Dawn is “The Admiral” as the lady of the boat is so frequently called in the world of sailing, but she’s not a web guru so I can post whatever pics I want of here and there’s little she can do about it but attack me in my sleep. :-)


Installing Rebedding Chainplates

Posted on Tue 25 May 2010 in Projects

DSC_7136

Before

  • The chainplates were previously pulled and cleaned up with a Scrotchbrite pad and water.
  • They were then polished by sanding with progressively finer grades of sand paper starting at 120 grit and going up to 1200 grit.
  • DSC00328 DSC00324 DSC00323 Plates were then dry fitted and marked with tape so we knew how thick the desk was and where to apply the butyl.
  • DSC00342 DSC00338 Butyl rope caulk which we got from New Found Metals when we purchased our potlights was wrapped around the chainplate and then it was inserted into the deck again and through bolted. The butyl you see sticking out here was pushed down into the deck.
  • image The chainplate covers were then placed down with 3M 4200 and screwed into place.

We’ve had some really good rain and no leaks through the chainplates. The chainplates were previously hidden behind teak enclosures, we plan to leave them open so we can inspect them and notice any issues sooner. Plus look how shiny they are !! Dawn did most of the work on this one, I only did some late night sanding. Did I mention how awesome she is?


Things are coming along !!

Posted on Tue 25 May 2010 in Projects

DSC00338

Dawn has finished re-installing the chainplates. She used leftover butyl from the portlight installation to seal the chainplates as they go through the deck and then put the cover plates on with 4200 and screws. The picture is is before she’s pushed all the butyl in.

She’s also been working to fair up the mast partner (where the mast go through the deck into the salon before attaching to the keel) by laying on epoxy and sanding it down. This seals the core of the deck and provides a smooth surface for when we then seal the mastdeck opening with Spartite. Dawn has been kicking much butt!!

DSC_7576

I’ve been finishing up the electrical installations on the masts, attaching all of the other bits that go up there and attaching the rigging to the masts. Along with that I’ve also been doing some Amsteel splicing for fixed sections of the running rigging. This is a pretty simple bury splice that is secured by thru-stitching and then whipping it. Samson has great splicing instructions on their website, this was a Class II 12 Strand Eye Splice (PDF). I didn’t use a fiddle as they show, I used Brion Toss’ Splicing Wands which are absolutely awesome! You can buy them online or probably at your local chandlery.

DSC00371

At this point I’m a couple of properly sized pins and some thru bolts away from finishing up at the yard. Finding the right length of clevis pins is proving to be more of a pain than I had imagined. I don’t know why manufacturer’s don’t make each pin diameter in all the necessary lengths. Now I know my old pins were so horribly long.

I will will also be having <The Yard> make me a new bolt that thru-bolts the main lower shroud tangs. It’s a custom lathed part. This pic is of the original one after it was cut off. Here is one of each side when it was installed.

All of this is goodness and will let us put the rig back up. I am going to order the new halyards this week as well. Once the rig is up we’ll finish up the booms and mount the winches. The main goal though is to get all of the parts and tools out of 3 places and get them all on to the boat so I can work in one place and not run around so much. Progress happens, and when it does we love it !!