Installing the Composting Head
Posted on Wed 08 July 2009
When we bought the boat it had a normal pumping toilet which went to a Y valve for pumping into a a smallish holding bag or through a macerator pump and out to sea. This was an OK setup for blue water sailing and Coastal Sailing in Canada where pump outs are few and far between and holding tanks are not required. We didn’t like this setup for our Puget Sound home waters nor did we like it for when we’re out cruising. Instead we’ve decided to go with a Nature’s Head Composting Toilet. I’ve blogged about that a few time before, but this post will describe the process from beginning to end.
 \
\
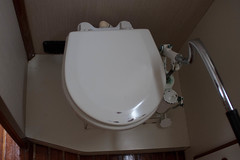
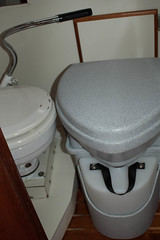
Here is a side by comparison of the two seats to verify the height of the new toilet will be about the same as the old. Notice that the old toilet is sitting on a little platform. Also that the handle is bent (oops).
The first step was to rip out the old toilet, plumbing, holding bag, macerator pump, and close up the through hull. The raw water in came off the drain for the sink in the head so that was fine, but the macerator pump through hull was dedicated and we closed and put a cap on that through hull with only a minor scare as the through hull didn’t really close all the way anymore.
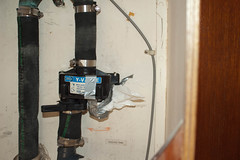
This picture is of the valve which allowed you to pump the holding bag out through the macerator pump. All of these hoses smelled horrible and would have needed to be completely replaced. These hoses are also in a hanging locker which today I’m happy to reports smells like a new house. ;-)
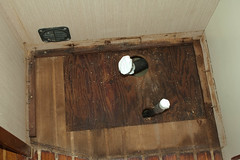
Next we ripped out the old toilet. In this pic you see we have removed the toilet and the little platform on which it sat. The floor here was damp, but not water logged. I ran a heater in here for a few days and it dried out nicely. You can see the plywood subflooring and the teak and holy sole here. We had to bring this all up to level so we put in a 1/2” sheet of plywood (it may have been 3/4” I forget) which was glued in place with Gorilla Glue and screwed down to the sub-flooring. This gave us a level, hmmm ok let’s call it a flatter surface to work with when we went to lay in our tile.
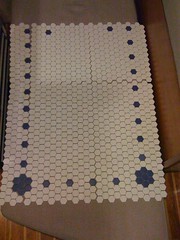
Dawn is the detailed oriented one in our house and but that I mean she does all the detailed design work and finish work when we work on projects together which is usually always. I also operate any heavy machine and anything that beeps when you back it. In this case Dawn came up with the pattern of the tile design, I laid it out and rough tiled it in. Dawn then came in and caulked it, did the final grouting and sealed it.
Next I had to cut the hole and install the vent hose for venting the composting chamber. This was a bit nerve wracking for me because cutting a hole in your boat sounds like a pretty dumb idea to me, but here we go.
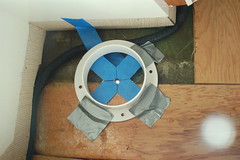
This first shot is how I lined up the hole from inside the head. I had a pretty open area on deck, but the placement from below was more crucial because of the wiring that needs to snake around the vent. The vent is a standard Vetus 3” Mushroom vent. I used one of the finishing trims from the vent and some tape to line it all up. I then drilled a hole in the very center of where I wanted to cut the larger 3” hole. You can see how I lined it all up and the initial center-hole drilled through the cabin top. Notice that half the hole goes through the deck and half also has a some additional wood for holding up the headliner. We’ll need to have the whole are flush for mounting the vent.
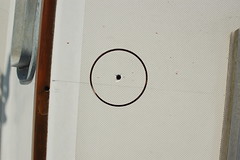
This is a shot from the top side where I have already started drilling through with the 3” hole saw bit. If you’re not familiar with these bits, they have a drill bit in the center and a circular ring of teeth to the size of the hole you want to cut.

This is the plug that was cut out when afterwards. Notice my balsa core is very clean and DRY. That’s a very good thing!
I also think it looks kind of cool and it showed me how my boat was put together.

I mentioned before that we’d need to have the are flush for mounting the vent, so I epoxied up some 1/4” plywood and here you can see that being held in with clamps while it dries. I was doing this in the winter so I put a plastic container over the outside and taped plastic down over that so no water would get on my epoxy work.
At the same time this was being attached, I also put epoxy along the inside edge of the hole I cut. This seals the balsa core from water getting into it.
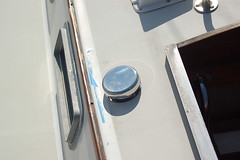
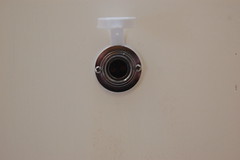
Here’s a shot of the finished vent installation. Shiny. shiny.
The white trim piece you saw a few pics back slides into the hole from underneath and into the bottom of the mushroom vent. The mushroom vent sits flush on the deck. I put some 5200 along the bottom of it and set it into place. The both sides screw into the cabin top separately. There is no clamping load on the deck at this point.
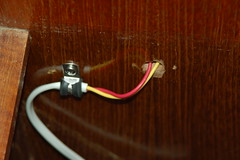
Next I needed to run a wire to the bulkhead behind the toilet to power the computer fan that draws air through the composting chamber. I wired this into its own switch on my breaker panel and put in a two prong DC plug on the wall behind the toilet. I could have hard wired this, but I think the plug is a nice finishing touch and if I wanted I could use that plug for something else.
The first shot shows the wire behind the plug, its in a small locker and then the plug itself. I used Ancor marine grade tinned wire and a Sea-Dog polarized 12volt outlet (PN SDL 426142-1). It was important that the fan be wired correctly, because it wouldn’t just run the wrong direction it would burn out the fan. That’s why I went with the polarized plug.
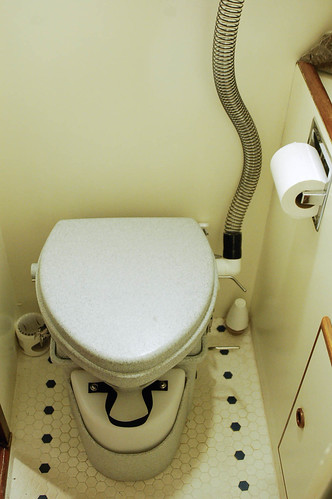
The toilet mounts to the floor with two brackets and then screws into the brackets with handles so i can be removed for emptying. I through bolted the brackets all what through about 2” of sub-flooring with bit washers. That toilet isn’t going anywhere.
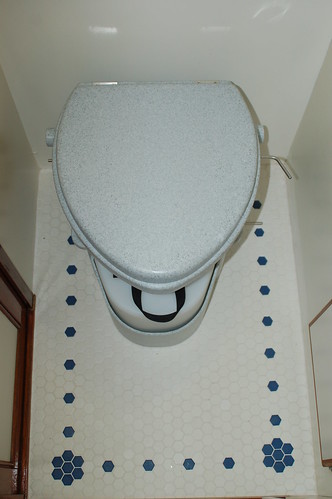
Here are two shots of the almost finished (left) and finished project (right) with the vent hose and new toilet paper holder which Dawn installed. I include both pics because I got the exposure off on the 2nd shot and the tile doesn’t look at nice.
The project was pretty easy even for a newbie like myself. We’ve been using it for several months and have emptied the compost chamber once. It smelled like dirt to me, a complete non-issue. Just like we intended. Having extra urine chambers is a definite must-have as when there are 4 people on board and you’re partying (like on the 4th of July) you’re going to emptying them frequently.
I have a lot more pictures related to this project on the Flickr tagged as Systems: Composting Toilet.
Here are our operating instructions:
- Lift Seat
- Sit Down (yes, even if you’re a guy and you’re just going pee)
- If you just have to do number one, go for it. It’s ideal if you can keep your aim towards the front of bowl so most of your business goes into the urine container.
- If you have to go #2, with your left hand flip the little lever which opens the trap door to the composting chamber. This is not a chamber into which you yourself would want to enter.
- Poop ! The trap door seems to be lined up perfectly for me, but remember “In the hole is better than on the bowl!” © (tm)
- Now your done your #1 and your #2
- Wipe – fold the paper over and set it aside. You are going to throw it away in the trash, not in the bowl.
- Put in one scoop of coir which is stored in the sliding cabinet.
- Close the trap door
- Squirt the bowl with the spray bottle just to wash down any urine in the bowl. 3 or 4 squirts is usually good.
- Turn the crank on the bottom right side (as you face the toilet). Turn it gently 3 or 4 times. If you go crazy with your turns you flip stuff up against the bottom of the top half of the toilet and it makes a mess when I go to empty it.