Mastodon

We're looking for the trash fence...

Final Battery Heater Design

Posted on Fri 06 December 2024 in ADVVAN

My Final Battery Heater Design: Keeping Things Cozy in Winter

This is the heater pad system I put together to keep my batteries from freezing their circuits off in the winter. It keeps the temperature right around 80-90°F, which is warm enough to keep the batteries happy and also doubles as a toasty hand warmer while I'm tinkering with stuff. The pad itself came with a built-in sensor that turns it on when things get “around freezing”, but I wanted more control. So, I snipped that sensor off and hooked it into a smarter setup.

The system is powered by my 24V house batteries and uses a couple of key components to make everything run smoothly and efficiently. Let's get into the details.

Here's what I'm using:

  1. Facon Heater Pad (Model CW-ST725):
  2. Runs at 13.5V and pulls about 78 watts.
  3. Big enough to do the job (about 25” x 7.5”).
  4. I modified this by cutting out its “dumb” sensor, which only turns on when it feels like it.
  5. DROK Temperature Control Board:
  6. This little guy is the brains of the operation. It lets me set exact temperature limits for when the pad kicks on and off. No more guessing.
  7. TOBSUN Buck Converter:
  8. Converts the 24V from my house batteries down to 5V for the control board and other electronics.
  9. It's rated for 75 watts, so it's got more than enough juice to handle this setup.
  10. Home Assistant-Controlled Relays:
  11. These give me full control of when the heater turns on. I can press a button in Home Assistant or let the automation handle it for me.

Power Details (Because Numbers Matter)

  • When Idle: It barely sips power at 0.001A.
  • When Heating: It pulls about 0.48A, which is roughly 12 watts.

How It's Set Up

The wiring diagram I made shows the heater connected directly to the 24V house batteries, but that's not exactly how I'm going to use it. Instead, I'm hooking it up to relays controlled by Home Assistant. Why? Because automation is awesome.

Here's how it'll work

  • Manual Control: I can flip the heater on or off from the Home Assistant app if I just want to use it like a big, warm switch.
  • Automatic Control: I'll set up rules to turn the heater on when temps drop below a certain level or when the van is in “Adventure Mode” (aka, not parked at home).

This setup gives me flexibility to keep the batteries warm when they need it, without wasting power when they don't. It's especially handy when I'm not around to babysit the system.

Eventually, this whole thing is going inside a dedicated winter battery box. The box will help trap the heat and protect the batteries from freezing temperatures. It's one more layer of protection for those really cold nights, especially when the van's out in the wild.

Why I'm Loving This Setup

This design just works. It's efficient, it's smart (thanks to Home Assistant), and it's built with reliable components I know won't let me down. Plus, it's super satisfying to build something that solves a real problem without breaking the bank.

All the parts are available on Amazon, so if you're dealing with cold-weather battery woes, you can totally DIY this. Whether you're keeping batteries warm or just want a heated surface for whatever reason, this setup is pretty flexible.

Alright, that's it! If you've got questions, ideas, or just want to chat about heaters, drop me a comment. I'm always up for a good nerd-out session.

Here's the wiring diagram in case you're a visual person like me.
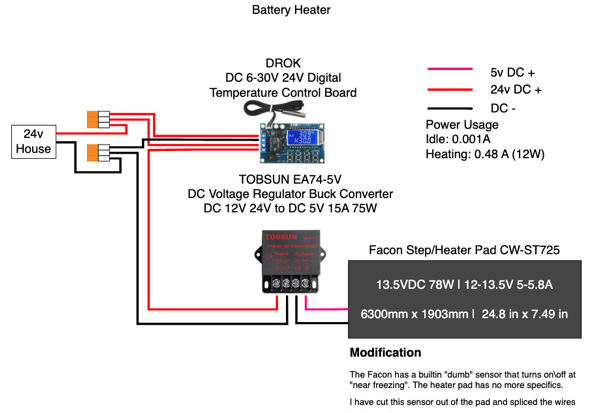
Battery Heater Pad Wiring Diagram


Hydronic Updates

Posted on Tue 16 August 2022 in advvan

Hydronic System Diagram 20220816

After many hours of research, I've answered some of my questions I mentioned in Hydronic System Planning, so it is time for an update.

Did I miss anything? :-)

Yes. since I plan to isolate the house sytem from the engine system, a coolant expansion tank is needed. The expanstion tank cap will be the highest point in the system. It is the kind of tank that is pressurized (7PSI). If the system is too full or boils over, the capp will open and release coolant out the vent hole. It can be run out of the van or into an overflow tank. Overflow tank is nice if you don't want evey spill coolant on the earth or fear you migth overfill. But it is not necessary in our application.

3 Way Valve Control

Can the the EastStart Pro control the Eberspächer 3-way valve so I can run the coolant pump and circulant coolant through the plate heat exchanger? I believe residual heat mode will run the pump, but I’m not sure about the valve.

No. The EasyStart Pro only connects to and controls the furnace. It can not control the Silencio 2 (air matrix \ radiator) or the valve.

Further, the Eberspächer valve is an automated valve, not a relay controlled valve. It is not suitable for this use case, where we want to control water flow to our preferences.

Can also add the EasyStart Web to the system?

Yes. But Not in the U.S. This controller has its own builtin in LTE connectivity. It is only available in certain countries.

Silencio Contoller

I’ve looked through the EasyStart Pro Installation, Instruction and Wiring diagrams. I don’t see how the EasyStart Pro wires up and how it controls the Silencio 2.

Sadly, it does not also control the Silencio 2, or any air matrix \ radiator fans. This is very disappointing as it means having to controllers. Seems like a real miss. In an Air heater solution, the Pro will control the whole system, this limitation is only for the hydronic heater.


Hydronic System Planning

Posted on Fri 29 July 2022 in Advvan

First system design discusion !

I've looked at several paths to achieve a comfy camper with warm showers and hand washing. This can be done many ways and you can find them all online, so I won't get too far into the other options. But this approach with a single Eberspächer Gasoline furnace which heats coolant that is then used to heat water or the camper was my preferred approach. The main advantage to me was the single furnace system and not using AC (see the common Bosche heaters) except when on shore powr.

The main goals and requirements of the system are as follows:

  • Runs off the gasoline fuel tank
  • Camper heating while driving and camping
  • Water heating while driving and camping
  • Shore power water heating
  • Engine system isolated from camper and water heating
  • Engine coolant heat can be used to heat water without extra furnance
  • Remote (over the internet) Control

System Diagram

Hydronic System Diagram

Major Components

  • Eberspächer S3 Economy B5E Kit Part Number: 29.2135.30.0021
  • S3 B5E gasoline (petrol) furnace w\ High Altitude
  • Water (coolant) Pump (12v)
  • Fuel pump (12v)
  • EasyStart Pro Controller
  • 300mm Fuel Pickup
  • Muffler
  • Wiring harness
  • and more …
  • Silencio 2 Air Matrice (12v) Part Number: 41T0034
  • Eberspächer 3-Way Valve (12V) Part Number: 29.2180.01.0030
  • Kuuma 6gallon Hydronic Water Heater (w\AC heater)
  • Single-wall plate heat exchanger
  • T Check Valve
  • Coolant reservoir

Remaining Open Items

  1. Did I miss anything? :-)
  2. Can the the EastStart Pro control the Eberspächer 3-way valve so I can run the coolant pump and circulant coolant through the plate heat exchanger? I believe residual heat mode will run the pump, but I’m not sure about the valve.
  3. Can also add the EasyStart Web to the system?
  4. I’ve looked through the EasyStart Pro Installation, Instruction and Wiring diagrams. I don’t see how the EasyStart Pro wires up and how it controls the Silencio 2.