Mastodon

We're looking for the trash fence...

More Wiring

Posted on Thu 07 January 2010 in Projects

Systems - Rigging Slug: more-wiring Status: published

I've been updating the drawing so it's more detailed than the original version. I'm getting to the point of needing to determine the number and size of things like terminal blocks, ring terminals, heat shrink tubing, etc.. Along with this I'm also getting ready to dry fit everything to the spars down at the yard before the final prep and then painting of the spars. I'm spending a lot of money having these things painted and I'd rather bounce the drill off the unpainted sand blasted spars than the newly painted spars.

Mast Wiring


New Year, Same boat projects

Posted on Sat 02 January 2010 in Projects

Ticked a few things off the to do list the past few days.

New Years Eve day, Dawn worked on the masts and booms filling all the holes we don't need anymore with Belzona 1111. Thanks to at for helping us get started. Dawn is really good at these kinds of projects that require being neat and detailed oriented. I'm better at breaking things an making a mess.

The bilge hoses have all been replaced. This took a little longer than planned because I used stiffer hose which added some unforeseen complexity. It also became delayed due to an apparent shortage of 316 SS hose clamps in the size I needed. Fisheries Supply in Seattle is horrible at managing their stock, but their prices are better than West Marine. Included in this a Perko bronze strainer for the manual bilg pump and an inline check-valv on the stern end of the secondaylarge bilge pump. I am considering walling off the aft-most section of the bilge to minimize the area which stays wet. We would place the primary pump in that section but if we had more water than that then it flow over the wall and we would kick on the secondary pump. We also need to put a float switch on the primary bilge pump, currently it is only enabled by the breaker switch.

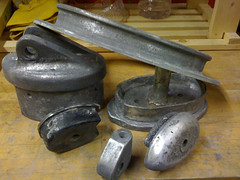
The Walter Machine RV-20 V-Drive has a raw water cooling chamber on the top of it which is prone to corrosion. Eventually it can corrode through allowing sea water to mix with the oil in the bottom half of the v-drive where all the gears are. This would be bad. Several owners have cleaned up the corrosion and used Marine-Tex to protect the area before hooking everything back up. Some owners (including my surveyor who also owns a Pearson 424) have removed the raw water cooling altogether. The corrosion in my unit is so bad that it damaged one of the bolt holes used to attach the top plate to the v-drive so I am going the route of leaving the unit dry. So now instead the raw cooling water going from the strainer to the v-drive and then to the egine it now goes directly from the strainer to the engine. I will install a temperature gauge on the v-drive to monitor it for overheating and I left the hoses in place so I could hook it up back if it ever did overheat. Eventually we will probably replace the v-drive, but that is not something we wanted to do right now.

I have not finished this yet, but the anchor washdown pump was not protected by a strainer. I purchased all the hoses, clamps and the Sherwood strainer. This will get installed completed tomorrow. I would have finished it today, but I forgot to buy the mounting bracket.

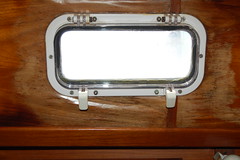
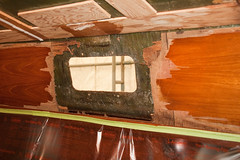
I also capped off the vent thru-hull that used to be part of the holding bag system. I will also being putting a plug on the inside portion of the deck fiting for pumping out. I thought about removing and glassing these closed, but I don't this it's neccesary, capping them of is adequate redundance. I also put a plug in the thru-hull I eventually plan to use for the water maker. It has a ball valve, but I like the added security of the plug as well. This is something we'll do just before we plan to leave.

All in all it was nice to tick a few thing off the list, but we still have a ways to go!


Website Upgraded

Posted on Mon 28 December 2009 in Geek

I finally upgraded the site to DotNetBlogEngine 1.5 so I'm guessing all you newsreader users just got all the posts again. Sorry about that. Jason from sv Hello World had said was reposting the entire feed every once in a while. Let me know if it still does that.


Making progress a little bit each day

Posted on Sun 20 December 2009 in Uncategorized

Every project has those days that seem to go on forever where you make baby step type progress but nothing gets to 100% complete. Here’s a bunch of things Dawn and I ticked off the list this weekend:

  1. Removed mizzen chain plates for cleaning and inspection. We now have all of the chain plates pulled
  2. Pulled new bilge hoses but not hooked up yet. I need a few more hose clamps and need to clean the base standsscreens then I can hook it all back up.
  3. Removed the prop shaft coupling from the v-drive so we can send the shaft, coupler, prop out for inspection.
  4. Removed the mizzen mast step for cleaning, inspection and refinishing. The lag bolts that hold the step in place were completely corroded such that there was no useful head to apply a socket. I had to grind the head of the bolt off with the Dremel tool and then pry the step off of the posts which remained.
  5. re-installed the hose for the heater. There was a 4” paper tube that ran from the aft berth to roughly under the starboard companionway where it connected to a T. This tub had become cut and did not seal well so I replaced it with a plastic HVAC tube from Trident that appears much better suited to being on a boat than corrugated paper. When I initially ran it through the bile I didn’t notice that it was probably going to rub on the drive shaft, which would have not been good. It’s now re-routed clear of the shaft.
  6. Cut the fiberglass and have everything laid out to repair the shelf tabbing in the v-berth. When they reinforced the v-berth they had to grind out the epoxy I had used to repair the tabbing so they could get a good clean non-epoxy contact area. I have to go back and put the tabbing again, that should be pretty fast when I decide to do it since I have everything cut and just need to mix up the epoxy and lay it up.
  7. Worked on the cutlass bearing. It was recommended that I cut a notch out of the cutlass bearing which would allow it to be removed without using a press. I’m having some problems getting a clean cut without impacting the strut so I’m  on hold with that right now. I’ll get back to it this week.

Nothing finished, but still that’s a pretty good weekend!


Mast Wiring

Posted on Thu 17 December 2009 in Projects

Mast Wiring

I was going a little crazy trying to remember all of the things we’re wiring into the mast and what kind of wire they needed so I drew it up.

Included in this simple not to scale drawing (my spreaders are not mid-mast) are the wires for the NMEA 2000 instrument, all 2 wire and 3 wire pulls for lights and the PA horn as well as the COAX which is going to be run in the mast. These were run in the mast hanging free and wrapped in foam. As part of the refit we will run PVC conduit inside the mast for the wiring.

Click on the picture for a larger version you can actually see.


Open Source Navigation Software

Posted on Tue 15 December 2009 in Geek

Great write up from Bob (a fellow Pearson 424 owner) about open source navigation software.


Mounting Idea

Posted on Fri 11 December 2009 in Navigation

Maretron WSO100 Mount

I emailed Maretron support when I was thinking about how to mount the WSO100 on my masthead and they sent me some pictures of a customers installation. I assume that’s a 1” piece of stainless steel pipe. Looks pretty good, maybe a tad on the heavy side.

It looks nice though, that’s for sure. There are a few more pics in my flickr account.


Lots of stuff on the masthead

Posted on Thu 10 December 2009 in Navigation

I plan to put a Maretron NMEA 2000 weather station on my masthead and replace my incandescent bulb nav lights with this ORCA Green Machine LED navanchor light. Everything seems great but now I’m thinking how am I going to get these two on the masthead and not have them interfere with each other.

OGM-LED-Mount

The OGM is 2.7” in diameter and 2.7” tall.

WSO100-Mount

The Maretron WSO100 is 4.25” in diameter and 3.45” tall.

Ideally you could stack them, but I’m not sure how you’d route the wire around or thru so it didn't interfere with the functionality of the weather station or the visibility of the light.

I’m sure someone else has done this, another research project…


Evolution of a Porthole

Posted on Wed 09 December 2009 in Projects

Before

Porthole Water Damage

Demolition

DSC_7121

Almost Done

image

This is actually a shot of the dry-fit, but they look the same. The headliner is still down and the white you see around the portholes is just the primer. We do plan to paint them white though along with the headliner.


Shilshole Bay Marina Tenants Meeting

Posted on Thu 03 December 2009 in Destinations - Shilshole Bay Marina

Officially it’s called the Dock Captain’s Meeting, but everyone’s invited so I’m going to call it a tenants meeting.

The meeting is Tuesday 8 December 6pm at the Corinthian Yacht Club.

If you have a boat at the Marina and can make it I highly recommend you do!