Mastodon

We're looking for the trash fence...

Battery Heater - Facon Test

Posted on Mon 23 October 2023 in ADVVAN

Facon Heater Pad Wires

In the previous post I did some testing of a battery heater system and the pads were able to melt XPS foam. I was concerned about this and wanted to do some testing with pads from Facon which are used in the RV world for tank heaters.

The Facon pads are desinged to be used at 12V and draw about 4-6 amps depending on your voltage. They have a built in hard-wired temperature sensor that turns the pad on when it is "near freezing". There is not a specific temperature mentioned.

I wanted to test these pads at different voltages to see how hot they get. I would not plant to use them with their own temperature sensor but rather with the DROK temperature controller I used in the previous test.

Modification

At first, I thought I had ordered pads without the thermostat they advertise because the it is just a pad with two wires coming out of it. I had assumed a thermostat would be am external device. I was wrong. The thermostat is built into the pads. It is inline with the positive wire, under the foam approximately 1 inch (2.5cm) from the heating wires. I believe as-is the heater would likely cycle on and off quite a bit as the thermostate is sensing the temperature of the pad and not the ambient air or the tank\battery it is heating.

To modify the pads, I pealed back the glue, and the black tape covering up the positive and negative wires. I then cut the positive wire, removed the thermostat and used a wago connector to rejoin the wires. In this configuration I used my benchtop power supply to test the pads at various voltages.

Facon Heater Pad Wires Facon Heater Pad Wires

Test Results

Voltage Amps Temp (F) Range
25 8 Hot very quick
12 4.7 115-145 F
5 2 90-95F

At 5v, and in an enclosed space, I think these heater pads would be perfect for batteries. They are not going to melt anything and they will keep the batteries warm. You could argue they'd heat more slowly than at 12V but I think that is more of a benefit than a problem.


Battery Heater

Posted on Sat 14 October 2023 in ADVVAN

Battery Heater Test Setup

As the fall sets in and the winter is coming, I did some test of a battery heater system. The parts of this system are:

The DROK temperature control board is a nice little board with a temperature sensor that can be used to control the output. The temperature sensor is a thermistor that is attached to the board with a 2 pin connector. The board has a 3 pin connector for the output. The output can be configured to be on when the temperature is above or below the set point. The board only supports Celsius display and settings.

The heaters are 12V 15W silicone pads. They are 50mm x 100mm.

At 24.8 Volts

With the heating pads off the DROK draws 0.001A. The heating pads draw 1.377. The pads reach over 300F!!

At that temperature they are hot enoogh to melt XPS foam very quickly. They did not seem to have any effect on the Coosa board.

NOTE: I am considering these materials in my winter battery enclosure.

Comparisons at other voltages:

Volts DC DROK Only (A) Pads On (A) Pads Temp. (F)
24.8 0.001 1.377 300 (open air)
13.8 0.004 0.773 190 (covered 5 min)
12.0 0.006 0.690 220 (covered 25 min)

The 12V test was done with the pads covered with a piece of XPS foam for over 15 minutes. I was reading 200F max, but usually around 190F. At 25 minutes, I did checked again and it was 220 and had started to melt the XPS. I uncovered the pads and they cooled down to 190F rapidly. The room I was in was 71.2F.

I then set some 1 inch wide by 1/8" thick aluminum bar on the plates and let is sit for 10 minutes. The temperature of the bars was max 93F and as low as 77F in the end not under the pads.

Next test was to use the aluminum bar and set the XPS directly on the bars. 10 minutes in max temp was 122F and the pads were around 135F. The XPS was not melting.

I'm not decided exactly how I will go but I thought this was interesting and worth sharing. Some thoughts:

  • Definitely do not want to put the XPS directly on the pads. I'd even say not on the aluminum bars or other heat sink either to be safe.
  • Definitely want to run at lower voltage. I did test at 5V and the pads did not get warm at all so 12V it is.
  • A heatsink greatly reduces the max temperature of the pads even when covered with the XPS there was enough air movement to keep the pads from getting too hot and melting the XPS.

Adding GPS to Victron Energy System and Home Assistant

Posted on Wed 06 September 2023 in ADVVAN

I have been working on a project to add GPS based location updates to my van automation. This will allow me to track my location and the location of my van on a map. I will also be able to use this data to trigger events and fetch location specific information (ex: weather) in Home Assistant.
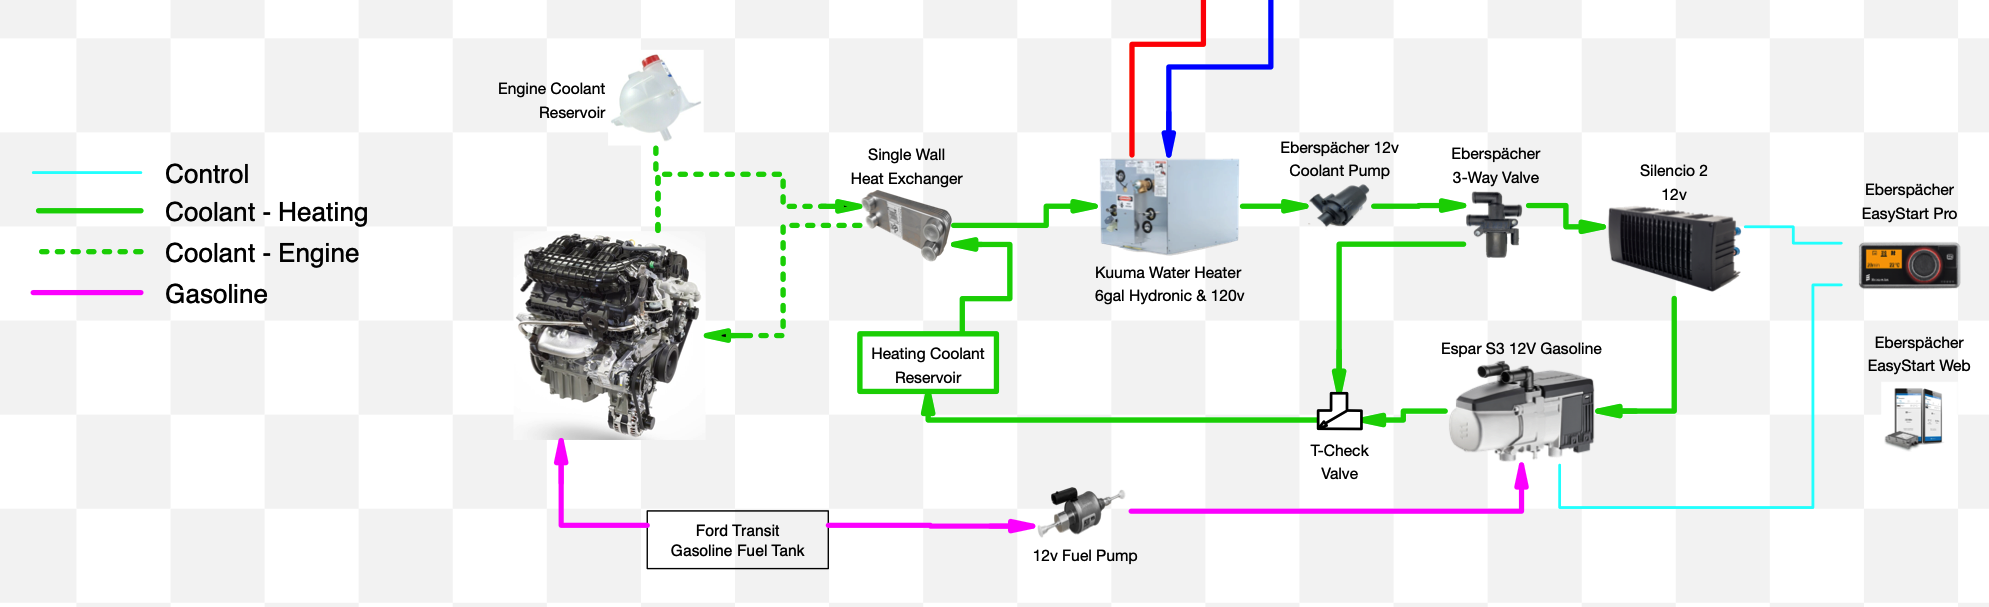
Hardware

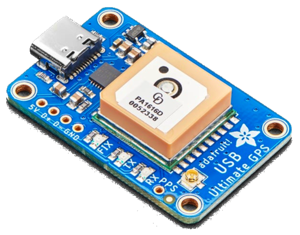
I am using a Adafruit Ultimate GPS with USB and a Parsec Belgian Shepherd 7-in-1 Antenna which will also provides external LTE and WIFI antennas for my router.

Adafruit Ultimate GPS with USB Parsec Belgian Shepherd 7-in-1 Antenna

Software

The Adafruit GPS is connected to the Victron Cerbo GX via USB. It was automatically recognized by the Cerbo GX and is then available in VRM and Victron Connect. Victron is integrated into my Home Assistant instance using SFStars's HASS-Victron integration. I had already set this up previously and had to ReScan the GX Device to get the GPS to show up in Home Assistant as entities.

Configuration

Sample Scripts

To test all this, I made several Home Assistant Scripts to write to the logbook, work out how to get the GPS data, and to do some special calculations. These scripts are created in Home Assistant under settings, Automation and Scenes, and then select Scripts. I used the YAML editor exclusively.

Current Location

This is how to access the location set in Home Assistant. This is stored in the zone.home entity which has latitude and longitude attributes. Notice I am using the state_attr() helper not states(). This was non-obvious to me as it does not use use dot notaton object.attribute or object[''] style like in Python and took a while to figure out.

alias: Log Current Location
mode: single
icon: mdi:map-marker
sequence:
  - service: logbook.log
    data:
      name: Current Location
      message: >-
        lat: {{ state_attr('zone.home', 'latitude') }}, lon: {{
        state_attr('zone.home', 'longitude') }}

Update Home Assistant Current Location

This script captures the current location from the Victron attached GPS and then updates the current location in Home Assistant with the homeassistant.set_location service.

I also started to get more advanced here and I'm using script variables at the beginning which makes the code more readable to me.

alias: Update Van Location
mode: single
icon: mdi:crosshairs-gps
variables:
  cur_latitude: "{{ states('sensor.victron_gps_latitude_100') }}"
  cur_longitude: "{{ states('sensor.victron_gps_longitude_100') }}"
sequence:
  - service: logbook.log
    data:
      name: New Location
      message: "lat: {{ cur_latitude }}, lon: {{ cur_longitude }}"
  - service: homeassistant.set_location
    data:
      latitude: "{{ cur_latitude }}"
      longitude: "{{ cur_longitude }}"

Distance between Home Zone and Current Location

This script calculates the distance between the current location and the home location. This is done using the Haversine formula which I found on Omni Calculator and then convterted to Jinja \ HA Script with Chat-GPT4.

If you want to use this, but you prefer Miles over Kilometers, you can change the earth_radius_km variable to earth_radius_mi in the formular for the distance variable

alias: Calculate Distance
mode: single
icon: mdi:map-marker-distance
variables:
  earth_radius_km: 6371
  earth_radius_mi: 3959
  pi: 3.141592653589793
  prev_latitude_deg: "{{ state_attr('zone.home', 'latitude') }}"
  prev_longitude_deg: "{{ state_attr('zone.home', 'longitude') }}"
  new_latitude_deg: "{{ states('sensor.victron_gps_latitude_100') }}"
  new_longitude_deg: "{{ states('sensor.victron_gps_longitude_100') }}"
  prev_latitude_rad: " {{ prev_latitude_deg * (pi / 180) }}"
  prev_longitude_rad: "{{ prev_longitude_deg * (pi / 180) }}"
  new_latitude_rad: "{{ new_latitude_deg * (pi / 180) }}"
  new_longitude_rad: "{{ new_longitude_deg * (pi / 180) }}"
  distance: |-
    {{
      (2 * earth_radius_km) * asin(sqrt(sin((new_latitude_rad - prev_latitude_rad) / 2) ** 2 +
      cos(prev_latitude_rad) * cos(new_latitude_rad) *
      sin((new_longitude_rad - prev_longitude_rad) / 2) ** 2))
    }}
sequence:
  - service: logbook.log
    data:
      name: Distance From Last Known Location
      message: "Distance: {{ distance|round(0,floor)|int}} Km"

This could be made more robust by checking each variable is valid but if everything is working, it works. I did have a problem where all my sensor.victron_gps_** entities switched from ending in _0 to _100 after upgrading HA to 2023.9, this appears to be a known issue.

Final Scripts

... More to come ...


2022 Winter Goals

Posted on Wed 12 October 2022 in ADVVAN

prototype platform bed

The main goal right now is to get the van ready for ski season so we can sleep in the van and be warm. This does not mean a finished interior, but a "campable" interior. We'll be using our Exped mattress, sleeping bags, and our camping kitchen from the Jeep. We'll have a place to sleep, eat and most importantly it will be warm and dry.

In addition to the Minimum Van Project goals, we're also trying to complete some projects which are hard to do to later in the build mostly because they involve cutting holes in the van.

Goals

Platform Bed

The platform bed you see above is just a lazily built prototype. We used 2x12's to create a mounting point for the Ikea Skorva support beams. This is sitting about 38" off the sheet metal floor which will be 36" off the finished floor. We'll be sorting out the final height of the bed and the final bed design in the spring. We want to be able to sit up in bed and have room underneath for our systems and toys like biks, SUPs, skis, etc..

We definitely will not be using the 2x12's as the final bed suport. They are too heavy and take up 4" in width. Even in this prototype, we'll be cutting them down so a platform can extend out beyond and into the wall cavities. The Exped is longer than the area you see Dawn laying down in.

Subfloor

The flooring install is a variation of what many vanlifers do with some slight improvements. We're using 1/2" Coosa Board instead of 1/2" plywood. Coosa board is lighter, as strong, and will not absorb water. Foamular NGX 250 XPS insulation will be used instead of the 150 you can get at big box stores. The 250 can has a higher compression rating and the NGX is a more "green" product. On the bottom Soundsulate 1b mass-loaded vinyl for sound deadening. All of this will be glued together in layers as it is installed. We'll likely hold off on the Lonseal vinyl until spring.

One thing others commonly do is filling in all the ridges in the floor. Its our belief that you will get moisture in the van no matter what you do so you want to allow for air flow and drainage.

I'll provide more details on the electrical and the heating system in future posts.


Installing Amazing Auto Seat Swivels

Posted on Wed 28 September 2022 in ADVVAN

Amazing Auto Swivels Installed

We installed the Amazing Auto seat swivels which are the only option for the 10 way power sears. It seems as though there are manufacturing variations both in the seat swivel and the Ford Transit seat riser as many people report wildly different experiences with the installation experience. For us, it was OK, but we had to hammer down two little tabs on the riser so the seat swivel's holes would line up with the riser's holes. Not a big deal.

One other area of installation disagreement is if you need to disconnect the battery since you are disconnecting the seat wiring which is connected to the air bags in the 10-way leather seats. We did disconnect the battery, but I don't know if it was necessary.

After the installation, I can see it was always going to have been be a huge pain in the butt to access the starter battery under the driver's seat. With this (any?) swivel installed this just get worse. I am planning to add external terminals so we could jump start or charge the van without taking apart the driver's seat.

Battery disconnected

Seat wiring harness

View under passenger seat

Cut off the loop on the back of passenger seat


Ford Transit 3D Scan for Design Work

Posted on Thu 22 September 2022 in ADVVAN

3D Scan and Fusion 360

I went to Calgary, AB back in August to visit Rapid 3D, who sell 3d scans of popular vans. Unfortunately they didn't have a 2022 Ford Transit LWB AWD HR in their inventory, so we worked out a deal for them to scan Van Luna.

I drove up and spent a good night at Robinson Lake Campground before crossing the border into Canada and driving the rest of the way to Calgary. This was my first solo long-trip in the still empty cargo van, and it drives awesome. The Ecoboost has a ton of power and the longer wheelbase tracks straighter and is an easy drive on the freeway compared to our Jeep Renegade's shorter wheelbase.

Once at Rapid3D I met with with Cesar and the gang who showed me around and then got to work. It would take them three days to do the scan and a week or so to prep the files to be usable for DIYers and Upfitters.

RAPID 3D Scan

If you'd like some tips on how to use the mesh files in Fusion 360, Rapid3D put a nice how-to on LinkedIN. Also convenient, Fusion 360's September update had huge perf improvements for working with Meshes.

One of the great things about the accurate scans is using them to place drawn objects and plan as in the picture above. The other useful thing is being able to extract outlines of shapes to use for things like cutting floor panels on CNC.

I'm a novice CAD user, but so far this has been a good process and fun to learn. Thanks to the whole gang at Rapid3D!


Hydronic Updates

Posted on Tue 16 August 2022 in advvan

Hydronic System Diagram 20220816

After many hours of research, I've answered some of my questions I mentioned in Hydronic System Planning, so it is time for an update.

Did I miss anything? :-)

Yes. since I plan to isolate the house sytem from the engine system, a coolant expansion tank is needed. The expanstion tank cap will be the highest point in the system. It is the kind of tank that is pressurized (7PSI). If the system is too full or boils over, the capp will open and release coolant out the vent hole. It can be run out of the van or into an overflow tank. Overflow tank is nice if you don't want evey spill coolant on the earth or fear you migth overfill. But it is not necessary in our application.

3 Way Valve Control

Can the the EastStart Pro control the Eberspächer 3-way valve so I can run the coolant pump and circulant coolant through the plate heat exchanger? I believe residual heat mode will run the pump, but I’m not sure about the valve.

No. The EasyStart Pro only connects to and controls the furnace. It can not control the Silencio 2 (air matrix \ radiator) or the valve.

Further, the Eberspächer valve is an automated valve, not a relay controlled valve. It is not suitable for this use case, where we want to control water flow to our preferences.

Can also add the EasyStart Web to the system?

Yes. But Not in the U.S. This controller has its own builtin in LTE connectivity. It is only available in certain countries.

Silencio Contoller

I’ve looked through the EasyStart Pro Installation, Instruction and Wiring diagrams. I don’t see how the EasyStart Pro wires up and how it controls the Silencio 2.

Sadly, it does not also control the Silencio 2, or any air matrix \ radiator fans. This is very disappointing as it means having to controllers. Seems like a real miss. In an Air heater solution, the Pro will control the whole system, this limitation is only for the hydronic heater.


Awesome Ford Transit

Posted on Tue 02 August 2022 in advvan

"Awesome Lists" are very popular in the tech world. They are well-formatted lists of helpful things for developers many times.

This list is an Awesome Ford Transit Resources List. Curated links to awesome stuff for your Ford Transit.

You can make a pull request to add to the list, or get a hold of me and I'll do it.

Enjoy!


Hydronic System Planning

Posted on Fri 29 July 2022 in Advvan

First system design discusion !

I've looked at several paths to achieve a comfy camper with warm showers and hand washing. This can be done many ways and you can find them all online, so I won't get too far into the other options. But this approach with a single Eberspächer Gasoline furnace which heats coolant that is then used to heat water or the camper was my preferred approach. The main advantage to me was the single furnace system and not using AC (see the common Bosche heaters) except when on shore powr.

The main goals and requirements of the system are as follows:

  • Runs off the gasoline fuel tank
  • Camper heating while driving and camping
  • Water heating while driving and camping
  • Shore power water heating
  • Engine system isolated from camper and water heating
  • Engine coolant heat can be used to heat water without extra furnance
  • Remote (over the internet) Control

System Diagram

Hydronic System Diagram

Major Components

  • Eberspächer S3 Economy B5E Kit Part Number: 29.2135.30.0021
  • S3 B5E gasoline (petrol) furnace w\ High Altitude
  • Water (coolant) Pump (12v)
  • Fuel pump (12v)
  • EasyStart Pro Controller
  • 300mm Fuel Pickup
  • Muffler
  • Wiring harness
  • and more …
  • Silencio 2 Air Matrice (12v) Part Number: 41T0034
  • Eberspächer 3-Way Valve (12V) Part Number: 29.2180.01.0030
  • Kuuma 6gallon Hydronic Water Heater (w\AC heater)
  • Single-wall plate heat exchanger
  • T Check Valve
  • Coolant reservoir

Remaining Open Items

  1. Did I miss anything? :-)
  2. Can the the EastStart Pro control the Eberspächer 3-way valve so I can run the coolant pump and circulant coolant through the plate heat exchanger? I believe residual heat mode will run the pump, but I’m not sure about the valve.
  3. Can also add the EasyStart Web to the system?
  4. I’ve looked through the EasyStart Pro Installation, Instruction and Wiring diagrams. I don’t see how the EasyStart Pro wires up and how it controls the Silencio 2.

Meet Van Luna

Posted on Tue 28 June 2022 in ADVVAN

2022 Ford Transit 350 AWD Cargo Van

16 June we picked Van Luna our 2022 Ford Transit 350 AWD Cargo Van.

We ordered the van in October 2021. Then the waiting and hoping to get a VIN, which is the golden ticket, letting us know our van would actually be built. In April we recieved the email from Ford with our VIN and then we waited for Chris Reade at Evergreen Ford in Issaquah to let us know when the can arrived.

I won't go into every little decisions we make, but as we do our build becuase there are so many good posts and DIY builds we're copying. I will do write-ups similiar to those we did for s/v Deep Playa when I think there is more to share, or when I feel like writing things down.

Here are some common quetions we get asked though:

q: Why Van Luna?

Dawn named the van. We both love to go stargazing and with her silvery paint she just felt like a Luna.

q: Why a Ford Transit?

1) AWD 1) Because they're less expensive and parts are readily available in smaller rural towns.

q: Why not buy a fully built van or a kit?

We enjoy this stuff. We enjoy the project, the learning that goes into the build, and making our own compromises vs. living with the compromises someone else made.

q: Which Transit did you get?

spec value
Year 2022
Make & Model Ford Transit 350
Body Type LWB Cargo Van
Drive Train AWD
Engine 3.6L Ecoboost
Color Silver Ingot

q: How long will the build take?

Forever. :-)

I think we'll always be tweaking it. But the short term plan is to get the van ventilated and insulated so we can use it for rough camping this summer. Then to work on a more permanent bed and heating so we can use it as a ski van this winter.

After that, we'll work on the planned large electrical system and more finished carpentry.

q: What are you going to do with Artie McFarti the Jeep Renegade Trailhawk?

Artie will still be our daily driver and there may be times we plan to go place Luna can't fit or can't get to, that the nimble Jeep Renegade can easily go.