DIY Wi-Fi System
Posted on Thu 14 October 2010
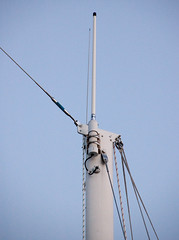
I was reading this post on Panbo about the RogueWave Wi-Fi system which is the same as the Ubiquiti Bullet M2-HP I am using at a much inflated price. Granted I don’t’ have anyone to call for tech support, but for this, it isn’t something I need tech support. Here’s a picture of my setup which I have mounted on my mizzen masthead.
The components
- Ubiquiti Bullet M2-HP\ This is the Wi-Fi Bridge. It connects the network on my boat to external Wi-Fi networks. If you were comparing this to your home system, it serves basically the same purpose as the cable or DSL modem (but different).
- Linksys E3000 Access Point\ This is the network the PCs and iPhones and other such toys on the boat connect to. I picked this one because it had a USB port on it which allows me to have a large USB drive plugged into it and to have all ship’s documents, manuals, PDF catalogs, magazines, etc available to all the computers I let on my network. I can also grab that little USB Drive if I need to ditch the boat and have all my documents with me in electric format as well and hard copies in my ditch bag.
- 12Volt POE outlet – I don’t have a product link for this. I had one from another device and reused it. POE – Power Over Ethernet is standard that allows power (heh!) and data to travel on the same Ethernet cable. This little device has an AC to DC converter wall wart that connect to it. One Ethernet port to connect to the Bullet and another to the Linksys Internet port.
- 50’ Direct Burial Ethernet cable Direct Burial cable is filled with gel so water won’t get into it and wick down inside. This is the Ethernet cable I ran up my mast and connected the POE outlet to the Bullet.
- Digital Antenna 825-WLW Wi-Fi Antenna I was buying a Digital Antenna VHF and AIS antenna so I went with their Wi-Fi antenna as well.
- Blue Sea CableClam + P-Clip Together these hold the Ethernet cable securely as it exits the mast, prevent it from chafing on the hole in the mast and prevents water from getting into the mast as well.
In order to protect the radio and secure it to the masthead I made a PVC sleeve that the radio is inside and the the antenna attaches to. I then made a teak bracket to hold the sleeve to the mast because I couldn’t think of anything better and was running out of time. Here’s the basics on that.
- Protective Sleeve for the Radio\ I didn’t want to leave the Bullet exposed to the harsh UV and rain, so I made a PCV Tube that the protects the Bullet. Here’s how that works:
- Let’s pretend the Bullet is 5” long
- I have a 7” x 2” PVC tube (approximately)
- The Top has a PVC Fitting that has a 1” threaded hole. This end is sealed with silicone and two screws to hold it securely but also to allow it to be taken apart if needed.
- The Digital Antenna 825-WLW threads into the 1” hole on the top of the sleeve.
- The Bullet threads directly onto the bottom of the Antenna
- The bottom of the PVC tubs has an cap with a hole drilled in it to allow the POE wire to exit and is glued onto the bottom of the sleeve with PVC primer and cement, just like when we made the conduit for the mast.
- Custom Mount for the Sleeve
 I could not figure out how to mount the PVC pipe to my mast, so I made
a bracket out of teak that is essentially a rectangle but with a
half-circle routed out of one side, kind of like a U-Chanel. I
bolted the teak to the mast and then used hose clamps to hold the
PVC sleeve in the U channel. This was a tad tricky as I had to drill
some holes through the teak for the hose clamps to pass through.
click this pic to se a close-up of that bracket. I admit it’s not
my best work, but its functional and it’s 40’ in the air so I’m
never going to see it anyway. :-)
That’s all of the pieces and how they go together. Let me know if you need me to write up any more about the wiring or the actual network setup. One thing I will not is that the POE and Linksys are currently running on AC, I plan to convert them to run directly of the DC power in the future.

