Mastodon

We're looking for the trash fence...

Plumbing Upgrade and Starter complete

Posted on Sun 07 June 2009 in Pearson 424

Raw Water Strainer

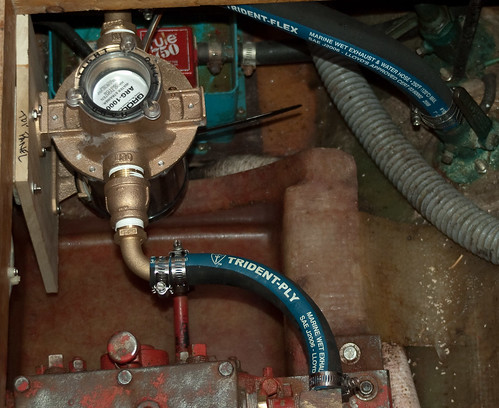
This weekend I finished installing the starter. Along the way I decided to replace the bonding wire on the starter to the v-drive with tinned wire because the existing wire was corroded. As I was doing this, I also decided to replace the bonding wire from the v-drive to the raw water strainer because it had broken a few months back. Removing the nut on the raw water strainer lead to the strainer breaking.  The strainer (bronze) was bolted to an aluminum bracket with stainless steel screws and it had started to bend at the hanger points. I was planning to replace this fall when I haul out, but turns out I needed to do it today. I put a board on that aluminum bracket and put in a new raw water strainer. All in all it was pretty simple, the new fittings lined up a bit differently, but the new strainer looks great and will provide years of reliable service! I have one more bonding wire to put in, just need a 8 AWG to number 10 screw ring terminal to check that one off the list.

DSC_4505

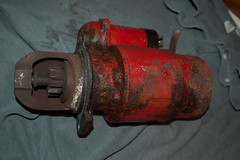
I also finished installing the starter this weekend after I painted it and let it dry. It pretty much popped right in, I fastened in all the bolts to the block, put the new bonding wires on and then hooked up the battery cables and starter switch. She started up on the first try and water ran well through the exhaust. Everything is look good!

Shower mixer and nozzle mount

Finally, I finished our plumbing upgrade as well by putting in a new shower mixer valve and handheld wall mount sprayer. The original faucet was a 4” on center individual knobs for hot and cold and had a fitting for the shower nozzle right on the faucet. When I pulled this off the wall I was left with two holes in the whole. I put a Shurflo mixer volume control in the bottom hole and a wall mount for the shower nozzle in the top hole. This completes a project I started last summer!


My Little Friend the Starter Motor

Posted on Fri 05 June 2009 in Pearson 424

DSC_4476For about two months now we’ve had intermittent luck getting our engine (Westerbeke 58 circa 1981) to start. I at first assumed I had been a batter minder and screwed those up so I did a bunch of tests and they seemed ok. I then started tracing wires and reading up on troubleshooting starting diesel motors in Nigel Calder’s book. That lead the section on bypassing the starter switch and the solenoid itself using a screwdriver. I won’t go into that too much, just to say, its awesome when you do it and a bit scary. ;-) Using that method for the past couple of weeks we’ve been able to get her started. The workaround pointed clearly to a solenoid failure. The plan for repair was to pull the starter and the attached solenoid and either replace them or get them rebuilt.

I started out (no pun intended) by calling up my local Westerbeke dealer Gallery Marine Services and asking them if they did this kind of work. They said “sure we can send it out” and I said can I just contact the place you send them and he totally coughed up Blanchard Auto Electric. I though this was very cool, they could have easily said, “bring it in” and charged me extra. I’ve not done any business with them really but Gallery Marine Services seems like an good place thus far!

I took my starter over to Blanchard Auto Electric and even MORE great service ensued! I walk in and talk to the proverbial guy at the counter. He looks some stuff up in the computer, looks in some books and says well you have two options for a new one. One costs \$260 and the other \$160 (numbers are approximate recollections) and then goes, go through that door into the shop, follow the yellow line on the floor and ask Todd if the one you have now is worth rebuilding. I go back and see Todd who is very much deep in the shop behind a wall of starter motors of all sizes. The only way he could looked more prophetic would have been had he been chanting incantations over a boiling pot of oil and diesel parts. Todd and I talked about the merits of the \$100 price difference and he wanted to tell me to just go ahead and buy the cheaper one, but he knew they had recently changed ownership and wasn’t sure if his past experience would reflect on current quality. So Todd looks at my starter and says let me take a look at tomorrow and I’ll let you know if what you have is worth rebuilding.

I drop my 40lb starter off with Todd and go to work thinking I’d get a call the next morning. Three hours later the same day Todd calls me up and goes, “Well I broke one the corroded bolts on your starter trying to get back open, but I was able to get it apart and the starter is perfectly fine. I put a new solenoid on the starter and you’ll be good to go, come down and pick it up.”

The grand total was like \$85 for everything, totally awesome experience with Blanchard Auto Electric.

All I have to do now is knock the rust off of the starter with a wire wheel on my new Bench Grinder (ah toys!), paint it again and reinstall it, that should be finished tonight if not Saturday and we should be back to dependable starting!


Engine sound proofing

Posted on Sat 23 May 2009 in Interior

DSC_4132

Today I got most of the new sound insulation installed on the engine cover. The old soundproofing was flaking and falling off the boards to which it was attached. The new material is a vinyl foam insulation with a silver Mylar finish from Sound Tec NW. The material is about 2" inches thick with two layers of foam sandwiching a rubber sound and vibration barrier material that is 2 pounds per square foot.

Installation was pretty simple. I took the surround to the workshop (more on that later) and made cardboard templates of each side and the lid. Next I traced teh templates onto the material which I cut using a SHARP drywall razor blade held in my hand with a duct taped finger so I could push really hard. This was pretty easy but I have pretty resilient hands. I think someone else might want to find a better way to cut it. Anyway, for me not a problem. The reason the blade was not in a knife was I need to use the full 2” length of the blade.

Next I dry fit everything together in the shop made a few tweaks and then took it to the boat. Once on the boat again I dry fit everything to make sure it all fit. That out of the way I used spray adhesive putting two coats on the wood and the foam before mating the two together. You need to be really carefully when you do that because the glue is very sticky and separating the two would have been very hard if not impossible with out damaging the foam.

Once the glue setup, which was pretty much instantaneously, I took #9 2-1/2” screws and matching fender washers and attached the foam to the wood. Before placing the screws in the foam I drilled them into a candle to wax the screws. This was a tip from Dave the Sound Tec NW guy. This kept the screws from gripping the foam and tearing it. The screws and fender washers went in without a hitch and I put them in just enough to quilt the Mylar and not so much that I went through the boards.

As you can see from the picture above the material looks great and I can’t wait to fire up the engine. There’s one additional picture on Flickr as well where you can see the individual layers of material. You’ll notice in that picture that only 2 of the three sides are installed. That third side would be impinged upon by the hydraulic prop-brake on my engine (right where the dark spot is) so I either need to remove that brake (which I plan to do eventually) or I need to cut out a window in the insulation so the brake has the room it needs. I also need to finish off the edges with the matching 2” Mylar tape, but that it what we call “detail work” and Dawn is better at that than I am.

Dave from Sound Tec NW was very helpful and easy to work with, I would definitely recommend talking to him if you’re looking to do a similar project. I bought a full sheet of the material and the tape for just under \$200.


Marine Diesel Engine Maintenance & Operation For Boaters- 7306 CSS 122 3D

Posted on Wed 07 January 2009 in Classes and Workshops

That is the title of the class Dawn and I started on Tuesday at the Seattle Maritime Academy which is a department of Seattle Central Community College. We got there at 6pm as the website said, the instructor seemed to be there milling around rummaging through things in the front of the room and people were trickling in and he started the class at 6:30 with barely a hello, barely introducing himself and mostly he ranted on about the facilities maintenance and then he told a pretty long story about the VP of SCCC selling a barge (and losing 9 classrooms and labs which sat on the barge) for \$24K when the barge surveyed for \$94-100K allegedly the buyer sold the barge on EBay for \$130K.

Ooookaaay…… is what I was thinking at this point a little confused and starting to get upset.

He finally started talking a little bit about engines and along the way gave some miss information about biodiesel, gave some smarmy answers to questions about propellers. He also mocked the environmental laws, tax laws, ‘liberals’ as he frequently put it. Its like we teleported Crazy Cooter from the Dukes of Hazard to Seattle and asked him to be as offensive as possible.

In general the guy was a surly boat engineer, that’s fine, but we also didn’t cover very much information, didn’t provide an outline of the class and didn’t give a general engine overview for orientation purposes.

We did cover 2 stroke and 4 stroke cycles, which was interesting. We did cover how fuel usage rates relate to the HP output of the engine, and how that can also be calculated by measuring the fuel exhaust temperature.

I really really hoping the class on Monday was just the guy having a bad day. I was really excited about this class and if its not going to improve I’ll have to find something similar somewhere else, but it will probably cost a lot more. Here’s hoping tomorrow goes much better. He handed out a bunch of handouts I need to read now.. yay homework. ;-)