New Chain Locker and Windlass Relocation Complete
Posted on Thu 30 December 2010
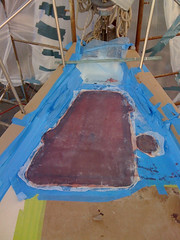
Before


After

Tonight we marked the chain and loaded it into our new chain locker with the windlass. This project has been over a year in the making since it was November 2009 when we removed the windlass from it’s original location and closed up the holes in the deck.
The reasons for moving the windlass were many, but the main ones were to remove the rubber hose hawse pipe from the middle of the mattress in the v-berth (which prevented any cuddling) and to create a proper chain locker in the bow below the original (and useless) foredeck anchor locker.
I did most of the demolition and prep work and <<The Yard>> did all the structural and finish work. Here are some shots of the fiberglass work in progress there are more pics on flickr.


We also installed a bow padeye for attaching an anchor snubber closer to the level of the waterline which is a better angle for the boat to pull on the ground tackle to keep the anchor digging in. It also removes some the up and down motion on the ground tackle as well which should also make the boat rider more comfortable at anchor as well. We used the 1/2” bolts coming into the chain locker to attach an eye nut which I used to attach the bitter end of the chain.
The inside of the locker was prepped, primed and painted by Dawn with Interlux Bilgekote. She used gray primer and white paint to help here see how things were covering. She applied two coats of primer and three coats of paint over the Christmas holiday weekend. She was wearing a full set of coveralls a painters hood and a respirator. I’ve done that when grinding fiberglass and I can tell you it sucks! We originally thought we’d go slap on some paint and go sailing, but it takes 24 hours between coats then you have to sand, clean and put on the next layer. It was not how we planned to spend Christmas, but it looks awesome and I’m confident the fiberglass is well protected!
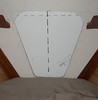
Once the paint was dry Dawn literally went inside the chain locker and we shut her into it so she could place two starboard guides on the inside of the bulkhead so our 1/2” inner panel would have a place to rest and line up properly. It basically fits in place like one giant hatch board. This bears all the weight of the chain. I was originally planning this elaborate and over engineered inner hatch that would also be water tight. Instead we put the original cover board back in place with a single screw on the top. We’re going to see how that goes if our toes get wet then I’ll resort to something more complicated. This is inline with the advice from fellow sailors and comparisons to other boats.
In addition to all of that we added proper up and down windlass foot controls (and control box) on the foredeck, port and starboard chain locker drains and just because we were in there doing stuff I replaced the very corroded port and starboard running lights with shiny new ones. We also re-marked our rode, but I’ll save that for another post. There are more posts in the Systems - Ground Tackle category if you want to see more details.
This means we can go sailing and anchor at fun places!! Woo Hoo !!