Engine sound proofing
Posted on Sat 23 May 2009
Today I got most of the new sound insulation installed on the engine cover. The old soundproofing was flaking and falling off the boards to which it was attached. The new material is a vinyl foam insulation with a silver Mylar finish from Sound Tec NW. The material is about 2" inches thick with two layers of foam sandwiching a rubber sound and vibration barrier material that is 2 pounds per square foot.
Installation was pretty simple. I took the surround to the workshop (more on that later) and made cardboard templates of each side and the lid. Next I traced teh templates onto the material which I cut using a SHARP drywall razor blade held in my hand with a duct taped finger so I could push really hard. This was pretty easy but I have pretty resilient hands. I think someone else might want to find a better way to cut it. Anyway, for me not a problem. The reason the blade was not in a knife was I need to use the full 2” length of the blade.
Next I dry fit everything together in the shop made a few tweaks and then took it to the boat. Once on the boat again I dry fit everything to make sure it all fit. That out of the way I used spray adhesive putting two coats on the wood and the foam before mating the two together. You need to be really carefully when you do that because the glue is very sticky and separating the two would have been very hard if not impossible with out damaging the foam.
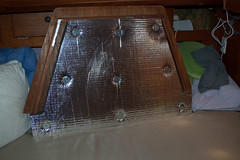
Once the glue setup, which was pretty much instantaneously, I took #9 2-1/2” screws and matching fender washers and attached the foam to the wood. Before placing the screws in the foam I drilled them into a candle to wax the screws. This was a tip from Dave the Sound Tec NW guy. This kept the screws from gripping the foam and tearing it. The screws and fender washers went in without a hitch and I put them in just enough to quilt the Mylar and not so much that I went through the boards.
As you can see from the picture above the material looks great and I can’t wait to fire up the engine. There’s one additional picture on Flickr as well where you can see the individual layers of material. You’ll notice in that picture that only 2 of the three sides are installed. That third side would be impinged upon by the hydraulic prop-brake on my engine (right where the dark spot is) so I either need to remove that brake (which I plan to do eventually) or I need to cut out a window in the insulation so the brake has the room it needs. I also need to finish off the edges with the matching 2” Mylar tape, but that it what we call “detail work” and Dawn is better at that than I am.
Dave from Sound Tec NW was very helpful and easy to work with, I would definitely recommend talking to him if you’re looking to do a similar project. I bought a full sheet of the material and the tape for just under \$200.