Installing Ash Battens
Posted on Wed 29 December 2010
After purchasing Deep Playa, the first project Patrick and I completed was to tear out all the old vinyl foam that lined the entire hull of the boat. After this was complete we prepped the hull and, in some areas, we painted and installed insulation to cover interior spaces and inside cabinetry. This makes a really big difference in the comfort level on the boat especially when sleeping near the hull!
We decided to beautify the interior by adding wood Ash battens in the v-berth, aft berth and the salon cubby holes. I followed Jerry’s recommendations for preparation and installation of the battens with a few modifications. http://www.pearson424.org/interior/Q424walls.html
Materials
- 55 - 2” x 3/8” ash battens cut to 82” long
- Around 10 pieces Fir firring strips 1” x 1”
- West System Epoxy
- Reflectix Insulation
- Varnish
Preparation
I was able to find a local hardwood specialty shop that was able to cut the ash according to my specifications. After receiving the battens I had our buddy, Jim Harris of Classic Wooden Boats, put a ¼ round edge on the battens and had him sand them down. Jim has all the high-end tools and know-how to finish them off beautifully. If you would like to complete the project without outside help, then please feel free to read through Jerry’s detailed instructions for recommended procedures.
I then laid out 20-30 battens at a time to sand and varnish the battens in our workshop. I first sanded them all down using 100 grit sandpaper, both sides and worked my way up to 120, 150 and finished them off with 220 grit. I then vacuumed and wiped them down with a tacky cloth and mineral spirits to remove any debris.
I decided to use a polyurethane varnish with a Satin finish which leaves a nice sheen but not a shiny finish. I applied three coats and sanded lightly with 220 grit sandpaper between coats on both sides of the battens.
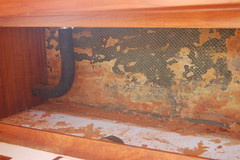
I prepped the hull buy sanding all of the old sticky glue in the areas where the firring strips would be installed. The firring strips will be epoxied to the hull and will provide the surface to fasten the battens. I ensured that the hull was clean and wiped free of dust and residue. As the final step, I wiped them down using Acetone. I first removed all of the trim from the areas and measured the length of the hull and installed three evenly- spaced vertical firring strips in the aft berth and four, each side, in the v-berth. Since some of the trim was going to cover the messy ends of the battens I made sure to include them in the measurements. You don’t want to install the firring strips and then realize the screw heads will look unevenly spaced after the battens are installed. I first tried to kirf the firring strips but then quickly realized that I did not have the skill level or tools to complete the job to satisfaction. After my kirfing was complete, I did not have enough material left to epoxy to the hull.
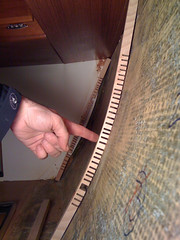
Again, Jerry was obviously much more skilled then I and completed this step on his own. I decided to cut the firring strips into small pieces so they fit snug to the hull. I then thickened up some epoxy and placed the strips on the hull ensuring that they are perpendicular to the berth. I then held them in place with tons of blue painter’s tape. I ensured the strips were straight so that the screw heads lined up after installing the battens. After the epoxy dried I went back and wet down every inch of them with epoxy to ensure that any moisture accumulation behind the battens would not penetrate the Fir strips. To ensure the screw heads lined up straight I took a carpenters’ square and drew a straight line down the middle of each firring strip. This acted as a guide for placing the screws into the battens.
Installation
I then cut pieces of insulation to fit in between each firring strip. I used the insulation tape that is recommended in combination with the insulation to hold the insulation in place. I recommend using Reflectix insulation because it was really easy to use and install. It is eco-friendly and does not require any special handling or protection to install. Reflectix Inc.
I cut the battens to fit starting at the top of the berth underneath the cabinetry and making our way down. I had a foam brush soaked in some varnish to apply to the unvarnished ends of the newly cut battens. Ash wood tends to blacken with age so I dabbed each end and each screw hole with varnish in hopes of preventing this from occurring. I then predrilled the holes through the battens and countersunk the holes. We chose #4 ¾” stainless steel flat head screws. Patrick and I created an assembly line to make the process faster. We would dry fit the batten against the hull. I would drill the holes ensuring that they lined up with the ones above it, then using another drill with a countersink bit, he would countersink the holes I just completed. After this is complete we held up the batten and screwed it into place.
After we completed the process I had to retrofit the old teak trim pieces we removed. I had refinished the varnish on each piece to make it really shine! It took quite a bit of modification to make the varnish trim that surrounds the scupper hose in the aft berth. Since we were pulling everything apart, we decided remove the old hose and replace it with a new one. The new one was less flexible so it stuck out slightly further then the old one.
I repeated this same process in the cubby holes (what we refer to as the “Library”) in the salon.
Some things of note:
I bought way too much Ash wood for the job. I didn’t take into consideration that Jerry’s original project used 1 ½” battens and I decided to go with 2”. So I recommend doing a final measurement on your own to ensure you don’t purchase too much wood.
So if anyone is interested in trying this on their Pearson, or any other boat, please feel free to reach out me. I have some finished Ash battens that you can purchase from me! :0)