Mastodon

We're looking for the trash fence...

Progress on the v-berth

Posted on Mon 07 February 2011 in Interior

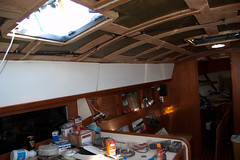
While my clavicle has been healing Dawn has been busy as monkey working to convert the shelves along the port and starboard sides of the v-berth into cabinets. Along with that she's also been working on turning that v-berth seat that a lot of boats have into a cabinet as well. Here's a quick rundown on the progress thus far and the proces:

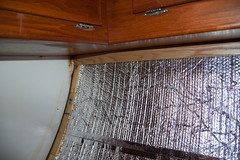
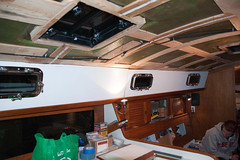
  1. First she pulled the drip rail off the shelves so the new cabinet face can attach directly to it.
  2. Directly above the shelf edge under the cabin top she screwed in two long 1"x1" boards to act as cleats to attach the top edge of the new cabinet face
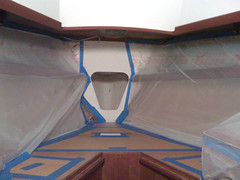
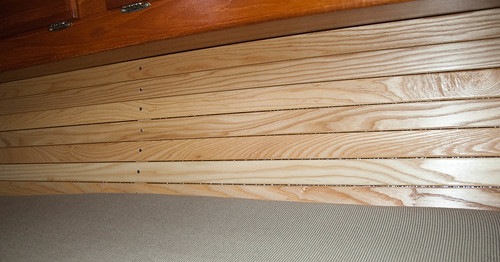
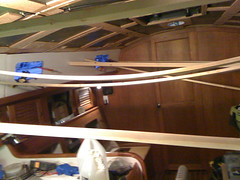
  3. With that done she  made all the templates out for both the port and starboard cabinet faces and the front of the cabinet at the head of the v-berth out of  3" wide strips 1/4" plywood. She takes the strips, clips them in place on the top and botom and then hot glues pieces to the fore and aft edges. This leaves us with a perfect template of the outer edges of the cabinet face.
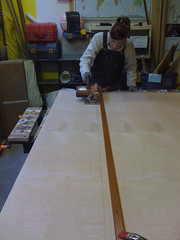
  4. The templates were then taken to the workshop and we cut out the plywood pieces to match the templates. These plywood pieces will make up the front of the new cabinets. The cabinet doors will attach to these boards as well.
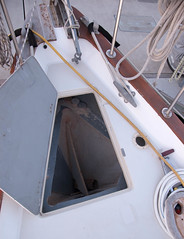
  5. The cabinet under the head end of the v-berth required one additional modification which was to route a 1/2" groove into the bottom of the normal removable seat board so it will slide over and help secure the new cabinet face.
  6. With that done you would think the cabinet faces would just slide right in, not exactly. Not 100% sure exactly what we're not doing right but the final boards always require a lot of sanding to make them fit into place. I know for one we didn't account for the angles of the bulkheads at either end, so in effect the board is always a hair long. She handled that by using the angle grinder to sand back the high spots until the board slid into place without as much pushing and shoving.

We ended the weekend with one cabinet face  fit and two more to go. The next steps after the cabinet faces fit correctly is to determine where the cabinet doors will be placed exacltly, to cut out the holes, place the hinges and latches. With that done we will install the new cabinet fronts.

Many pics and more details to come, I just felt bad for not giving you all an update.


Chain Locker Bulkhead Design and Material Issues

Posted on Wed 08 December 2010 in Projects

Preparing to make a huge
mess

I’m hemming and hawing a bit on the chain locker bulkhead. I need to make a removable panel that keeps the chain and water out of the v-berth. There probably won’t ever be any substantial amount of water in the chain locker, just the normal mess from brining up the chain.

The bulkhead itself is 1/2” thick. The design seems pretty straight forward. I need to make a 1/2” thick piece that fits neatly into the hole and then another 1/2” piece about 1” bigger than the hole. This 2nd piece will be bolted to the bulkhead. Since it needs to be removable and you can’t get to the inside once the panel is in place I’ve decided it will be attached with tee-nuts and machine screws.

I’ve been going back and forth on a couple of things:

Should the panel be bolted on the outside or the inside?\ \ If the panel is on the outside the bolts alone will have to hold the weight of the chain if it rests against the panel. This could be alleviated by putting in a removable set of panel on the inside to bear the weight. A guy at <<The Yard>> mentioned they have done this before and used starboard. Basically it would look like hatch boards.

If the panel is on the inside thee is NO way you’re going to remove the panel without first removing the chain from the locker. This seems like a deal breaker for inside, but I’m already resolved that I will likely add a small water tight deck plate above the panel for quick access to deal with chain castling or other quick inspection needs.

Should the panel be made out of starboard or marine grade plywood coated in epoxy?

Both materials seem fine and I don’t think the plywood would be much cheaper. Joining two 1/2” pieces of starboard seems impossible. I don’t’ think epoxy alone will hold, it would also need to be screwed together. Epoxying two plywood 1/2” thick pieces would be easy and wood is easy to work with. We (pronounced Dawn) also have pretty good epoxy skills. We could put a layer of fiberglass on the inside surface to protect it even more from chain hitting it. We could put a Formica surface on the outside to match the existing bulkhead.

Another option is to use 1” thick material and basically mill the hatch out of the solid material. This would probably be the way to go with starboard.

I’ve looked at G10FRP4 panels and I don’t think they’d be easy to work with especially since I have never seen the stuff in person. I’ve also looked at aluminum and stainless steel sheet metal, but they are way more expensive.

No real conclusions yet, but I need to make my mind up quickly. I’m going to send this to the Pearson 424 list and see what they think if any of you have suggestions please do use the comments.


Replacing gate valve with proper seacock

Posted on Mon 22 November 2010 in Projects

Gate valve

On the left is a shot of the original thru-hull for my shower sump. It has a bronze thru hull with a gate (common household hose bib) type valve. It is situated above the waterline unless you’re on a port tack then it’s well underwater. I don’t think it’s not up to code, but it made me squeamish so I am replacing it with a marelon thru hull and ball valve seacock.

There’s a great video on YouTube from Forespar about how to mount Marelon seacocks which I posted previously. I am basically following those exact steps.

I removed the old hose from the barb, the valve from the thru hull and the thru hull from the boat.

I then prepped the inside of the hull by sanding it down to clean fiberglass with a 4” Ryobi angle grinder.

I prepared a 1/2” marine grade plywood backing plate by cutting the wood and coating it with West Systems epoxy. This will be an upgrade over the original installation which has no backing plate.

Next I dry fit everything to make sure it would all fit together and be able to be tightened adequately. – CHECK!

I removed all of the pieces and cleaned the outside and inside of the hull with Bio-Solv (a more friendly   acetone substitute) being sure to get all of the old silicone (yes, silicone) sealant off the hull.

Assembly based on the Forespar video (You will need a helping hand)

  1. Coat the outer part of thru-hull with 5200 (I used fast cure) all the way up to point to where the nut tightens
  2. Coat the back of the backing block with 5200
  3. Insert the outer part of the thru hull into the boat noting the orientation of the internal grooves to prevent it from spinning
  4. Insert the interior backing block over the thru hull
  5. Place the nut on the thru hull and tighten by hand
  6. Clean up any excess 5200 which squeezes out
  7. Use pliers or a board inserted into the thru hull to prevent it from spinning as you tighten the nut with pliers. Don’t over do this, just tighten it enough so the thru hull is tight and doesn’t spin (but don’t try too hard). We’re looking for just tight enough….
  8. Clean up all the excess 5200 from the hull, the backing plate and the threads of the thru hull
  9. Let this setup and cure (24 hours for Fast Cure)
  10. Put plumbers tape on the thru hull threads and attached the seacock tightening by hand.
  11. Have someone keep the thru hull from spinning again and using pliers tighten the seacock so it is aligned properly as in your dry fit, but it may not line up exactly as you did during the dry fit. DON”T OVERTIGHTEN IT. (See Note below)
  12. Put plumbers tape on the hose fitting, thread it into end of the seacock, attach the hose and clamp in place.

Drink Beer !

We’ll be finishing off the interior soon with the DuraFlex paint we’ve been using everywhere, but it will have to warm up a bit for that to be completed.

NOTE: Really what happens is while you’re putting the seacock on the thru hull you’ll snap the damn thing off and have to run half-way across town and buy another thru hull (luckily only \$12). You’ll then redo the thing as outlined above.


DIY Seacock Installation

Posted on Fri 19 November 2010 in Classes and Workshops

I’m in the middle of replacing a gate valve on my boat with a proper seacock and thought I’d share this video from Forespar. It does an excellent job of showing step by step what you need to do.

NOTE: Link lost due to bit rot.


Windlass Project is ramping up

Posted on Fri 24 September 2010 in Fiberglass

Preparing to make a huge mess

DSC_8889

This week I got a quote on the work to create a proper chain locker. That estimate was higher than I thought it was going to be so I’ve started to do some of the prep and demolition work myself.

Pictured on the left you can see that I’ve bagged off the beautiful ash battens that Dawn installed and closed off the storage under the v-berth as well.

On the right (if this works), I started doing some demolition. I cut out the floor of the anchor locker and now it’s open to the lower area and will create what I’m calling a chain locker.

When this is all done, the deck will be cut open and a new solid deck without a door is what you see. It will be ship shape and water tight, just like we like it!


Big Weekend

Posted on Mon 21 June 2010 in Projects

I love to update the blog with checkboxes as we go. Feels good to celebrate the wins and document our progress. As you know we’re working toward stepping our masts on Thursday 24 June.

I got all the pins from Andersen Machine Shop in Port Townsend and they were beautiful. Had a slight mishap with them last week because I put in an incorrect dimension (too long) for some of the pins, but with PT all mail is basically overnight so we were able to send them back have them cut down and get them back in 2 days! I highly recommend Andersen Machine Shop. Olaf is a very nice guy and was very helpful. He made our pins on his CNC machine, they look awesome.  With pins in hand I was able to attach all of the rigging to the masts! I did all that in the pouring “Junary” rain we’re experiencing in Seattle this summer so no pics yet.

On the boat Dawn has been working on the ash battens to line the aft berth, v-berth and open lockers.

DSC_7633

First she’s lining all our lockers with Reflectix Insulation which looks like aluminum foil bubble wrap. We’re laying it in loose along the hull NOT gluing it down. We don’t ever want to have to scrape the hull for a month again. The insulation will keep a tad warmer here in Seattle and a tad cooler in the Tropics. It’s pretty cheap, you can get it at Home Depot and its easy to work with.

Here’s what the battens look like when they are installed. Dawn as always does gorgeous work when I stay out of the way. ;-)

DSC_7635

The only thing left to do before we step the masts on Thursday are to install the mast steps and make some leather grommets for the wiring exits on the main mast. After that I’ll remount the booms and winches along with a couple other things. Right after we tune the rig we should be able to sail again!


Things are coming along !!

Posted on Tue 25 May 2010 in Projects

DSC00338

Dawn has finished re-installing the chainplates. She used leftover butyl from the portlight installation to seal the chainplates as they go through the deck and then put the cover plates on with 4200 and screws. The picture is is before she’s pushed all the butyl in.

She’s also been working to fair up the mast partner (where the mast go through the deck into the salon before attaching to the keel) by laying on epoxy and sanding it down. This seals the core of the deck and provides a smooth surface for when we then seal the mastdeck opening with Spartite. Dawn has been kicking much butt!!

DSC_7576

I’ve been finishing up the electrical installations on the masts, attaching all of the other bits that go up there and attaching the rigging to the masts. Along with that I’ve also been doing some Amsteel splicing for fixed sections of the running rigging. This is a pretty simple bury splice that is secured by thru-stitching and then whipping it. Samson has great splicing instructions on their website, this was a Class II 12 Strand Eye Splice (PDF). I didn’t use a fiddle as they show, I used Brion Toss’ Splicing Wands which are absolutely awesome! You can buy them online or probably at your local chandlery.

DSC00371

At this point I’m a couple of properly sized pins and some thru bolts away from finishing up at the yard. Finding the right length of clevis pins is proving to be more of a pain than I had imagined. I don’t know why manufacturer’s don’t make each pin diameter in all the necessary lengths. Now I know my old pins were so horribly long.

I will will also be having <The Yard> make me a new bolt that thru-bolts the main lower shroud tangs. It’s a custom lathed part. This pic is of the original one after it was cut off. Here is one of each side when it was installed.

All of this is goodness and will let us put the rig back up. I am going to order the new halyards this week as well. Once the rig is up we’ll finish up the booms and mount the winches. The main goal though is to get all of the parts and tools out of 3 places and get them all on to the boat so I can work in one place and not run around so much. Progress happens, and when it does we love it !!


New Portlights

Posted on Mon 22 February 2010 in Destinations - Port Townsend

When we bought our Pearson 424, we knew right off the bat we had to replace the portlights and the teak eyebrow trim along the outsides of the cabin top. The existing portlights were old and leaked causing the interior teak veneer to delaminate, no structural issues. The plastic windows were also hazed over and they just looked poor. At the 2009 Seattle Boat Show we made the first decision towards the beginning of this big project in that we purchased our new portholes from New Found Metals, located in Port Townsend, WA. Its always nice to be able to support local businesses.

The new portlights are either slightly larger (in case of the 5”x12”) or much larger than the existing portlights so there is some work to enlarge the holes once the existing portlights are removed. Doing all of this prep work is actually really easy using the templates provided by New Found Metals. You clamp the template in place, trace your lines and cut out the new hole. You also use the template to drill all the holes for thru bolting the portlight to the outer trim.

One time consuming piece is handling the bolts. You have to custom cut the bolts that attach the portlight to it’s outer trim. Every hull is a different thickness so they can’t really stock every possible length. I used my handy vise, cut them with the Fein Multimaster, cleaned them up with the dremel and a sanding wheel and then used two bolts to ensure the threads were clean. Here’s a video of that process.

As we’re replacing the portlights, we’re also putting up new wood along the interior teak along the insides of the cabin top. We will match the new headliner to this when we replace that as well. Painting it all white will brighten the boat considerably and visually make the cabin feel a bit taller. We’re using 1/4” plywood, primed on the finished side at the workshop prior to installation. We epoxy the new wood to over the top of the existing wood. That is a pretty involved process of making a paper template, cutting out the new pieces, dry fitting them (which involves a lot of tweaking) then making the cut outs for the portlights and then finally epoxying the new wood in place.

Here are a bunch of photos which roughly chronicle the process. Click thru for larger pics or to see more. They look awesome, the glass is so clean and clear I keep thinking they’re open!

DSC_7485

DSC_7494

image

DSC_7495

image

DSC_7511


New Year, Same boat projects

Posted on Sat 02 January 2010 in Projects

Ticked a few things off the to do list the past few days.

New Years Eve day, Dawn worked on the masts and booms filling all the holes we don't need anymore with Belzona 1111. Thanks to at for helping us get started. Dawn is really good at these kinds of projects that require being neat and detailed oriented. I'm better at breaking things an making a mess.

The bilge hoses have all been replaced. This took a little longer than planned because I used stiffer hose which added some unforeseen complexity. It also became delayed due to an apparent shortage of 316 SS hose clamps in the size I needed. Fisheries Supply in Seattle is horrible at managing their stock, but their prices are better than West Marine. Included in this a Perko bronze strainer for the manual bilg pump and an inline check-valv on the stern end of the secondaylarge bilge pump. I am considering walling off the aft-most section of the bilge to minimize the area which stays wet. We would place the primary pump in that section but if we had more water than that then it flow over the wall and we would kick on the secondary pump. We also need to put a float switch on the primary bilge pump, currently it is only enabled by the breaker switch.

The Walter Machine RV-20 V-Drive has a raw water cooling chamber on the top of it which is prone to corrosion. Eventually it can corrode through allowing sea water to mix with the oil in the bottom half of the v-drive where all the gears are. This would be bad. Several owners have cleaned up the corrosion and used Marine-Tex to protect the area before hooking everything back up. Some owners (including my surveyor who also owns a Pearson 424) have removed the raw water cooling altogether. The corrosion in my unit is so bad that it damaged one of the bolt holes used to attach the top plate to the v-drive so I am going the route of leaving the unit dry. So now instead the raw cooling water going from the strainer to the v-drive and then to the egine it now goes directly from the strainer to the engine. I will install a temperature gauge on the v-drive to monitor it for overheating and I left the hoses in place so I could hook it up back if it ever did overheat. Eventually we will probably replace the v-drive, but that is not something we wanted to do right now.

I have not finished this yet, but the anchor washdown pump was not protected by a strainer. I purchased all the hoses, clamps and the Sherwood strainer. This will get installed completed tomorrow. I would have finished it today, but I forgot to buy the mounting bracket.

I also capped off the vent thru-hull that used to be part of the holding bag system. I will also being putting a plug on the inside portion of the deck fiting for pumping out. I thought about removing and glassing these closed, but I don't this it's neccesary, capping them of is adequate redundance. I also put a plug in the thru-hull I eventually plan to use for the water maker. It has a ball valve, but I like the added security of the plug as well. This is something we'll do just before we plan to leave.

All in all it was nice to tick a few thing off the list, but we still have a ways to go!


Next set of things in the refit

Posted on Thu 19 November 2009 in Projects

The boat has been moved form sitting in the yard where the bottom was prepped and painted, some keel damaged was repaired (oopsy), the v-berth was prepped by me, and the windlass was removed. The boat is now sitting inside the prep tent. I’ve not been to it yet, but I’ll go tomorrow and take a bunch of pictures.

from gave me a call about some blisters he saw along the waterline. We’re not sure if it’s just a paint issue or if there is some gelcoat damage. We’ll know more when they start to prep for painting. This is one of those “known unknowns” which could be nothing or could be expensive. We’ll find out soon enough.

The yard is prepping the boat for repainting the stripes, and I aguess polishing the hull as well as a bunch of fiberglass projects including closing up some thru-hulls, reinforcing the v-berth and moving the windlass. I also have a lot of chores to do:

  • Grind off a thru-hull so it can be pushed in and then glassed closed.
  • Remove the teak trim from the deck where the windlass was removed.
  • Cleanup the water jacket in the VDrive and sand off the corrosion on the input shaft.
  • I have a lot of measuring to do to determine the wire lengths needed for the new electronics and mast lights. I’ll start with just the lengths needed for the masts plus some extra so I can put in terminal blocks or connectors which will allow the masts to be pulled without cutting any wires.
  • I also want to work on replacing the hoses below the waterline. I’ll pull the hoses, measure them and pickup new hose from Fisheries or West Marine.
  • Dawn is probably going to star on the portholes or at least getting all of the pieces in place to make it happen.

Very busy weekend!!