Mastodon

We're looking for the trash fence...

Marshall Island Navigation Techniques

Posted on Wed 22 July 2009 in Geek

Great talk from Ignite Seattle by Ken Beegle has some great overview of Polynesian navigation techniques. The talk is really has a deeper meaning, but he does a good job in his allotted 5 minutes covering the stick charts.

Ignite talks are timed 5 minute min-lectures, the slides are pre-programmed to flip automatically and the presenters have to have it down-pat. My friend Brady from O’reilly publishing hosts these in Seattle and they occur around the world.


Dive! Dive! Dive!

Posted on Tue 21 July 2009 in Electrolysis

OK, we’re not in a submarine about to be imploded by a depth charge, we just need to have new zincs put on our prop shaft. Phil checked and verified we had no zincs remaining and then cleaned the shaft while snorkeling over the 4th of July weekend. He has also offered to put the zincs on, but he’s out of town and I was getting a bit freaked by the whole thing so I called Marina Dive Services of Puget Sound (AKA Morgan) based solely on his sign on the bulletin board at the Marina.

He should up promptly, suited up, dove in, scrubbed the shaft and put on the zincs. He also scrubbed the waterline to remove the chin beard Deep Playa had been growing on her bow. I would definitely recommend him, let me know if you want his number or email.

Here’s a video of Morgan cleaning the shaft and prop that I made with my Flip camcorder and waterproof case. I was just laying on the dock with my hand in the water. It was a sunny day, low tide and there was a minimum of crap floating in the water.

Still shots will come later when I process them.


We're Goin' Fishin'

Posted on Fri 17 July 2009 in Fishing

I've done a little fly fishing on the Wylie's stocked pond when I'd visit my grandparents in Charlotte, NC when I was like 10 and you'd think I'd be a fishing expert since there's a fly fishing named after me and all, but sadly that is not the case. But Dawn and I are anything if not undaunted learners up to any challenge. So we marched down to Fred Meyer and bought ourselves some WA State fishing licenses. I feel like I’m one beer drinking weekend away from asking my oldest brother (and bow hunter) to take me hunting, but luckily he’s in Charlotte and that make impulse hunting very unlikely to happen, whew.

Of course the real reason we bought fishing licenses was so we could buy more books and more toys! Did I mention we don’t know anything?

So first of the licensing is a bit of a daunting process there’s a lot of questions about what kind of fishing you want to do, do you want to crab, collect seaweed, use live humans as bait, on and on so we just bought the combo package which allows us to fish or trap anything that is legal to catch in both the salt and fresh water environs of Washington State. I’m not sure if we’re going to harvesting much seaweed, but you never know and at least this way we have the option. BTW, when seaweed gets all over my anchor rode does that count?

Next step is to fill the void between my ears about crabbing, shrimping, clamming and trolling in Puget Sound without being sucked into watching fishing competitions on TV. I say trolling because I assume what we’re going to want to do is drop the line over the side, sail along and hope we catch something.

How to Catch Crabs

How to Catch Shellfish

How to Catch Crabs: A Pacific Coast Guide image How to Catch Shellfish: Along the Pacific Coastimage

The first two books by Charlie White are good light reads They explain the gear, what the different critters look and taste and like and how to catch ‘em. I especially like that he’s done some comparative analysis of different recreational traps and professional traps as well. The books are a little dated with cheesy cartoons from the mid 90’s, but the info you  need is in there. I read both of these in about an hour or so.

Saltwater Fishing Made Easy

Saltwater Fishing Made Easyimage

Saltwater Fishing Made Easy by Martin Pollizotto is much thicker and more in depth mostly because the options are more limitless and confusing when it comes to fishing gear. I’ve not finished the book yet, but the author is attempting to lean towards what is common, reliable and practical verses what is exotic or high-end and possibly unnecessary for the average fisher’s needs. That’s is always helpful because I either tend to be a buyer of the least or most expensive thing depending on my buzz thrill from it and this helps me reign that in a bit.

I’ll share more when I decide what kind of gear we’re going to get. In the mean time if you have any recommendations on fishing shops or gear feel free to post a comment.


More Composting Toilet Pictures

Posted on Thu 09 July 2009 in Systems - Composting Toilet

There are a lot more photos of the composting toilet project in Flickr tagged as Systems: Composting Toilet.


Outboard

Posted on Wed 08 July 2009 in Systems - Dinghy

We bought an Aquapro Sportsmaster 860 used off of craigslist last summer and we wanted to add an outboard. I thought buying an outboard would be a pretty straight forward thing to do, we had some specific criteria:

  1. 4-Stroke – I don’t want to have to carry 2-stroke oil, deal with mixing it in with gas and 4-strokes burn cleaner and run quieter. Ideally we’d have gone with an electric outboard but they run \$3k and I just couldn’t justify the money on such a new technology.
  2. 8HP – Our dinghy is rated to 8hp and I wanted the biggest engine she could handle. This will essentially be our car, no actually more like a pickup when we’re out cruising so I wanted to be sure it could move when we wanted it to and that it could carry a load when we’re ferrying supplies and parts.

I looked at the SSCA’s Equipment survey and 2-stokes were more common than 4-strokes, but 4-strokes are really starting to take off over the past few years especially given the environmental and noise considerations. Looking at the brands all the biggies were there in sufficient quantities and were well rated. I also read the Practical Sailor reviews of Outboards and while I don’t think there were any clear winners and losers they Yamaha rated well and had nice touches so I decided to go with a Yamaha F8 Short Shaft (I think it has since been replaced by the 9.9).

I spoke with two dealers at the Seattle Boat Show and one was kind of slimy saying “For you, we’ll throw in a gas tank.” where Jacobsen's’ Marine said, “There’s a Yamaha special right now where they throw in \$200 of free accessories and you can pick what you want”. Jacobsen’s was \$10 more, but I just felt they were more forthright in their sale and they’re office is located here in Seattle.

We’ve use the outboard a few times now and from a weight perspective I think we could have gone with a 6hp. However, I have been able to get the dinghy up on a plane with both Dawn and I in it, so maybe 8hp was the way to go. Initially when you run the motor you push a pretty big wall of water for a while. When towing with the motor on, I think it slows Down Deep Playa by a knot or maybe even two knots. I don’t plan on towing the dinghy like that but hey occasionally we all get lazy. Weight aside and me being a complete and utter neophyte to outboards aside; she runs greats and starts with one or two pulls so you can’t complain about that. The “guys on the dock” say I will probably want to add a fin to the motor (like a wing) which will allow it to get out of the hole and up on a plane faster. I’m still looking into that.

I’m also building and installing a teak outboard mount and then we can mount the motor on the stern rail for short trips. The current outboard mount is made out of fiberglass and starboard and I don’t trust it so I have to leave the mizzen halyard on when I was mounting the outboard. The new mount will be VERY sturdy and then we can use the mizzen halyard or a block on the mizzen boom to raise and lower the outboard.


Installing the Composting Head

Posted on Wed 08 July 2009 in Interior

DSC_0009

When we bought the boat it had a normal pumping toilet which went to a Y valve for pumping into a a smallish holding bag or through a macerator pump and out to sea. This was an OK setup for blue water sailing and Coastal Sailing in Canada where pump outs are few and far between and holding tanks are not required. We didn’t like this setup for our Puget Sound home waters nor did we like it for when we’re out cruising. Instead we’ve decided to go with a Nature’s Head Composting Toilet. I’ve blogged about that a few time before, but this post will describe the process from beginning to end.
DSC_0013\

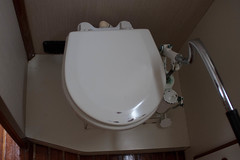
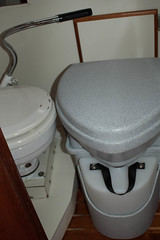
Here is a side by comparison of the two seats to verify the height of the new toilet will be about the same as the old. Notice that the old toilet is sitting on a little platform. Also that the handle is bent (oops).
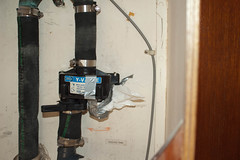
DSC_0213

The first step was to rip out the old toilet, plumbing, holding bag, macerator pump, and close up the through hull. The raw water in came off the drain for the sink in the head so that was fine, but the macerator pump through hull was dedicated and we closed and put a cap on that through hull with only a minor scare as the through hull didn’t really close all the way anymore.

This picture is of the valve which allowed you to pump the holding bag out through the macerator pump. All of these hoses smelled horrible and would have needed to be completely replaced. These hoses are also in a hanging locker which today I’m happy to reports smells like a new house. ;-)
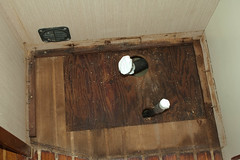
DSC_0226

Next we ripped out the old toilet. In this pic you see we have removed the toilet and the little platform on which it sat. The floor here was damp, but not water logged. I ran a heater in here for a few days and it dried out nicely. You can see the plywood subflooring and the teak and holy sole here. We had to bring this all up to level so we put in a 1/2” sheet of plywood (it may have been 3/4” I forget) which was glued in place with Gorilla Glue and screwed down to the sub-flooring. This gave us a level, hmmm ok let’s call it a flatter surface to work with when we went to lay in our tile.
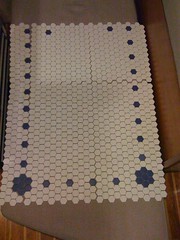
2008-11-18 22:36:21 -0800

Dawn is the detailed oriented one in our house and but that I mean she does all the detailed design work and finish work when we work on projects together which is usually always. I also operate any heavy machine and anything that beeps when you back it. In this case Dawn came up with the pattern of the tile design, I laid it out and rough tiled it in. Dawn then came in and caulked it, did the final grouting and sealed it.
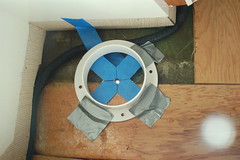
DSC_3073

Next I had to cut the hole and install the vent hose for venting the composting chamber. This was a bit nerve wracking for me because cutting a hole in your boat sounds like a pretty dumb idea to me, but here we go.

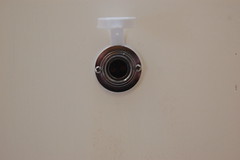
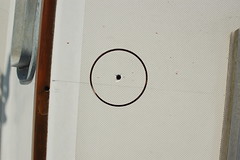
This first shot is how I lined up the hole from inside the head. I had a pretty open area on deck, but the placement from below was more crucial because of the wiring that needs to snake around the vent. The vent is a standard Vetus 3” Mushroom vent. I used one of the finishing trims from the vent and some tape to line it all up. I then drilled a hole in the very center of where I wanted to cut the larger 3” hole. You can see how I lined it all up and the initial center-hole drilled through the cabin top. Notice that half the hole goes through the deck and half also has a some additional wood for holding up the headliner. We’ll need to have the whole are flush for mounting the vent.
DSC_3075

This is a shot from the top side where I have already started drilling through with the 3” hole saw bit. If you’re not familiar with these bits, they have a drill bit in the center and a circular ring of teeth to the size of the hole you want to cut.
DSC_3077

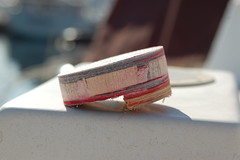
This is the plug that was cut out when afterwards. Notice my balsa core is very clean and DRY. That’s a very good thing!

I also think it looks kind of cool and it showed me how my boat was put together.

DSC_3247

I mentioned before that we’d need to have the are flush for mounting the vent, so I epoxied up some 1/4” plywood and here you can see that being held in with clamps while it dries. I was doing this in the winter so I put a plastic container over the outside and taped plastic down over that so no water would get on my epoxy work.

At the same time this was being attached, I also put epoxy along the inside edge of the hole I cut. This seals the balsa core from water getting into it.
DSC_3275

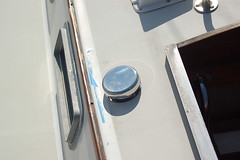
Here’s a shot of the finished vent installation. Shiny. shiny.

The white trim piece you saw a few pics back slides into the hole from underneath and into the bottom of the mushroom vent. The mushroom vent sits flush on the deck. I put some 5200 along the bottom of it and set it into place. The both sides screw into the cabin top separately. There is no clamping load on the deck at this point.
DSC_3178

DSC_3177

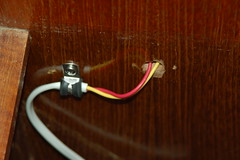
Next I needed to run a wire to the bulkhead behind the toilet to power the computer fan that draws air through the composting chamber. I wired this into its own switch on my breaker panel and put in a two prong DC plug on the wall behind the toilet. I could have hard wired this, but I think the plug is a nice finishing touch and if I wanted I could use that plug for something else.

The first shot shows the wire behind the plug, its in a small locker and then the plug itself. I used Ancor marine grade tinned wire and a Sea-Dog polarized 12volt outlet (PN SDL 426142-1). It was important that the fan be wired correctly, because it wouldn’t just run the wrong direction it would burn out the fan. That’s why I went with the polarized plug.

The toilet mounts to the floor with two brackets and then screws into the brackets with handles so i can be removed for emptying. I through bolted the brackets all what through about 2” of sub-flooring with bit washers. That toilet isn’t going anywhere.

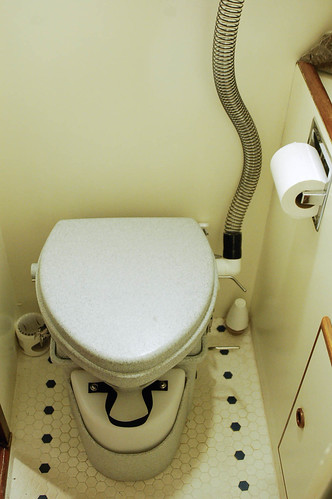
Here are two shots of the almost finished (left) and finished project (right) with the vent hose and new toilet paper holder which Dawn installed. I include both pics because I got the exposure off on the 2nd shot and the tile doesn’t look at nice.
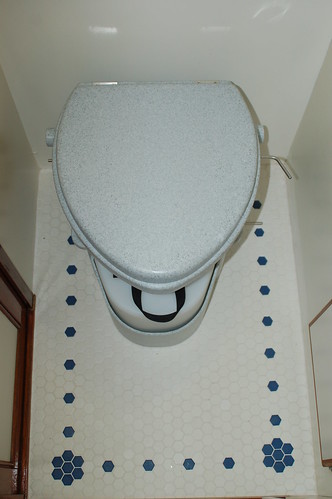
DSC_2235 _DSC3905

The project was pretty easy even for a newbie like myself. We’ve been using it for several months and have emptied the compost chamber once. It smelled like dirt to me, a complete non-issue. Just like we intended. Having extra urine chambers is a definite must-have as when there are 4 people on board and you’re partying (like on the 4th of July) you’re going to emptying them frequently.

I have a lot more pictures related to this project on the Flickr tagged as Systems: Composting Toilet.

Here are our operating instructions:

  1. Lift Seat
  2. Sit Down (yes, even if you’re a guy and you’re just going pee)
  3. If you just have to do number one, go for it. It’s ideal if you can keep your aim towards the front of bowl so most of your business goes into the urine container.
  4. If you have to go #2, with your left hand flip the little lever which opens the trap door to the composting chamber. This is not a chamber into which you yourself would want to enter.
  5. Poop ! The trap door seems to be lined up perfectly for me, but remember “In the hole is better than on the bowl!” © (tm)
  6. Now your done your #1 and your #2
  7. Wipe – fold the paper over and set it aside. You are going to throw it away in the trash, not in the bowl.
  8. Put in one scoop of coir which is stored in the sliding cabinet.
  9. Close the trap door
  10. Squirt the bowl with the spray bottle just to wash down any urine in the bowl. 3 or 4 squirts is usually good.
  11. Turn the crank on the bottom right side (as you face the toilet). Turn it gently 3 or 4 times. If you go crazy with your turns you flip stuff up against the bottom of the top half of the toilet and it makes a mess when I go to empty it.

Zip Car coming to Shilshole ?

Posted on Wed 08 July 2009 in Destinations - Shilshole Bay Marina

I don’t know but I’m trying to make it happen!

If you’re not familiar with Zip Car they’re a car rental service focused on people who have fewer or no cars but occasionally need a car. I think the Shilshole Bay Marina is a great candidate for such a service. 99% of the time I ride my scooter and Dawn has the car. But frequently we have to do this logistical dances so I can take the car to run errands for Deep Playa. It would be a lot better if I had easy access to a pickup or small SUV to run errands and carry around large items that won’t fit in my scooter. Zip Car is that solution to me.

Anyway, I’ve got the form from Zip Car and I’m working to get a hold of Sharon in the office to help me fill it out. I’ll let you know how its going.


Physics of Sailing Video

Posted on Wed 24 June 2009 in Geek

Just watched a pretty decent physics of sailing video which would be great for kids or novice sailorsvisitors to watch. It was produced by KQED and you can watch the video on their site.


Looking at RADAR Navigation vendors

Posted on Thu 18 June 2009 in Geek

I’m beginning my search for how I want to approach my radar and navigation system. I mention them together because RADAR is proprietary and it only works with THAT vendors chart plotters and computer navigation software. The only exceptions to that would be companied like Si-TexKoden who make RADAR for other companies like Rosepoint Navigation Systems. There are a couple other cross breeders like that in the mix but for now I’m just going to look at these as single vendor solution. I’ve been having a lot of trouble keeping the software packages and vendors and who has “HD” or “Broadband” claims. I call them claims because there is no standard usage of those terms across vendors.

The main decision I need to make is to go all PC based or to have a PC Chartplotter mix. I was 100% for Chartplotters, but the more I think about it, they are WAY expensive compared even to a hardened tablet or laptop. \$6000 for a 17” screen is pretty high for a dedicated device, you can also push video to displays on the high end as well, but for the most part that’s it. So now I’m leaning more towards not having chartplotter and going with a hardened laptop or tablet (on a swing arm ?) in addition to regular laptops we’d keep inside the the boat.

For the most part, I think all the other potential instruments will play nicely on the NEMA 2000 network, the only exception to that is I’m considering upgrade from a purely depth sonar to fish finder or something equivalently more high-res and meaningful than just a simple depth ping.

There is a lot to think about there but for now here’s a screenshot of my comparison thus far and I’ll keep the complete Marine Navigation Comparison online. I’ll update this over time and probably add some twists to it as I start to look at NEMA 2K displays, cabling and other components as well.


Researching Dinghy and Vessel Registration Requirements

Posted on Tue 09 June 2009 in Vessel Documentation

I keep getting a lot of “fog” from people who claim to know all that all dinghies are required to have state registration. This usually amounts to people saying “oh yeah well so and so just got a ticket the other day in their dinghy!”

I’m going to outline what I know and I’m going to outline some steps to get greater clarification on the issue. Here’s what I know and how I know it:

I bought a used 8.5” RIB which is USCG certified up to an 8hp outboard. I contacted the WA Department of licensing in June of 2008 explaining that and asking if I had to have state registration. They said no and this is their reply:

From: DOL INT Titles [mailto:TITLES@DOL.WA.GOV]\ Sent: Monday, May 19, 2008 18:28\ To: Patrick Walters\ Subject: RE: TenderDinghy Vessel registration

Hello Patrick,

As long as the outboard is less than 10 horse power, you do not need to register the tender if it is used exclusively to furnish transportation from a larger vessel to shore and return.

WAC 308-03-010 (18) Definitions

RCW 88.02.030 (6) Exceptions from vessel registration

Thank you,

Vehicle Services

I can’t actually find the link to that WAC code, but RCW 88.02.030 (6) reads as follows:

(6) Vessels equipped with propulsion machinery of less than ten horsepower that:\ (a) Are owned by the owner of a vessel for which a valid vessel number has been issued;\ (b) Display the number of that numbered vessel followed by the suffix "1" in the manner prescribed by the department; and\ (c) Are used as a tender for direct transportation between that vessel and the shore and for no other purpose;

Based on that I see no need to register my dinghy. My vessel; is USCG documented. That means, I do have to pay for WA registration and I have to display a current registration tag, but not the state registration numbers. I am also required buy the USCG to indicate that my dinghy is a tender to my vessel (tt Deep Playa) . I would assume I do not have show any additional stickers on my dinghy, but maybe I am required to display the state sticker or the registration with a “-1” on my dinghy.

There also seems to be some wiggle room with the “and for no other purpose”. Someone commented “if you have a fishing pole on that dinghy they’ll write you a ticket". I am sure some people who enforce these laws find them as confusing as I do.

So that leaves two more things to look into, here’s how I’m going to go about that. I am going to write the same letter  (email more likely) and send it to the following agencies who I feel should have the answer about the law:

  • Washington State Attorney General Rob McKenna
  • Senator Ed Murray
  • Representative Jamie Pedersen
  • Representative Frank Chop

I thought about contacting the Police and Coast Guard, but I see them more as enforcement and not the “source” of what the law should be.

This should be a fun exercise, I’m expecting that its going to take a lot longer than I do right now (a month) to get an answer. I also think I’ll probably get differing answers, so my expectations are low, but I’m still thinking this will be somewhat fun. I’ll let you know about it as I go along.


Corrected WAC form Allan : The WAC they gave you is wrong.  The 03 should be 93, and the WAC should be WAC 308-93-010 (31), not WAC 308-03-010 (18) —  #18 is for lifeboat, while #31 is for tenders.