Mastodon

We're looking for the trash fence...

Page Updates

Posted on Tue 11 November 2008 in Pearson 424

There are a lot of additions and a  major reorganization to the Pearson Upgrades page. I spent a few hours on this last night. This is one of the pages I keep going back to when I want to figure out how to attack a project on Deep Playa. Its great to have an active group of owners.

I also added some linked to the Pearson Information page for the groups I created on the social networking sites to which I belong:


Web Site Changes

Posted on Fri 07 November 2008 in Geek

I owe you a write up on the plumbing work and wifi systems I’ve been working on at the boat. That will come, but this morning I made a couple of minor changes to the website. I moved the Flickr photos badge up to the top on the right hand side, and added a Twitter badge to the left hand side.

The twitter account is nice because I frequent take pics with the iPhone and send out little updates when I’m down working on the boat. Which currently is pretty much the only camera I have because my Nikon D50 is on the fritz and the battery in my point and shoot optio is also dead. Cameras and I always have had bad luck. Anyway, check the updates by coming to www.DeepPlaya.com.


Brion Toss Rigging Class Photos

Posted on Mon 20 October 2008 in Classes and Workshops

image

My real camera is busted and the backup point and shoot had a dead battery so I took very few photos with my phone. You can check them out with descriptions on Flickr.


Brion Toss Rigging Workshop

Posted on Sat 18 October 2008 in Classes and Workshops

image I am in Port Townsend this weekend attending the Brion Toss Rigging Workshop. At the end of day one, its been very worthwhile thus far. The basic flow of the class thus far has been to walk through the systems of a rig, explain what they are, how to think about them in terms of the entire rig, how to inspect them, etc. Obviously the point isn’t to make you an expert in 2 days, but I’m feeling like at the end of this I’ll be a much better informed consumer when we do our re-rig and I think there are aspects of it I could do myself in consultation with someone who is a rigger by profession.

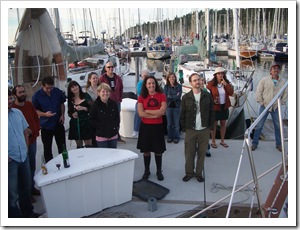
In addition to the classroom there has some hands-on and dock-walking. Its one thing to talk about chain plates, clevis pins, wire and fair leads and then to go look at an actual boat. The hands on activities, drilling a hole in a spar (I never got my entry and exit holes to line-up), knot tying for going up the mast, and splicing an eye into three-strand braid were great. The splicing part was particularly awesome because it took something that I thought was witchcraft and proved to me that I could definitely learn do it and it.

As a rock climber I found some of the knots and practices used in going aloft to be a little riskier than what I am used to and the terminology to be confusing but that’s fine and I’ll probably adapt some of my climbing into my own practices. For instance they will hoist a ratcheting block to allow the person going aloft to raise themselves (using a another halyard as a backup) and using a carabiner hitch to tie-off when at the top. I think I’d rather have a something like a Gris-gris instead, but Brion did mention that could also be an option when were out on the dock so its not like the two are odds with each other. Also people climbed using two carabiners as a belay device for a long time before any specialized devices were made so really for me I think its just a comfort thing for me to use what I’m used to (i.e., they are right too).

We ended the day talking about wire sizes and how to calculate what you need on your boat for shrouds, stays as well as how to calculate chainplate dimensions. That was really interesting and the formulas are pretty simple. I’ll try to work up all the numbers for a Pearson 424 tonight as I’m reviewing my notes.

Its been a great first day and I’m looking forward to tomorrow. I’m off to roam Port Townsend for awhile before dinner.

[gpress map_position="48.11749711017371, -122.75229328459473" marker_title="My Map" map_type="SATELLITE" map_zoom="13"]


Boat Renaming Complete

Posted on Wed 01 October 2008 in sv Deep Playa

IMGP4034 I want to thank everyone who came down to the boat Saturday and helped Dawn and I with the renaming ceremony (pics on Flickr). Dawn and I have been a long time coming to this point in our lives where we could actually have the boat and call her by a name we loved. Its been about 2.5 years since we first sold the house to make all this possible and to share it will all of you was important to us.

There will be many more times when we can raise a glass to give thanks aboard Deep Playa and Dawn and Dawn and I look forward to sharing those times with you.


Before and After

Posted on Fri 12 September 2008 in Interior

Ok, more of a During and After, but still... its WAY better now.

DSC_0061 DSC_0063

DSC_0075 DSC_0085


Stern Tattoo Complete

Posted on Wed 10 September 2008 in Projects

Deep Playa has her stern tattoo completed.

photo

Nancy the sign painter did an awesome job! She's in the back of 48 North, tell her we sent you.


Replacing the tabbing

Posted on Thu 28 August 2008 in Projects

One of the things we knew we had to do going into this was to repair some of the tabbing holding up the shelves in the v-berth and one of the settees in the salon. I was a little nervous having never done this myself, but the reality is that the process is really simple. The executive summary of this process is as follows:

  1. Put on a respirator.
  2. Grind away the loose fiberglass and remove any paint in the area you need to attach new glass.
  3. Clean the are well and and then wipe it down with acetone.
  4. Mix up your 2-part epoxy. I bought mine at Fiberlay here in Seattle.
  5. Cut and Dry fit (no epoxy) the piece of fiberglass. You are just getting everything ready.
  6. Brush epoxy onto the hull about 1/2 to 1 inch wider than the glass.
  7. Lay the fiberglass down onto your wet area.
  8. Brush more epoxy onto the fiberglass until it is well saturated the kind I used turned translucent when it was well covered.
  9. Use a laminate roller to remove any area bubbles. Brush on more epoxy where you missed spots.
  10. WAIT for it to harden.

When you reach step 10 you'll have left over epoxy. When this leftover amount starts to finalize its reaction its going to put off a LOT of heat. If its in a plastic container it may melt it. I put on my respirator and stirred it until it was hard and stopped gassing (looks like smoke). This seemed to allow it to cool down faster.

You might need to build up layers depending on the work your doing. Read a more detailed book for specifics on all of that, but its really easy and you can totally handle this job! the book I have is Sailboat Hull and Deck Repairimage by Don Casey.